Thursday, April 25, 2013

Chapter 64 - The Tokonoma of the Right Hand Room Second Floor, A Bird Cage

April 17th - 25th 2013

With the room prepared, it was time to install the tokonoma or the raised dais section of the room.  I had been given some small pieces of olive tree wood and wanted to use this as the column support for the tokonoma.  Usually you can use a small branch or just plain wood as I did in the first two rooms but I wanted this column to reflect a little where this house is being built.  I know that it is quite improbable that Japan would use olive wood for a column as I suspect it’s not quite hard enough to support walls and would be more decorative but I liked the idea none the less.

The piece of wood was rustic with some bark still attached.  I was keen on keeping that section of bark intact somewhat but the shaping needed cutting and sanding to adapt to the rest of the installation.  I used a small saw and my electric sander to get the piece down to a certain point.  Then I just had to figure out the best position to show off the wood and the bark.  To do that, I had to move ahead with making the wall pieces that are attached to the column.  I covered them with some leftover tatami mat and then tested them against the column.  Once I decided on the side I wanted to be viewed, I notched the column where the wall pieces would fit.  This took a while but eventually I got them to fit in.
Original kit column piece and the piece of olive wood.

Cutting and shaping the wood.

Nearly finished.  Just have to fit to size.

Two ceiling pieces that get inserted into the olive column

Olive column now notched for the ceiling pieces.

How the pieces in theory will fit.

In the meantime, I had to prepare the raised dais which needed painting (black) varnishing and sanding much like before.  Once I got through various layers of varnish and sanding, I then waxed this piece as well.  I also did the same to the olive wood column until it had a nice shine.

Now in a perfect world, everything should fit but it doesn’t really.  It took some coaxing and sawing off of the wall pieces to have this section fit into the room.  The olive column is larger than the actual kit piece so it causes the wall pieces to be too long or too high.  I eventually got them in place although some bits of tatami came away in the process.  I replaced some but since I liked the idea of a rustic unkempt inn (something I’ve been leaning towards since the beginning of this build) I just left some bits exposed.   Needless to say, only 6 days later was I able to start playing with more embellishments in the room. 
Small tokonoma dais installed as well as the dividing wall.

Overnite clamping and coaxing the pieces in
I needed to cover some wooden cabinet doors with the paper I had used for the fusuma in the previous chapter.  Only I was using the reverse side so I got through gluing on the paper and leaving it to dry.  I had to paint all the cabinet pieces black to stay in the theme of the black/red in the room.  Also, I had received as a “free gift” from DHE (after making some purchases) a bird cage and a bird.  The cage was pretty awful wicker thing with a plastic bird in it - quite horrible - but the other bird was actually made of feathers of some sort and a pretty blue.  So, I had decided that my red room would have a bird in a gilded cage too.  I opened the cage to remove the cheesy bird and painted the whole thing black.  I then fashioned the pretty bird’s perch and repainted the whole cage a dirty gold bronze like color.  I also managed to find some Japanese newspaper print and placed that in the bottom of the cage.  I also made a bit of “bird poo” in there too.  The bird does not seem very pleased but what bird is actually happy about being caged?  I then added a toothpick and a bit of chain that was left over from an earlier installation and the cage is ready to be hung in the room.
Blue bird on the left, wicker cage painted black.

Adding some newspaper in the bottom of the cage

Painting the cage bronze

Unhappy bird in the cage.
I took the opportunity of drilling a small hole in the lower left side of the floor for the LED that will go there.  I am going to make another small lamp that will fit in the corner.  I imagine there would be no room on the other side what with the cabinets and all.  Putting together the cabinets as usual was a chore.  The pieces are so small and never really fit quite right.  The upper cabinet was impossible and I ended up glueing the doors in place so that I could fit them in after tedious sanding.  They therefore do not slide.  The bottom cabinet is a bit larger so technically the doors would slide - but I wouldn’t dare try for fear the whole thing would not be able to withstand the stress.  Such small doors require lots of precise sanding to make them actually functional and honestly I do not have the expertise.  I like them the way they are tho. 
Painting all the tiny cabinet pieces.

Sorting them out with the covered cabinet doors. Tedious.
After touch ups and varnishing, they were glued into place.  The upper cabinet seems a bit off but it’s actually the overhead ceiling piece which is crooked.  No matter.  I love the little doors with the motif from the Japanese paper.  And the cage will look nice once I’ve got my other objects on the tokonoma.
Long chapter but pretty satisfying.
Finished tokonoma. LED peeking thru on the left.

View of the olive grain in the wood.

Tuesday, April 16, 2013

Chapter 63 - The Walls, The Fusuma and Small Table to the Right Hand Second Floor Room

April 12 - 16th 2013

I was keen to get started on this phase of the room build because I was going to try a method to make the floor of the tokonoma as lacquered and shiny as possible.  I had read that what was needed was to paint, then gloss varnish, sand, varnish, sand, varnish etc.  So that is exactly what I did.  I don’t remember how many layers I did in the end (maybe 5) so in between waiting for the varnish to dry, I built the little table.  It was easy enough.  Just had to paint and then varnish that as well.  Once the varnishing stages were completed, I moved on to waxing.  I read in the same blog about using regular furniture wax so I bought a tin of neutral color and used that.  Just spread it on with a cloth and waited around an hour, afterwards buffed it up and wiped off the excess.  I must say the floor is quite shiny and soft as butter.  This confirms the method I will use when I get to the last room which has a wooden floor instead of tatamis.  Very excited.

Varnishing and sanding the tokonoma floor.

You can see the difference just in the repeated varnishing and sanding. The little table top is on the left.

Adding the wax.
Backside of the little table.  Working out the position to glue the legs (in the background)
The fusuma were the usual although the instructions were a little off.  Thank goodness I had already done a few so I new how to adjust and make the pieces fit.  Lots of fitting and sanding here.  I used the kit’s fusuma decoration for the outside of the doors but I used Japanese themed paper I had found in a shop in Florence.  I admit I was a bit distracted applying the paper and even warped out the doors doing so (had to pull off the outside paper and redo it - the kit came with more than one paper panel so nothing lost) but I had a good excuse.  I was working on the doors whilst listening to the goings on right after the Boston Marathon bombings.  It had just happened so I was clicking like crazy trying to find news and figure out which of my marathon running relatives and friends were there.  Seems as of this writing friends and family are fine but I wasn’t really concentrated on the fusuma so I ended up leaving it for the day after.  They’re not as clean or well installed as the others but that’s ok, I’ll remember why.
Front paper decor attached, just measure and cutting the back.  The paper is a double face so I can use the other side to decorate other parts of the house. 

The paper now glued in place. 

Once of the two doors was very warped so I had to invent some way of glueing the frame in place overnite.
The last bit was the retaining piece in the front which holds the tatami in place.  I organized the tatami so that the color differences were a little less evident then just had to wait till the retaining piece was good and dry before “forcing” the tatami in place.  They look fab! And so does the little table.
Waiting for the front retaining piece and fusuma framework to fix in place.

Outside of the room (a little damaged on the right - will repaint a bit)

The fusuma and tokonoma floor.

Finished fusuma and little table.


Thursday, April 11, 2013

Chapter 62 - The Floor, Back Wall and Left Wall of the Second Floor Right Hand Room

Painting the walls and waiting for it to dry...

April 10 - 11th 2013

Working on the room, biggest time consuming job was just the painting.  The back wall needed the external buttermilk color while the inside walls needed white.  I decided to make the back internal wall red since it gets pretty much hidden under the tokonoma and since I would have the contrasting black pavement plus some furnishings which would look quite exotic in there.  Once the painting was done, I had to get to work on the installation of the sliding door posts and attaching everything to the underside of the floor.  The actual room floor would be covered in the tatami mats previously made so I didn’t have to paint anything there.


The underside of the floor.

Adding the wooden trim to the back wall - even if it will be removed later.


Fitting each wall was pretty easy but before I did that, I decided to fit the sliding door (fusuma) supports and door jams.  They are always difficult to fit and require some coaxing and hammering so I put them in before actually attaching the wall to the floor supports.  It worked out well.  The back external wall had the usual trim but since I will eventually screw some back metal supports between the first and second floor to give the whole house some stability should it need to be moved, I just slightly glued some of the trim in place.  That way, I can remove it easily in future during the re-enforcement installation.

Finished up with the upper wall wooden embellishments (which basically support the ceiling once it goes in) by using the little plastic clamps to force the pieces into place.  That or a hammer will do the trick. 

Squishing trim into a slot that it won't go into easily, hence the clamp for extra leverage.

Finished wall installation.  Love the red !

Wednesday, April 10, 2013

Chapter 61b - Right Side Wall to Second Floor Right Side Room

April 8th - 10th 2013

This was just the second part of the previous chapter.  I split it because I figured the tatamis would take so much time but they didn’t really.  But between documenting everything to make a tutorial, I just didn’t feel like tackling the room construction right away.  So I waited till the next day.

The wall had to be painted as per the usual procedure (buttermilk outside and white inside) but instead of making the interior wall all white, I decided to use a sort of rice paper I had found in Florence as the wallpaper.  I had been debating whether or not to make the room “sexy” either by black walls or red walls...in the end, I opted for this one section of wall to be red and the others white.  I will eventually add some black in the guise of the tokonoma platform but for now, there will be mostly white for this room.

I had to measure out from previous rooms and looking ahead at the instructions and the pieces to work out somewhat where the trim would end up.  Hopefully it will all match up in the end.  I do have enough of this lovely rice paper to correct the wallpaper if need be.  I think it’s very unique.  I preferred not to paint on top of the paper because it would reduce the fuzzy papery quality which is what makes the paper so interesting.  Now the wall has texture !
Working out the position for painting.

Taping off the areas for the white....

...then doing the same to apply the red.

External view of the wall with wooden trim glued in place.

Wooden trim applied and tape removed.  Glue applied to the red area only.

Application of the rice paper with a water/glue 1:1 ratio. I preferred not to paint on top of the paper.

Sunday, April 7, 2013

Chapter 61a - The Tatami for the Right Hand Second Floor Room - Tutorial


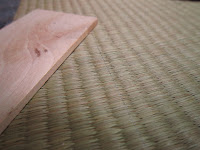
Small scale bamboo type mat
April 7th 2013

Starting work on another bedroom on the second floor right hand side.  That means tatami mats. 

Since I’ve noticed that many people are looking for how to make these mats, I figured I’d show what this kit came up with for a solution.  I thought I could give you a step by step even if it’s from a kit that may help you make your own tatamis.  I have made so far 12 of these and have found a few short cuts and methods that makes short work of what used to be a very long and tedious job.  I made these six mats in 2 hours flat.
That actual matting smells like woven bamboo reeds.  As you can see, it’s important that the matting is tightly woven so that the scale is maintained somewhat.  I suppose anything can substitute, including fabrics, as long as the weaving is small.

Penciling in the cutting line using the actual wooden piece

The kit comes with six 3mm thick wooden flats of 44mm by 86mm.  The room to be decorated is approx. 12cm by 16cm so you have to work out how the six separate matts would lay out on the floor.  Traditionally the placement is as per the previous chapter for tatamis.  But I suppose it all depends on the floor you’re working on to cover.
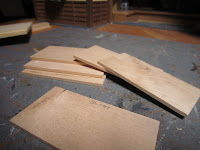
6 mat pieces

Anyway, once you work out your own dimensions,  I just used the actual flat pieces to measure where to cut the bamboo.  I then taped some double sided tape wrapped around from back to back fairly hugging the edges but not quite meeting at the back.  The reason for the space on the back is to allow room to cut and to unravel the mat and flatten it as much as possible.  I then wound the cut matt around the wood very tightly.  Should the mat be too wide covering the wood, just trim it back.  It’s important that the matt is cut quite close to the edge of the wood.  It doesn’t matter much if the cuts are not perfect as all the edges of the mat will be covered in fabric of some sort.  Keep in mind also that the double sided tape will not hold overnight so the passage from applying the bamboo to the wood and the subsequent application of the binding fabric on the edges should be done at the same time.
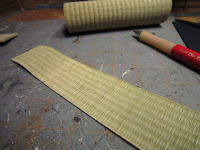
Cut mat ready for wrapping
Wrapped pieces with double sided tape


Taping the mat to the wooden support
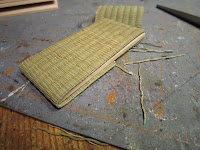
Trimming the excess bamboo

Trimmed and ready for the fabric edging.
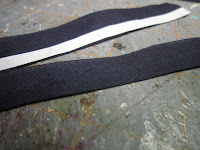
The fabric the kit provided is very lightweight black cotton.  Each piece was around 8cm by 12cm.  They had us cutting the fabric in half to end up with 4cm by 12cm and then again to end up with strips of  2cm by 12cm.  The next step is applying a 6mm double sided tape (purchased at DHE) to one side.  You then can easily make a finished edge by folding the fabric over the 6mm taped edge.   Next you can apply a second strip of 6mm tape to the unfinished edge, and another to the finished edge.  It’s ok if they overlap a bit.  You are going to remove the finished edge strip first so it’s important that you apply that tape last.
Fabric cut in half....

...and cut again.

Add the tape to one side...

...then fold it over on itself to create a clean edge.

Then add another strip to the unfinished edge...
...and to the finished edge again.
The kit came with a small tatami template which assists you in applying the fabric edging to the mat.  In this case, it is just a piece of wood with a raised smaller piece of wood (about 2mm in thickness and 10mm wide) attached to it.  This helps you to place the fabric strips against a straight edge onto the mat.  The template is 100mm by 51.5mm so that when you lay these pieces of tatami, they line up just right to the edge of where the fabric needs to be placed.
Template.  Used for other trials as well (hence the holes and color tests :))
Line up the mat with the right side upwards.
Lining up the mat and taping.
Remove the tape from the finished edge of a fabric strip and position it so that the excess on each end is the same.  That end will have to be folded over later to fix the fabric to the wrong side of the mat.


Remove from the template and turn the whole thing over and trim the side edges to form small pieces to use to finish the edge and fix the fabric to the back of the mat.  Roll the entire mat onto your flat surface which will help to adhere the tape to the side, then to the back.  Lastly, fold over the flaps on the edges to finish.
Cut away a small corner to make flaps.

Roll the whole mat onto a flat surface to adhere the fabric. Then turn up the edges.

Put a few drops of glue on the top edges where the fabric usually pulls away

 I add one final step to be sure my fabric doesn’t unattach after time (something I noticed having done many of these).  I apply a drop of quick drying gel glue with a toothpick under the top flaps of the fabric.  Then I clamp the whole thing against another flat surface and allow it to dry for a while.  By the time I get through the other 5 mats, the first one is dry and well fixed.  You could stack them as you go and leave them overnite but it’s really not necessary.  More than anything, leave them out to see if the fabric unattaches so that you can use more glue to fix them edges better.
Finished tatami mat.


Placement of the 6 mats


And that’s it! All I can say is thank goodness for double sided tape!