Saturday, August 3, 2013

Intermediate Work: Adding a Light Screen and Making a Wooden Bucket

July 31st - August 3rd 2013

Technically, the light screen was an idea I got from someone else’s treatment of the tokonoma area and I pulled that off in an evening while my sister was visiting here in May.  Just that between visiting Berlin, then deciding to attack the pavement project, I never got around to installing the screen and taking some pictures of it.  But here it is.  It was just a matter of cutting out some small wooden frames, painting them and glueing them onto some printed parchment paper.  The buddha statue I got some time ago as well but this is the room I had planned to put it in.  I will probably create some orchids or ikebana behind the statue.  That’ll be done once the room is actually installed onto the house.
The screen installed and back lit.
I saw a bucket tutorial on pinterest and decided also here to make my own.  I figured I need a water bucket outside the kitchen area (when I build that area up it will be full of various stuff for outside work) so I grabbed some toothpicks and glue and went nuts.  I dipped some crochet thread in some brown paint and washed it off a bit to make the twine to wrap around the bucket.  And I used one of the kit’s small buckets from the onsen spa to make the ladle to drink from and the lid I threw together with some small pieces of balsa.  Little varnish and done.
Cutting up some toothpicks....

...glueing them onto a plastic scoop for support till they dry.  Drying off the crochet thread for wrapping.

Finished water bucket.

Monday, July 29, 2013

Intermediate Work - Installation of the House onto the Pavement

Setting up the pavement onto the table.
July 26th - July 29th 2013

The next part was to install the pavement I so painstakingly created.  Again, my theory was to screw the pavement on top of a table (which I purchased at Ikea for like 20 euro) so that if one day I wanted to move the house to a new location, I would just unscrew it from the table and re-install it somewhere else.

That said, I measured out the table and the pavement and screwed it into place.  Amazingly, only two screws were needed and it’s pretty fairly centered.  My plan is to get some thin trim board to cover the edges of the pavement board but since I still have a lot to build, I can’t see doing esthetic work now.  Will do it at the end.  One of the two screws is uncovered so I covered that with some of the grass granules.


Installing the right drill bit.

Right hand screw installed.  Will be covered over with grass.

Left hand screw.  Will be covered over with grass adhesive sheet.


 The next job was emptying the house of fragile pieces.  I took out the pieces that were not held in place by the wax adhesive.  There were quite a few actually.  Other stuff I was just afraid it could be damaged during the transfer of the house onto the pavement. 

Fragile stuff taken out for safety reasons.
I had to wait a few days for my son to help me transfer the house (he had full immersion baseball weekend) but finally I managed to get the house transferred onto its base.  The bottom floors open easily and just have to wait till the small amount of glue I used on the underside fixes the house somewhat.  The sidewalk painting needs some touch ups in the back and on the side but not too concerned since the base of the house is the same color as the back sidewalk.  Looking pretty nice I think.
House in place.  Now at least we can add onto it without fear of having to transfer it when it's heavier.

Thursday, July 25, 2013

Intermediate Work : The Pavement Part B

June 24th - July 25th 2013

Well, health issues cleared up somewhat with the help of steroids as usual.  Course work became intense the first week of July along with weaning myself off the steroids which led to overeating.  And high temps here in Italy led to overheating.....  Anyway, a month later I can post my second phase of the pavement.

As per my previous posts, I had done some research as to how I wanted this pavement to look more or less.  Keeping in theme with my ryokan being run by bohemians (smile) and therefore a bit rustic and 60’s experimentation, the pavement out front had to be equally unkept.  I wanted mismatching sizes and stone colors along with lots of moss and grass growing up between the pavement stones.  I found my inspiration.  So, I started painting.


Inspiration for the front courtyard. 
Rought idea of moss between the stones and shale like chipped stones

Sidewalk which will be at the back of t he house.
First off, I quickly colored the back sidewalk area.  That will be finished later once the whole house is installed.  It will be pretty filthy and perhaps a small fenced area behind the sidewalk.  Definately overgrown low trees or something.  But that can come later.

Then, to the stones.  I chose two shades of brown and one of grey for the stones.  I knew I would mix back in all three on top of each other later with lots of water but to start I needed some intense color to get a sense of the overall look.  So, I painted away for quite a while.  I left the spaces in between unpainted as I was going to add the grass like material in there anyway so I wasn’t too concerned with that part.
Once completed, I started washing in the other stone colors on top of the painted ones.  This gave a little more depth and dirtiness to the stones.
First passage of painting the stones different browns and grey.

Before adding more color and wash.....

...same area after adding in a color wash.


Once that was done, I broke out the “grass”.  Basically, it’s ground down green granular material.  I had sacks of it when my son was working on his train layout.  So I used that to fill in between the stones.  It took quite a while since I had to use a small spout glue dispenser and then a toothpick to spread the glue into the grooves as well as clean off the stones where it spilled over.  After some experimentation in pressing the grass into the grooves with tools then finally (the best way) with my fingers, I then had to sand it down slightly as the grassed areas couldn’t interfere with the opening of the lower floors kitchen and spa rooms.  I may have to still adjust later once the house is actually installed.  I can’t know if the rooms will open until the house is installed on top of the pavement.  We shall see.
Different grass materials, glue, toothpick and small spatula.

Sprinkling in the material to fill the spaces between stones.

I also added a few details with a fine pencil where the color shading on the stones suggested sort of slate cracked areas.  I think it will give the stones a bit more 3D effect.
Some penciled details to give the stones a shale look.
Once this was done, I turned my attention to filling the open areas in front of the paved area.  I left it open as I liked the idea of being able to add some variety instead of having the entire board filled with paving stones (boring).  Again, I turned to leftover materials from the train layout.  There was some “static grass” in the landscaping kit.  I had no clue what the hell that was so of course, did some research.
Amazingly, I found that there is a system of grass application using static electricity.  All very cool stuff!  You basically sprinkle the static grass fibers and then using a small static tool you lift them up so they stand straight on the board (more or less).  I discovered also that this tool was very pricey and there was no way I could spend that kind of money.  (Although I did find a way to make one using a tennis racket like bug zapper.  That cracked me up as I have two of these in my house!! I could conceivably do it.)  Also because the area I need to decorate is very small I couldn’t see spending any money on this.  But I did find another method using something called a “puffer bottle”.  Once I saw the bottle, I was sure I could make THAT at least!  So, I did.

I just used an old relish bottle (fitting color) and drilled and cleaned the top of the bottle with holes to puff the grass out on the board.  Shaking the bottle creates quite a bit of static on its own and limiting the amount of glue to control globs etc. did the trick.  I think it’s a pretty economic and efficient method to applying the grass.  I didn’t have as much throw away as I thought I would.  And I’m pleased with the result.  After I actually get the house on its base, I will probably go back into the grass with some moss like materials I found (on sale) in a home furnishing store.  It will make the grass areas a  little more realistic.  The left side of the pavement will be covered instead with some sheet grass which I purchased off DHE.  I'd like to make a tiny garden there.
Recycling a bottle - cutting holes in the top for spinkling.

Widening the opening.
Relish bottle now full of static grass ready for puffing.

First application.  Pretty full.

Side view showing how the bottle does help the grass fibers to stand up a little more than normally would.

After the glue dried.


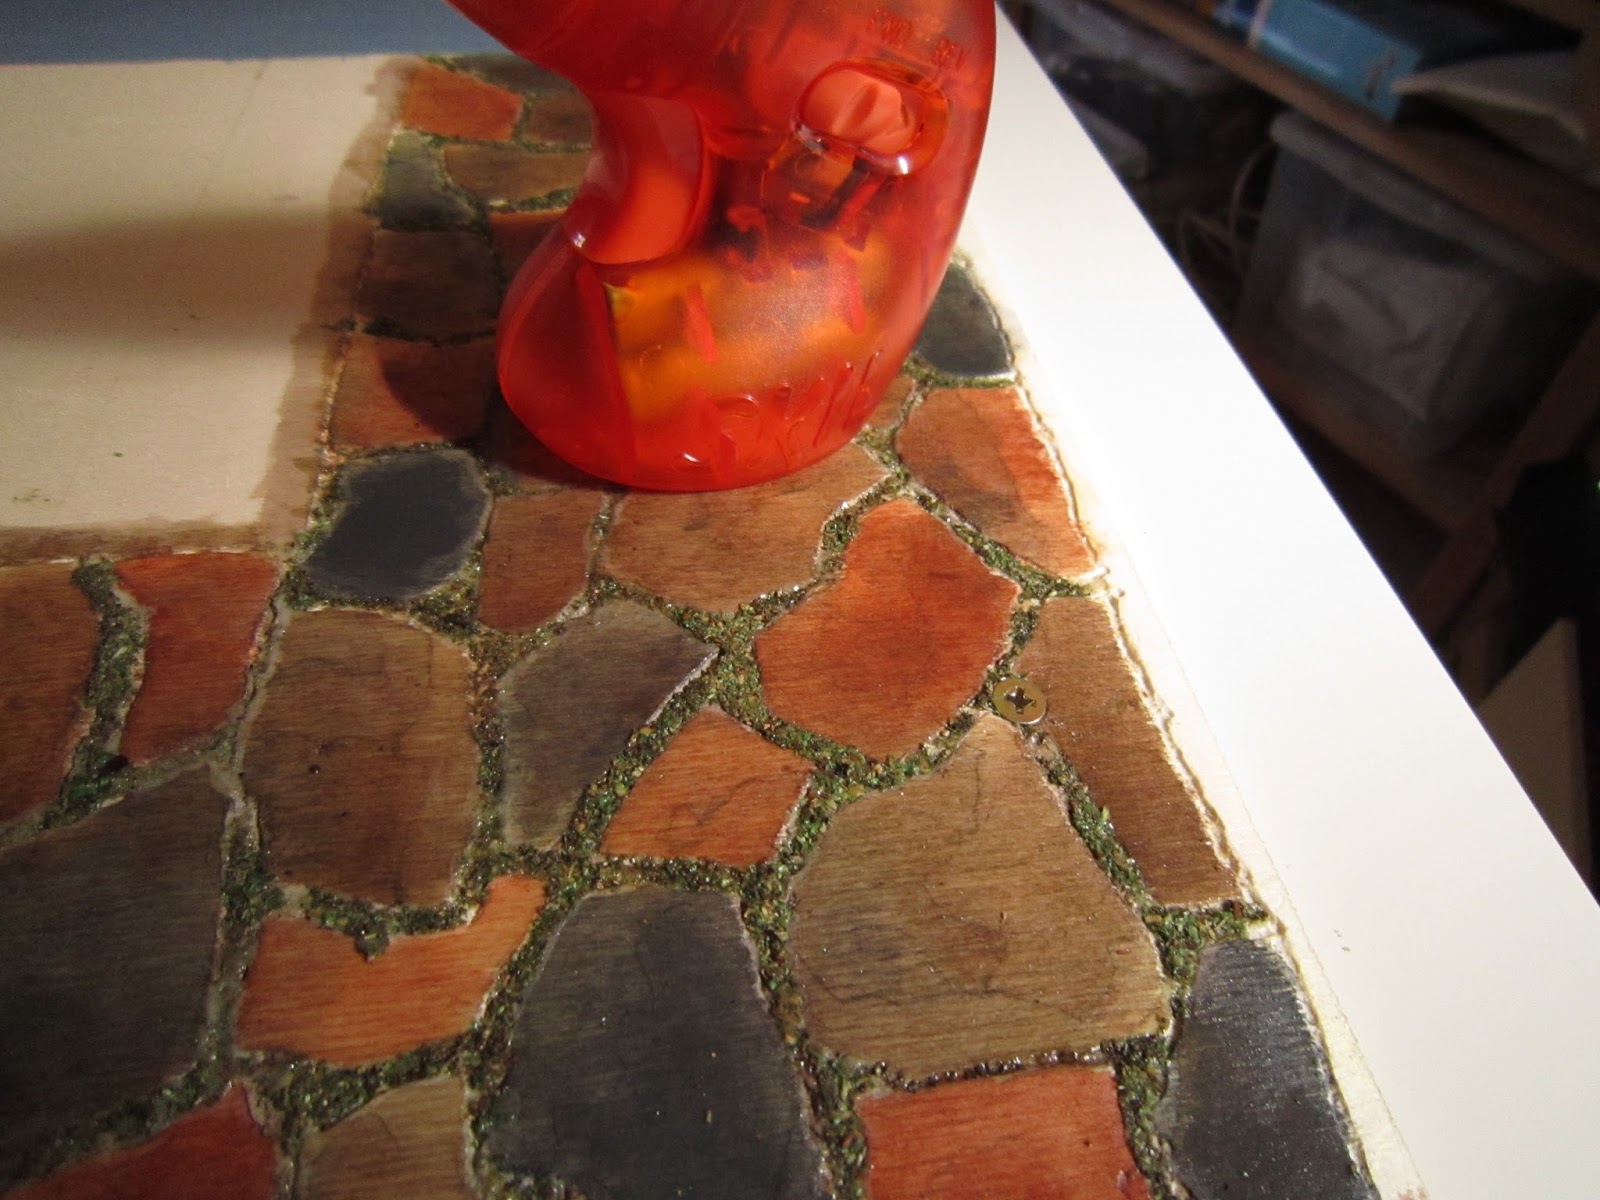
The final stage of the pavement was varnishing the stones and grass in between.  My varnish (which is around 2 years old at this point) finally clumped up to no return.  So I went out and bought some decoupage gloss varnish.  It’s not water soluble so that is an annoyance but it’s a gel so it fills the spaces nicely.  Plus it gives the overall wet look to the stones. Two hands were necessary as the wood just absorbs the gel.  But it did the job.
Finished static and granular grass.  Secondary grass will be done later.

Finished varnished and drying.  Ready for the house!


The next and final step is drilling holes and screwing the pavement into the table.  Then transfering the house on top of it.  That may take a few days as I'm going to have to empty the house of its more fragile contents.  But nearly there.....

Sunday, June 23, 2013

Intermediate Work : The Pavement Part A


Measuring the placement of the house on the board
26th May - 23rd June 23rd 2013

Almost a month ago, I began work on the pavement.  The first thing I had to do was to purchase a board which would be big enough as a base for the house along with the front sections which open.  I ended up purchasing some plywood that measured appx 60cm x 90cm.  My idea was to leave a little room to the right of the kitchen so I could build an external area where outside work in food prep and storage would be.   The back of the house needed a small space as well as my plan there is to make a small garbage container where I will hide the batteries that will power the LEDs in the house.  I then purchased a table at Ikea which could hold the whole thing.  I will screw the pavement base to the Ikea table in the eventual case that I decide to move the house or change the actual set up.  I 'll just use wood screws on the sides so I do not foresee any issues there.

Using stepping stone template to trace out on the board.

Still working out the placement of stones.


The next part was to decide what kind of pavement I was going to do.  I had thought about stenciling and painting stones but really didn’t like the lack of three dimensionality.  I then thought about papering and doctoring up the paper with some dimensional decor but I realized that wouldn’t work because I had two sliding areas in front.  The pavement had to be rather smooth and without much hinderance so the front room door would open without difficulty.  So, I decided on a method which I had found on the blog MitchyMoo. 
Flagstone pattern I used.  I made an mirror image of it and used both for as stencils.
I am using my Black & Decker type dremel tool and I carved out all the stones after stenciling them in.
Round headed tip for carving in between the stones.
Needless to say, it has been a very long process.

Mostly because my wrist and hands couldn’t take the vibration and stress of keeping the lines within certain areas.  I have sanded down the surface and any irregularities will be hidden anyway since I will be painting over the spaces in between the stones and covering them in moss like material.
In any case, as of today, the carving is done and I can now proceed with the painting, varnishing and grass decoration.  Hopefully, that will not take a month although I have a bit to do at work and my health issues have been acting up the last few days.  Still, I’m pleased I’ve come this far.

Sunday, May 26, 2013

May Holiday, Berlin and the Pavement is Born

May 4  - 26th 2013

Sorry for the lack of updates.  My sister visited from around 4th May till the 16th so I have been very busy with other activities and unable to work on any projects during that time.

We did have a lovely time together and a great trip to the city of Berlin.  I had been there many years ago and was glad to return to see how the city has developed.  When I was there before, it seemed to be in a constant state of construction.  What I didn't know was that Berlin is ALWAYS in a state of construction.  The amount of new buildings and blocks of flats or just overhauling of existing squares or office skyscrapers is constant.  I had heard the reference to Berlin as a city that never *is* but is always *becoming*.  I think that is true. 
The highlight of the trip for me was to finally view the bust of Nefertiti.  Something I have been dreaming of since I was a teenager.  It was well worth the wait.  There was a special showing since it has been 100 years since the bust was found.  Fascinating!  I also celebrated my 50th birthday while there.  Even if I do not care much about birthdays or my age, it was very nice to celebrate in a such a unique city and in the company of my husband and sister.  We of course had a grand time at the HB Hofbraeuhaus eating lunch meats and various sausages and hot dogs and drinking liters of beer.  What more do you need from life?

I finally got back to some mini work today.  I tackled the pavement base for the dollshouse and must say that even if I am very pleased with the plan, it is going to take me a very long time to execute it.  Since this phase is necessary before proceeding further in the build, then I must excuse myself for a while as I carve out my pavement.  I've gotten hold of a wrist brace to at least avoid any damage from holding the dremel carving tool over long periods but it is going to be a long process.

I will leave you with this teaser.  See you when I see you !


Friday, May 3, 2013

Intermediate Work - Bamboo Shades for Right Side First Floor Porch, Pavement Research

April 26th - May 3rd 2013

I had already done a pretty extensive chapter and tutorial on the bamboo shades here, but since I wanted shades on every porch, I had some more to make.  I figured I’d make these since they are pretty easy and then start to think about how I was going to stabilize the dollhouse.  It’s getting big and heavy.

Anyway, bamboo shades were made from a cheapy placemat I found at Ikea.  I had to abandon the bugle beads since the holes were much too small to pass the DMC thread for the pull.  I opted for some triangular beads and glued those in place to line up the pull string.  I attached the shades onto the porch by putting a glob of tacky wax adhesive and glue.  That way I didn’t have to come up with a way to clamp the shades in place while the glue dried.  Done.

Trimming the bamboo to size

Fitting in the beads which will hold the pull string.

Glue the back support (bottom edge of the placemat cut to size)

Glue and tacky stuff for easier attachment.

Ready to roll.
 While I was working on these, I got to thinking seriously about the final disposition of the dollhouse.  I had bought a table at Ikea (for like €20.00) and had some plywood cut to size at my local hobby place (€5.00).  I decided I would fix the house to the plywood and the plywood to the table.  That way if I wanted to ever change the actual table I could do that.  Plus, I wanted to decorate the plywood with some kind of stone pattern to simulate a street or garden path. 

My original idea was to use some paper with stone decoration on it.  But it just seemed so flat to me.  Plus I had to keep in mind that the ground floor has two sliding rooms so the this may cause too much friction every time I would open the rooms.  I thought I could use stencils but even here was very time consuming considering the amount of space I was going to have to fill (60cm by 90cm).  Then I came across a blog that has some excellent suggestions for flooring.  I used a scrap piece of plywood and made some cutting tests with my dremel machine.  I figured out the speed had to be pretty high otherwise a straight cut into the wood is impossible.  Also, once I started screwing around with color, the cut areas were not so visible and I really did not like the final effect.  I also made a cutting test using my stencil to make some stone pavement.  I used some of my smelly vinegar wood aging (copper and steel) to age the wood and see what kind of result came out.  Didn’t like that either.  Altho the steel one made a nice effect by darkening on top of the “stone” and not on the inside.  Since I’m debating on adding grass inside the cracks, this could be doable.  Anyway, I have a lot more testing I need to do.

Paper stone pattern

Transferring the stone pattern from MitchyMoo's blog

After "carving" the pattern.


Painted a bit...do not like. The detail is lost.
Cutting out the stencils.

Penciling in the stencil for "carving".

Cooper wash on the left, steel wash on the right.
In the meantime, here are some pics that got me thinking.  I love the food pic in particular (ok, I HAVE to try fimo!!!) and the perfectly shiny waxed floor of a ryokan hotel entrance.  That is what I should have done from the beginning ! Live and learn.
Like the different pavement sizes.

Straight forward long stones perhaps would give depth?

Absolutely yummy looking fish and love the serving tray! Help! I must learn to use FIMO!

Perfectly waxed wooden floor.  Looks liquid.

I like this placement of the table and the futon layered on top. May use this.
I think this is my favorite stone look.  It may just be where I'm going.