Tuesday, October 1, 2013

Chapter 72 - The Water Closet (Bathroom)

September 24th -  1st October 2013

Ok, last chapter I gave fair warning.  This is a bathroom chapter and thus, bathroom humor.  Sorry.

As hinted in chapter 66, the bathroom seemed really minimal to me.  Then I ended up doing some more research and found that in fact this bathroom is fairly common in many kinds of hotels or hostels, ryokan inns etc. in Japan.  It’s pretty traditional although it seems extremely rustic to me.  But then again, I’m American so the idea of a bathroom like this would be pretty traumatizing if I had an urgent need to defecate.  Sort of like the first time you had to do such a thing in the woods whilst camping or something.
Japanese toilet

In any case, since I’ve been in Italy now a long time, I can relate somewhat to the similar experience upon finding my first “turkish” bathroom.  In Italian, it’s called the bathroom “alla Turca”.  Not to be confused with a lovely turkish bath that you may find in a spa or luxury hotel.  I’m purposefully giving you an unpleasant pic here because 9 times out of 10, this is the condition you end up finding such a bathroom.
Filthy.
Italian toilet. Filthy.
For scientific use - the Shelf Toilet
They can be found still in most clubs, bars, and even some restaurants which, by law, are supposed to also offer a normal toilet for the handicapped.  Even so, I have had occasion to be stuck with one of these which proves a challenge given my hovering capabilities are minimal.  Slowly, tho, at least here in in the mid-north of Italy, these are pretty much being phased out in favor of a normal toilets.  Still, the toilets here are very low water which can be disturbing too since we Americans are used to lots of water (to the point of “back splash”).  I think in Europe it all still tends to be low water.  One of the most interesting toilets I came across was in fact the shelf toilets found in Germany and Holland (Amsterdam).  I was traveling again with my family and my sister and we discovered this jewel of a toilet.  Also here, low water yet intriguing use of the shelf I would suspect.  Could it be the most efficient way to check for intestinal vermin? In any case, one has to be sure to close the cover otherwise the rush of water could cause material to be launched onto the bathroom wall (or person using the toilet).
Hence also the european use of ceramic tiles all over the bathroom.  On the walls, floors and round the sanitary services.  It does make for easy and hygienic cleaning (when bars and restaurants feel like doing it). My bathrooms are ceramic tiled.  And the one lovely invention which Americans do not have and are missing out on is the bidet.  Best French invention ever!!  Unfortunately, we do not have that in our Japanese Ryokan.  We barely have a bathroom.

Getting back to our Japanese toilet, I find it interesting to see that after many years, the Japanese are now opting for these mega high-tech toilets.  When I visited Japan in the late 90’s,  I was surprised to find so many buttons and knobs on a toilet.  There are lots of blogs that can relate this experience in detail so I won’t get into it here.  But I find it interesting that we go from something so basic bare bones rustic to something out of Star Trek!  From having no sense of modesty or comfort to having an actual button you can press that will emit sounds to mask the tinkle of your urinating.  Amazing.

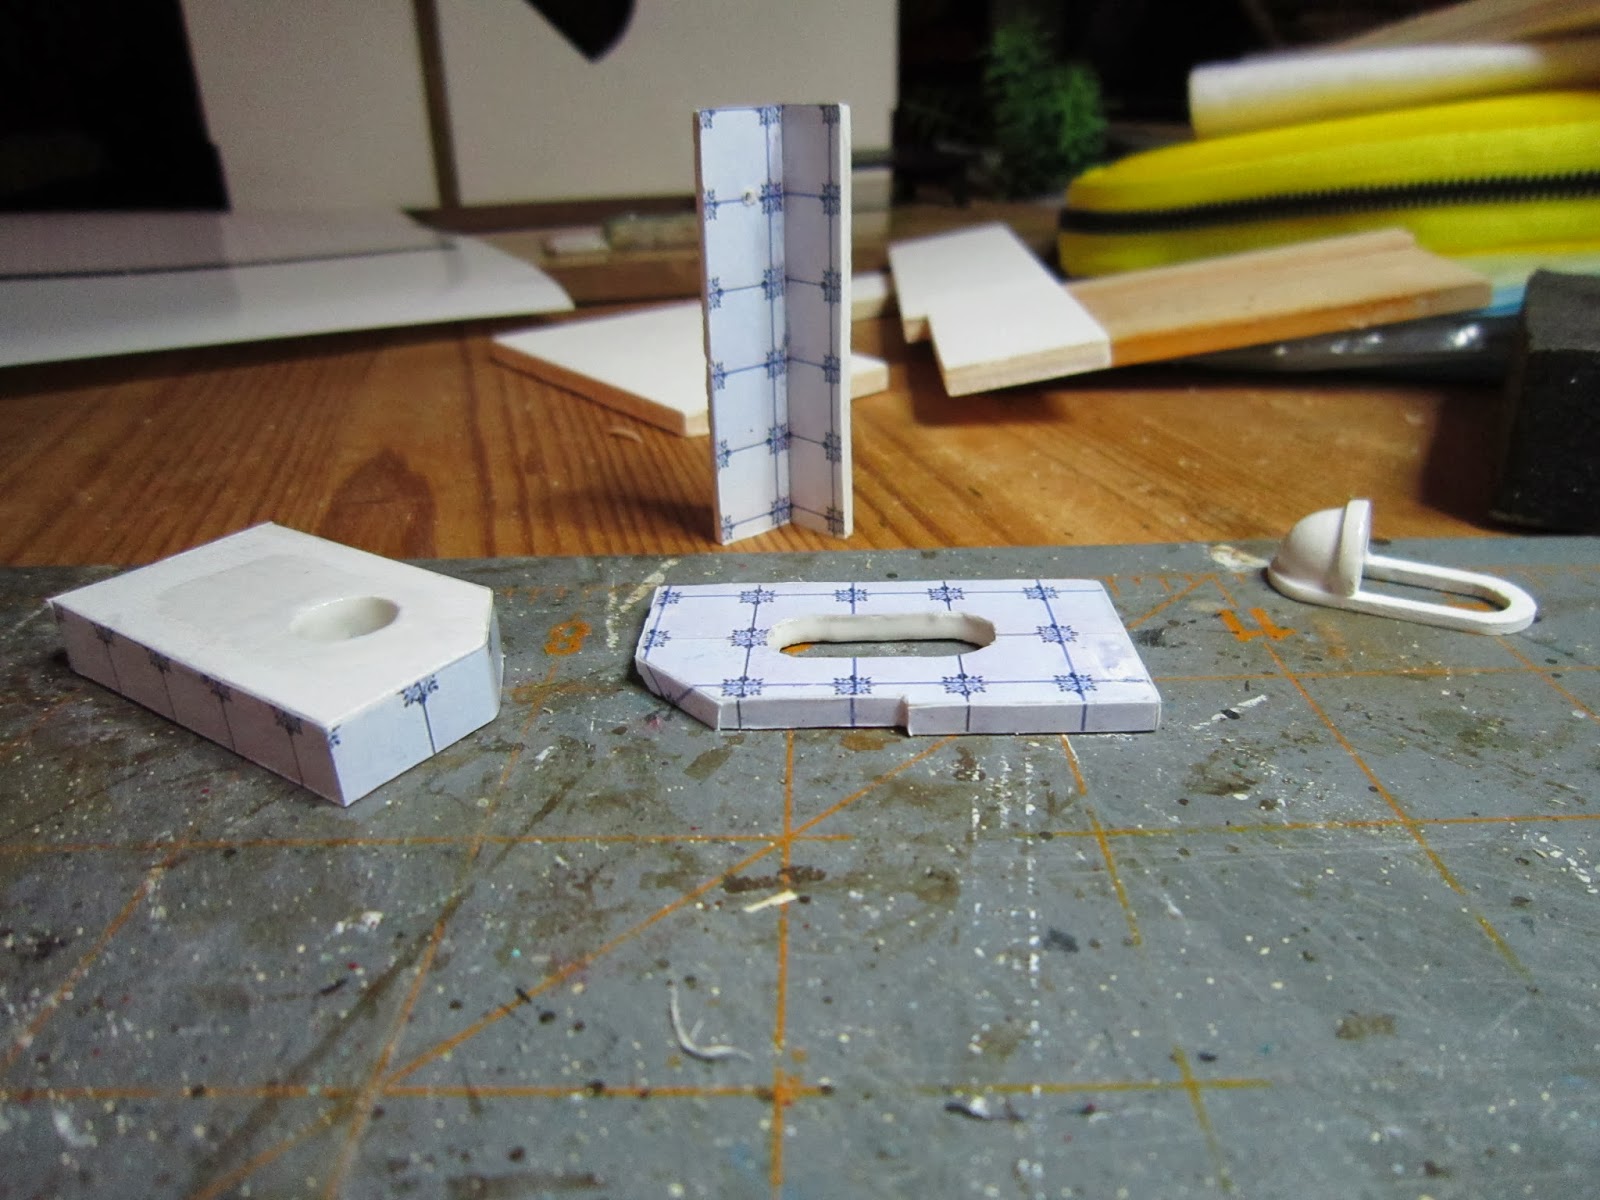
So, having decided to build the bathroom the way the kit intended, there were a few changes I had already contemplated on making.  One was to tile the bathroom.  I found some printies and printed the tiles out on glossy paper.  All I had to do was cut to size and glue the pieces onto the walls.  I wanted the bathroom a bit kitchy and for this reason we have two kinds of tiles.  One around the actual toilet and sink (Delft style) and the other for the walls.  I stuck with a kind of 50’s tiling there.


Adding the printie tiles to the backsplash and the toilet base

Adding more Delft to the base and assembling the backsplash.


I also decided to test out some liquid enamel.  I really wanted the sanitary pieces to look like porcelain so I used a few layers of this liquid enamel on those pieces.  They worked out pretty well.  It’s a bit of a pain tho since this product is quite liquidy, takes a while to dry and needs acetone for cleaning up (and still didn’t clean up as well as it should have).


Liquid Enamel


The wash basin before enameling


I then had to join the right hand room to the landing so that I could have a better idea of where to tile the back wall.  That was glued and left overnite.  In the meantime, I checked the kit instructions for the installation and discovered that I needed one piece from a chapter further ahead to install the bathroom.  So, after digging that out and resealing the remaining pieces in their package, I stained it and installed it.  Now I could tile the remaining walls.
Glueing the landing to the right hand room


Tiled and glued in place. 


Tiny wash basin. Was a difficult fit. I had to use some sticky wax just to hold it in place for gluing.

Finished "toilet". Better have strong thigh muscles.


With the installation of the extra wood pieces in the corner, I could no longer actually tile the back wall.  It didn’t make sense with all that wood.  So I just tiled the facing wall.  I used double sided tape this time instead of glue.  The landing is off quite a bit so I had to straighten out the tiles more than match up to the landing edge.  Now, I was ready to test fit the bathroom.

Bathroom finished.
It fit in fine! Except for a few areas that needed sanding to give a tighter seal (once the light goes in, I didn’t want lots of light leaking out) and discovering that I had mis-installed one side, after rectifying the error and re-glueing it was ready to install.  I noticed the bottom edge under the tile was showing white from the wall so I used some fine tipped black marker pens to fill in the area.  That way it doesn’t annoy me when I open the door.


The door to the bathroom.

View inside.  Tiny space.
View from above.


And lastly, I pasted the “how to use” poster on the back of the door.  I had found this on the net and loved it!  Fitting, since I, more than anyone, had no idea how to use this bathroom.

"How to" instructions.
Good to know! I would have sat on it!!


Monday, September 23, 2013

Chapter 66 - Back Wall to Second Floor Hall, Small Overhang to Right Hand Room, Roof to The Vestibule (Ground Floor)

September 19th - 23rd 2013

The back wall was not complicated but as usual it was a bit warped.  So, after painting the back and inside walls, I had to join them together using a clamp.  I decided to also attach the back wall to the pavement section at the same time.  It would have worked out great except that I have been suffering from allergies of late and right when I had balanced the attachments, I sneezed.  The floor went flying hit the ground and broke.  Luckily it broke right at the small pavement area on the right side but glueing it back things didn’t meet up as nicely as they did before.  Oh well,  things happen.  I left the whole setup overnite to be sure the glue fixed.
Clamping everthing down for overnite dyring.
The next step was the overhang above the sliding doors.  I've done this already twice before so I am not going to go thru the explaination again.  Suffice to say that even this piece was a little warped but ended up fitting fine over the doorway.
Finished overhang.
This chapter had us going back to chapter one and pulling out the front door vestibule.  I realized that for some reason, the outside wall was white (WTF) and when I went back to the first chapters where I had painted this, obviously I wasn’t paying attention.  It was supposed to be beige.  So, I had to repaint it.  The inside isn’t painted either but at this point, I’ll decide what I want to do there.  I was playing with the idea of adding a small light to the front door.  So I can wait to paint that anyway. 
The kit came with plasticine that is supposed to be used to attach the roof over the front porch.  It doesn’t make sense to me but it seems to hold the roof on well enough. I just flattened out a bit of plasticine and attached it to the support beams then pressed the roof on top.  I checked to be sure that the roof fit into place and it did (miracle!) without having to cut or make further adjustments.  So now I’m going to leave it for a few days just to see if it dries out somewhat and creates a bond.  I doubt it.  But if it does dry out, it offers me a flat surface to glue the roof on more permanently. 
I also decided to repaint the stone pavement in front with a little green and overgrown grass.  I found some hay like grass materials at a hobby shop (yes, while in America I went nuts at the hobby shops) and cut them to resemble some grass growing up by the front porch posts.  I will probably add more later.
Test fitting the vestabule roof onto the front of the house.
Repainting the stone landing a bit. 

Artificial hay or grass - this will be used around the edges of the house.

Some artificial grass in place.


Front door installed.  It removes by opening the bottom room doors.  Not very pratical.
The next few chapters had me working on some furnishings and such and then on to the next room but I really didn’t want to go into that yet.  I was more interested in attaching the landing to the right hand room so I could build the bathroom.  Well, more like a place to wash your hands and urinate.  It’s hardly what I would imagine a bathroom would be for women.  And there is no other bathroom in the kit.  Whatever.  I guess the ryokan of the sixties wasn’t for women clientele.  But you’ll see in the next chapter.

Sunday, September 15, 2013

Chapter 65 - The Second Floor Landing, The Kutsunugi-ishi

September 8th - 15th 2013

Well, after a long and much needed August holiday, I am back to work on the dollhouse.  I managed to spend some time with my parents in Maine as well as enjoying summertime on Little Sebago Lake with my family.  It was very nostalgic.

The next chapter was the construction of the second floor hallway landing.  I had already done this for the ground and first floor so it was pretty much a quick build.  The only thing was the time needed in between coats of paint, varnish and wax.  I also had to even out somewhat the right side since the piece of wood fairly thinner than the rest of the landing pieces.  I managed to slide in a few pieces of thin cardboard to even it out somewhat. 


Penciling in the floorboards.  Then cutting in the verticle lines.

Painting the floorboards. First coat of varnish on the larger piece.
After two coats of varnish and one of wax, polished and ready.

Evening out the right section with some extra paper for thickeness.

Clamped and drying time.

Adding the inside decorations to the stairwell.


 The kutsunugi-ishi or shoe stone was the same as the others more or less.  I wanted this one to have a little more brown and green highlights in it as well as appearing wet.  I don’t know why. I just liked the idea I guess.  Sort of like a moldy green damp stone. It actually does look that way.  But in reality it would just be polished.
First passage of colors, brown and dark grey.

Light addition of watered down green.

Completed with varnish and white sand.

Finished pavement and kutsunugi-ishi.

Saturday, August 3, 2013

Intermediate Work: Adding a Light Screen and Making a Wooden Bucket

July 31st - August 3rd 2013

Technically, the light screen was an idea I got from someone else’s treatment of the tokonoma area and I pulled that off in an evening while my sister was visiting here in May.  Just that between visiting Berlin, then deciding to attack the pavement project, I never got around to installing the screen and taking some pictures of it.  But here it is.  It was just a matter of cutting out some small wooden frames, painting them and glueing them onto some printed parchment paper.  The buddha statue I got some time ago as well but this is the room I had planned to put it in.  I will probably create some orchids or ikebana behind the statue.  That’ll be done once the room is actually installed onto the house.
The screen installed and back lit.
I saw a bucket tutorial on pinterest and decided also here to make my own.  I figured I need a water bucket outside the kitchen area (when I build that area up it will be full of various stuff for outside work) so I grabbed some toothpicks and glue and went nuts.  I dipped some crochet thread in some brown paint and washed it off a bit to make the twine to wrap around the bucket.  And I used one of the kit’s small buckets from the onsen spa to make the ladle to drink from and the lid I threw together with some small pieces of balsa.  Little varnish and done.
Cutting up some toothpicks....

...glueing them onto a plastic scoop for support till they dry.  Drying off the crochet thread for wrapping.

Finished water bucket.

Monday, July 29, 2013

Intermediate Work - Installation of the House onto the Pavement

Setting up the pavement onto the table.
July 26th - July 29th 2013

The next part was to install the pavement I so painstakingly created.  Again, my theory was to screw the pavement on top of a table (which I purchased at Ikea for like 20 euro) so that if one day I wanted to move the house to a new location, I would just unscrew it from the table and re-install it somewhere else.

That said, I measured out the table and the pavement and screwed it into place.  Amazingly, only two screws were needed and it’s pretty fairly centered.  My plan is to get some thin trim board to cover the edges of the pavement board but since I still have a lot to build, I can’t see doing esthetic work now.  Will do it at the end.  One of the two screws is uncovered so I covered that with some of the grass granules.


Installing the right drill bit.

Right hand screw installed.  Will be covered over with grass.

Left hand screw.  Will be covered over with grass adhesive sheet.


 The next job was emptying the house of fragile pieces.  I took out the pieces that were not held in place by the wax adhesive.  There were quite a few actually.  Other stuff I was just afraid it could be damaged during the transfer of the house onto the pavement. 

Fragile stuff taken out for safety reasons.
I had to wait a few days for my son to help me transfer the house (he had full immersion baseball weekend) but finally I managed to get the house transferred onto its base.  The bottom floors open easily and just have to wait till the small amount of glue I used on the underside fixes the house somewhat.  The sidewalk painting needs some touch ups in the back and on the side but not too concerned since the base of the house is the same color as the back sidewalk.  Looking pretty nice I think.
House in place.  Now at least we can add onto it without fear of having to transfer it when it's heavier.

Thursday, July 25, 2013

Intermediate Work : The Pavement Part B

June 24th - July 25th 2013

Well, health issues cleared up somewhat with the help of steroids as usual.  Course work became intense the first week of July along with weaning myself off the steroids which led to overeating.  And high temps here in Italy led to overheating.....  Anyway, a month later I can post my second phase of the pavement.

As per my previous posts, I had done some research as to how I wanted this pavement to look more or less.  Keeping in theme with my ryokan being run by bohemians (smile) and therefore a bit rustic and 60’s experimentation, the pavement out front had to be equally unkept.  I wanted mismatching sizes and stone colors along with lots of moss and grass growing up between the pavement stones.  I found my inspiration.  So, I started painting.


Inspiration for the front courtyard. 
Rought idea of moss between the stones and shale like chipped stones

Sidewalk which will be at the back of t he house.
First off, I quickly colored the back sidewalk area.  That will be finished later once the whole house is installed.  It will be pretty filthy and perhaps a small fenced area behind the sidewalk.  Definately overgrown low trees or something.  But that can come later.

Then, to the stones.  I chose two shades of brown and one of grey for the stones.  I knew I would mix back in all three on top of each other later with lots of water but to start I needed some intense color to get a sense of the overall look.  So, I painted away for quite a while.  I left the spaces in between unpainted as I was going to add the grass like material in there anyway so I wasn’t too concerned with that part.
Once completed, I started washing in the other stone colors on top of the painted ones.  This gave a little more depth and dirtiness to the stones.
First passage of painting the stones different browns and grey.

Before adding more color and wash.....

...same area after adding in a color wash.


Once that was done, I broke out the “grass”.  Basically, it’s ground down green granular material.  I had sacks of it when my son was working on his train layout.  So I used that to fill in between the stones.  It took quite a while since I had to use a small spout glue dispenser and then a toothpick to spread the glue into the grooves as well as clean off the stones where it spilled over.  After some experimentation in pressing the grass into the grooves with tools then finally (the best way) with my fingers, I then had to sand it down slightly as the grassed areas couldn’t interfere with the opening of the lower floors kitchen and spa rooms.  I may have to still adjust later once the house is actually installed.  I can’t know if the rooms will open until the house is installed on top of the pavement.  We shall see.
Different grass materials, glue, toothpick and small spatula.

Sprinkling in the material to fill the spaces between stones.

I also added a few details with a fine pencil where the color shading on the stones suggested sort of slate cracked areas.  I think it will give the stones a bit more 3D effect.
Some penciled details to give the stones a shale look.
Once this was done, I turned my attention to filling the open areas in front of the paved area.  I left it open as I liked the idea of being able to add some variety instead of having the entire board filled with paving stones (boring).  Again, I turned to leftover materials from the train layout.  There was some “static grass” in the landscaping kit.  I had no clue what the hell that was so of course, did some research.
Amazingly, I found that there is a system of grass application using static electricity.  All very cool stuff!  You basically sprinkle the static grass fibers and then using a small static tool you lift them up so they stand straight on the board (more or less).  I discovered also that this tool was very pricey and there was no way I could spend that kind of money.  (Although I did find a way to make one using a tennis racket like bug zapper.  That cracked me up as I have two of these in my house!! I could conceivably do it.)  Also because the area I need to decorate is very small I couldn’t see spending any money on this.  But I did find another method using something called a “puffer bottle”.  Once I saw the bottle, I was sure I could make THAT at least!  So, I did.

I just used an old relish bottle (fitting color) and drilled and cleaned the top of the bottle with holes to puff the grass out on the board.  Shaking the bottle creates quite a bit of static on its own and limiting the amount of glue to control globs etc. did the trick.  I think it’s a pretty economic and efficient method to applying the grass.  I didn’t have as much throw away as I thought I would.  And I’m pleased with the result.  After I actually get the house on its base, I will probably go back into the grass with some moss like materials I found (on sale) in a home furnishing store.  It will make the grass areas a  little more realistic.  The left side of the pavement will be covered instead with some sheet grass which I purchased off DHE.  I'd like to make a tiny garden there.
Recycling a bottle - cutting holes in the top for spinkling.

Widening the opening.
Relish bottle now full of static grass ready for puffing.

First application.  Pretty full.

Side view showing how the bottle does help the grass fibers to stand up a little more than normally would.

After the glue dried.


The final stage of the pavement was varnishing the stones and grass in between.  My varnish (which is around 2 years old at this point) finally clumped up to no return.  So I went out and bought some decoupage gloss varnish.  It’s not water soluble so that is an annoyance but it’s a gel so it fills the spaces nicely.  Plus it gives the overall wet look to the stones. Two hands were necessary as the wood just absorbs the gel.  But it did the job.
Finished static and granular grass.  Secondary grass will be done later.

Finished varnished and drying.  Ready for the house!


The next and final step is drilling holes and screwing the pavement into the table.  Then transfering the house on top of it.  That may take a few days as I'm going to have to empty the house of its more fragile contents.  But nearly there.....