Showing posts with label Doll House Emporium. Show all posts

Thursday, April 25, 2013

Chapter 64 - The Tokonoma of the Right Hand Room Second Floor, A Bird Cage

April 17th - 25th 2013

With the room prepared, it was time to install the tokonoma or the raised dais section of the room.  I had been given some small pieces of olive tree wood and wanted to use this as the column support for the tokonoma.  Usually you can use a small branch or just plain wood as I did in the first two rooms but I wanted this column to reflect a little where this house is being built.  I know that it is quite improbable that Japan would use olive wood for a column as I suspect it’s not quite hard enough to support walls and would be more decorative but I liked the idea none the less.

The piece of wood was rustic with some bark still attached.  I was keen on keeping that section of bark intact somewhat but the shaping needed cutting and sanding to adapt to the rest of the installation.  I used a small saw and my electric sander to get the piece down to a certain point.  Then I just had to figure out the best position to show off the wood and the bark.  To do that, I had to move ahead with making the wall pieces that are attached to the column.  I covered them with some leftover tatami mat and then tested them against the column.  Once I decided on the side I wanted to be viewed, I notched the column where the wall pieces would fit.  This took a while but eventually I got them to fit in.
Original kit column piece and the piece of olive wood.

Cutting and shaping the wood.

Nearly finished.  Just have to fit to size.

Two ceiling pieces that get inserted into the olive column

Olive column now notched for the ceiling pieces.

How the pieces in theory will fit.

In the meantime, I had to prepare the raised dais which needed painting (black) varnishing and sanding much like before.  Once I got through various layers of varnish and sanding, I then waxed this piece as well.  I also did the same to the olive wood column until it had a nice shine.

Now in a perfect world, everything should fit but it doesn’t really.  It took some coaxing and sawing off of the wall pieces to have this section fit into the room.  The olive column is larger than the actual kit piece so it causes the wall pieces to be too long or too high.  I eventually got them in place although some bits of tatami came away in the process.  I replaced some but since I liked the idea of a rustic unkempt inn (something I’ve been leaning towards since the beginning of this build) I just left some bits exposed.   Needless to say, only 6 days later was I able to start playing with more embellishments in the room. 
Small tokonoma dais installed as well as the dividing wall.

Overnite clamping and coaxing the pieces in
I needed to cover some wooden cabinet doors with the paper I had used for the fusuma in the previous chapter.  Only I was using the reverse side so I got through gluing on the paper and leaving it to dry.  I had to paint all the cabinet pieces black to stay in the theme of the black/red in the room.  Also, I had received as a “free gift” from DHE (after making some purchases) a bird cage and a bird.  The cage was pretty awful wicker thing with a plastic bird in it - quite horrible - but the other bird was actually made of feathers of some sort and a pretty blue.  So, I had decided that my red room would have a bird in a gilded cage too.  I opened the cage to remove the cheesy bird and painted the whole thing black.  I then fashioned the pretty bird’s perch and repainted the whole cage a dirty gold bronze like color.  I also managed to find some Japanese newspaper print and placed that in the bottom of the cage.  I also made a bit of “bird poo” in there too.  The bird does not seem very pleased but what bird is actually happy about being caged?  I then added a toothpick and a bit of chain that was left over from an earlier installation and the cage is ready to be hung in the room.
Blue bird on the left, wicker cage painted black.

Adding some newspaper in the bottom of the cage

Painting the cage bronze

Unhappy bird in the cage.
I took the opportunity of drilling a small hole in the lower left side of the floor for the LED that will go there.  I am going to make another small lamp that will fit in the corner.  I imagine there would be no room on the other side what with the cabinets and all.  Putting together the cabinets as usual was a chore.  The pieces are so small and never really fit quite right.  The upper cabinet was impossible and I ended up glueing the doors in place so that I could fit them in after tedious sanding.  They therefore do not slide.  The bottom cabinet is a bit larger so technically the doors would slide - but I wouldn’t dare try for fear the whole thing would not be able to withstand the stress.  Such small doors require lots of precise sanding to make them actually functional and honestly I do not have the expertise.  I like them the way they are tho. 
Painting all the tiny cabinet pieces.

Sorting them out with the covered cabinet doors. Tedious.
After touch ups and varnishing, they were glued into place.  The upper cabinet seems a bit off but it’s actually the overhead ceiling piece which is crooked.  No matter.  I love the little doors with the motif from the Japanese paper.  And the cage will look nice once I’ve got my other objects on the tokonoma.
Long chapter but pretty satisfying.
Finished tokonoma. LED peeking thru on the left.

View of the olive grain in the wood.

Thursday, October 4, 2012

Intermediate Work - The Bamboo Shades, An Iris Plant


Shibuya Town Feed - inspiration for the bamboo shades.
October 1st - 4th 2012

I had seen on a feed some nice fotos of Shibuya in Japan and in one of these fotos, there were these lovely bamboo shades which were hung on the outside of the terraces in many of the two story houses.  It reminded me of the same shading process here in Italy but here they use fabric curtains that just serve to block out the sun and heat during the day.  Most have these rolling full window shades but if you want to move in and out of a door, you need one of these curtains.  So, I decided my ryokan would have some bamboo shades to keep out the heat and sun.

I did some searching on the internet and came across a tutorial where you can use a bamboo placemat as a bamboo shade.  The bamboo slats are the correct scale so all I needed to do was find some bamboo placemats.  Years ago I found a ton and now all of a sudden I couldn’t find any!  As luck would have it, one day at Ikea, in the discount section (where they dump opened packages or the stuff they use in display) there was a nice bamboo placemat for a Euro 1.50.  Can’t go wrong with that! So I picked it up.
Ikea E 1.50 place mat!! Yoohoo!

Glueing the edges where I plan to cut thru
The first thing to do was to glue the slats where I would be cutting since we didn’t want the threads to unravel.  So, after taking some measurements, I glued the top and bottom and waited overnite to be sure the string was hardened and set.  Then I cut using my exacto-knife.  The bottom of the matt was perfect as a support to hang the shade.  I then measured out some black DMC thread, tied one end, threaded it round the back and up the front again and back thru.  The whole ordeal was because I wanted my shades to actually open and close.  I had to find a way to fix the threads across the top and I did that with some bugle beads.  Threading through those was a pain (I had to glue the tip of the floss to a fine point to thread it thru) but eventually I got both threaded and secured.  I used a small orange bead to weight the end of the pull.
Cutring the matts to size for the shade
Threading the bugle beads...

...and glueing them in place so the string would slide.

Glueing the back support (bottom piece of the placemat)


The next part was a little more difficult.  I had to figure out a way to weather the bamboo shades on one side.  I really didn’t like the new look to them.  I generally do not like the whole ryokan looking brand spanking new so the shades had to look a little sun faded.  I tried using household bleach and a paintbrush but it just isn’t concentrated enough.  Neither was hydrogen peroxide.  Only solution was to put some bleach soaked paper towels on the sun bleached side and let them sit on there for around 5 hours.  That did the trick enough to please me.  I then added a little graphite colored paint (has a bit of a blue hue) to make the shades look weathered. 
Top side now slightly weathered, underneath still fairly clean.
Attaching the shades was great since the bottom piece of the placemat was actually almost the exact same width as the space between the top window sill and the under roof beam.  Just a bit of sanding and those fit in perfectly. 

And the shades do go up and down! Fun!


Funky little flower petals - also a find.

The finished vase....
...in situ.


I also found some small terracotta vases which were a good size for the house.  I aged one with some brown and green and then stuffed it with some of the pink flowers I had purchased.  I also found a package of blue purple flowers and used the same method as making the geranium petals - squishing them on the mousepad - then glueing them to a green wire support.  I then inserted an iris that I had purchased from DHE UK site.  I think it looks quite nice on the porch! 

Next will tackle the magnetic closure of the first floor porches.

Sunday, July 15, 2012

Intermediate Work - Purchases

April - May - June 2012

Well, I have been busy with work (life work, not dollhouse work) and have somewhat abandoned the build for a bit.  I have been learning how to make miniature paper flowers tho but I will post about my results later for that.

Over the last few months in my internet travels, I have accumulated quite a few contacts and made some purchases that can now begin to be put into the dollhouse.  So, I figured I’d attempt to show some of them here and link over to some of the shops.

On a side note, I came across an insert in Wikipedia which explained the term ryokan which I had come across previously in another post.  There, they had a detailed explanation of what it is and it matched exactly with dollhouse I am working on.  Basically, most of these ryokan are pretty nice luxury / spa hotels where you sleep on a tatami mat and eat all in the same room.  During the day, the futon is rolled up and put aside so you can pull out tables and chairs and eat or relax in the room.  The bathroom and spa are communal.  The entrance hall actually has two functions.  One it for “check in” for the guests and the other is a gathering place for the guests to sit and watch TV or read or socialize.  So, I decided to make my entrance hall this way.  It says they furnish you with kimonos for the spa and little geta sandals too.  So knowing all this, I’ve decided to make my ryokan not so run down or trashy but still a place for young people to come to and be entertained and enjoy the indoor spa !  Love to actually visit a real one.

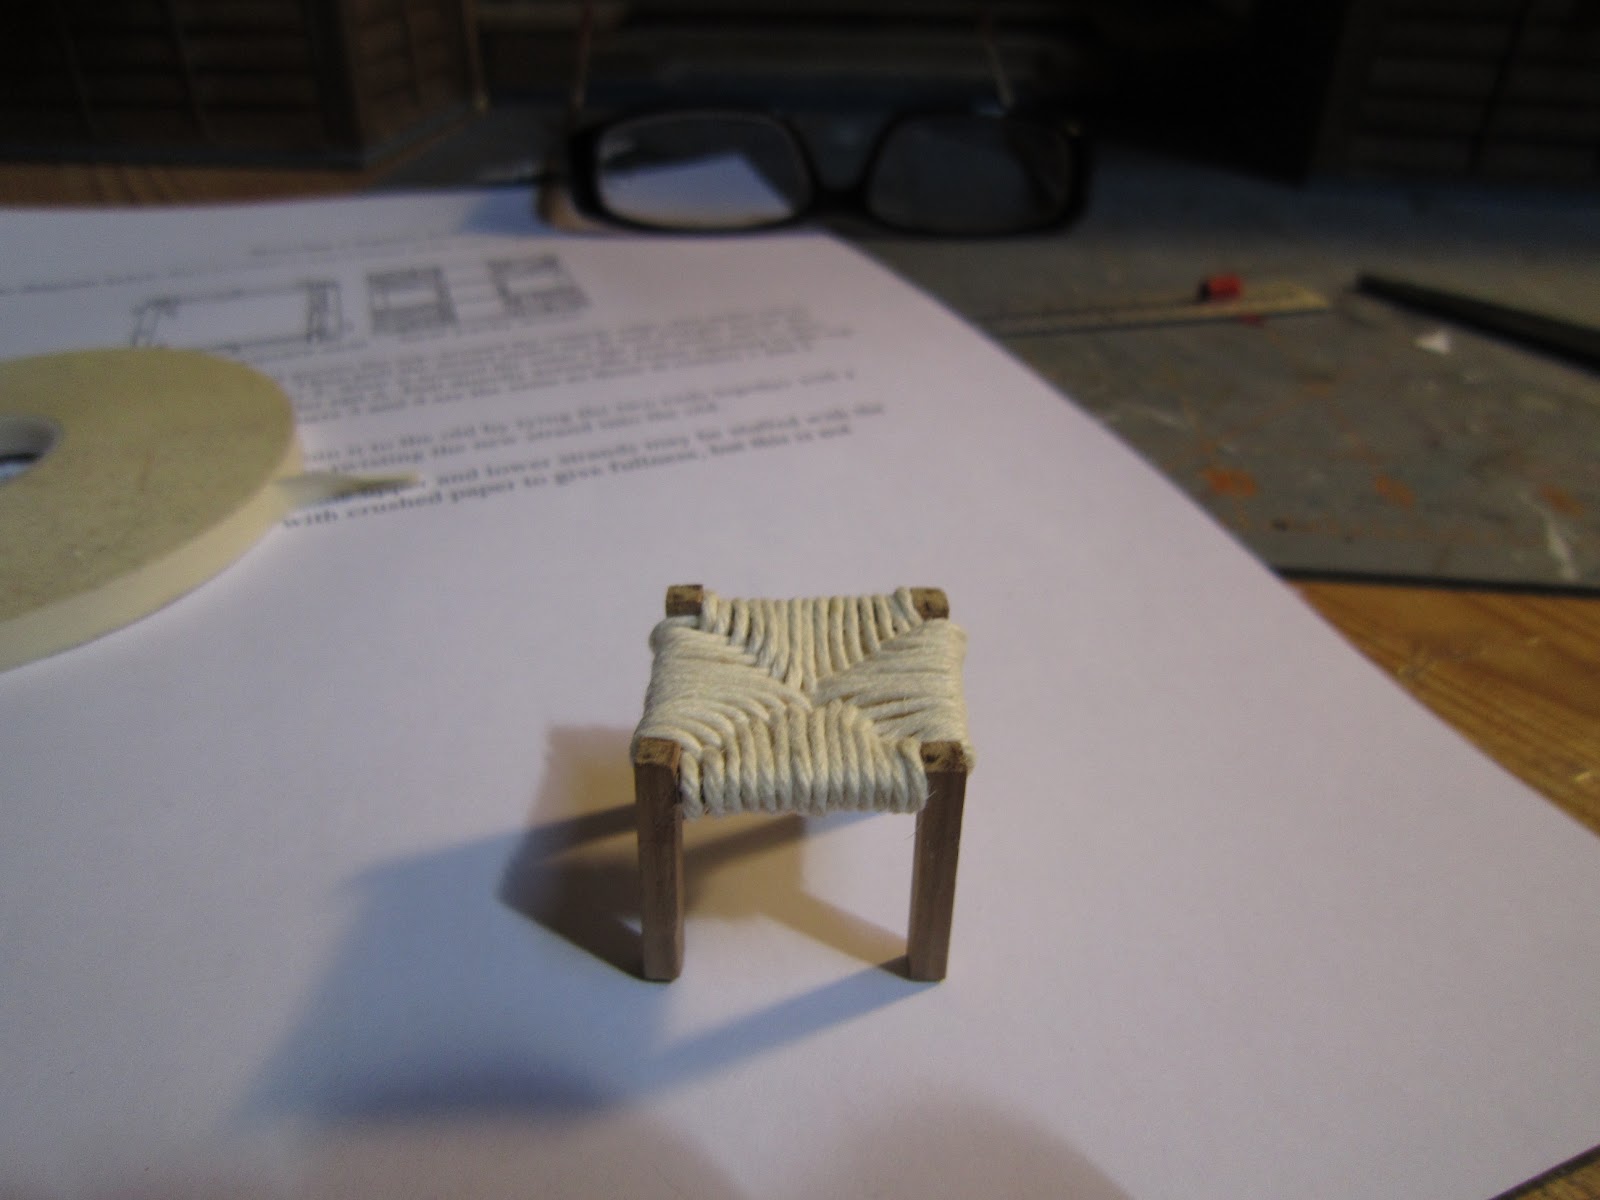
The Spa really doesn’t have anything that I purchased in it. The stools and buckets were part of the kit as were the geta.  The changing area cabinet (with the kimonos I made) along with the scale and sink came with the kit.  The only purchases were the little laundry basket and the medicine cabinet over the sink.  I bought quite a few little objects from Doll House Emporium and they have great service and quick delivery.  The cabinet is a bit big (as DHE has mostly 1/12 scale) but I’m thinking I’m going to pull it down and weather it a bit.  Plus I want to fill it with medicine cabinet essentials.  But that’ll have to be later.  I'm also thinking of adding a little shower head to the right mostly because technically you are supposed to be clean before you enter into the spa pool.  It's not a bathtub - so I pretty much need a shower area in here.

I'm contemplating adding a shower head to the right.

Spa changing area

You can see the medicine cabinet above the sink.

View thru the spa window


The entrance hall has quite a few pieces which were part of the kit and needed construction.
Cabinet, desk, TV and the bonsai on the right.


View up thru to the first floor.
Cards for guests and little Evil Eye Charm
The large cupboard in the back, the front desk, the chairs, the TV and the screen were all part of the kit.  The clock on top of the cupboard was a DHE freebie with a purchase so I stuck it there.  The bonsai was also a special purchase from DHE.  They are issuing replicas from Queen Mary’s Dollshouse and they started with the Queen’s bedroom.  The bonsai was a 1/12 scale but I think it looks fine in the entrance.  I had to add some moss and greens to the vase as it was a bit ugly and unfinished but it looks great now.  The cards on the desk were a freebie from Japanese Miniatures off of Ebay. I bought many little kitchen items from her site all of which we can see in the kitchen.  The little black and white kitty on the desk is actually a pocket charm to ward off evil.  I found it in a shop in Florence that sells Japanese objects of all kinds.  I also found fabrics which I used to make the futon bedding and chair pillows and origami papers there too.  (I’d like to got back and buy some washi tape to use in my doll constructions - but that’s for later...)  The little paper lamp comes from Jim's printables page.

The kitchen is full of stuff that was from the kit (back and right side cupboards, wooden shelving, sink and stove) but many things I ended up making myself.

Coal and burnt ember container for cleaning
Lots of fun stuff in the kitchen. Mr Sparkle too!
The butcher’s block and knives, the ice box, the aluminum top table and stool I fashioned on my own.  The fruit and veg were purchased from Superminiatures who also had great quick service.  The bowls and bento box as well as the sushi board on the table were from Japanese Miniatures and the fish and knives came from Superminiatures.  The wok, pots and pans and wall mounted cups all came from I Love Miniatures who also gave me some free 1/20 scale Japanese 50’s style posters and calanders as their freebie.  Everyone is very nice about giving extra little things to add to the details of your project.  The mirror, coal collector (which is actually a slop bucket!), milk bottles and carrier were all purchased from DHE.  The food stuffs, boxes and cartons of juice and milk were made from the printies pages (either Jim’s or Jen’s or the Japanese Rainy pages) or I created them myself (see Mr Sparkle from The Simpsons). 

So, at this point, the ground floor is pretty much complete.  The kitchen still needs a few items to be attached and I want to make a rice paper globe for the spa ceiling light.  Plus an upcoming chapter has a paper and wood lamp which, if easy enough, I will reproduce for a few more rooms and replace the printie one I have in the entrance right now. 
Ground floor nearly complete.
The lighting is temporary still because I still need to wire the third floor and bring the wires down the back of the house to the ground level.  So, the back of the house is still a mess with missing boards and wires hanging out all over the place.  Not only that, I am still trying to figure out how to make a permanent table to put the house on.  I'd prefer it with wheels so I could move it around if I had to.  I have plans to make an outside garden area and an area right outside the kitchen where garbage and trash is left for pick up as well as an area for pickling vases. So I have plywood to install the house on, just no clear idea yet on where or how to install it.  I am trying to get my wandering mind organised and even purchased a trolley from Ikea for around E39.00 to get all the tools and paints organised.
Loaded Ikea trolley
Now if I could only do it with my mind ! I think I need a dollhouse journal so I can write down all the ideas that flash at me - I'm so afraid of forgetting!

And I’m still not done with my purchases or my own additions outside the kit.  Upcoming projects will be a rolled up futon for the music room on the 1st floor as well as loading up the table there with all the sushi and food stuff I already purchased.  And I have actually commissioned a stain glass room screen for that room which hopefully is being shipped soon.  Two flower boxes are in the works so will post once they are complete. It's all a viscious cycle in the end.  One thing leads to another idea which leads to another.  Now I know what they mean when they say you never really finish building a dollhouse.

Tuesday, June 26, 2012

Intermediate Work - Small Kitchen Stool


Cutting pieces for creating the stool.
June 25-26th 2012

Still navigating and making some purchases.  I bought some minis from the Dolls House Emporium and they arrived fairly quickly.  The objects are a bit big but I can adjust as usual to fit where I need them.  I did find a great handled bucket that will be the coal bucket (since I just couldn’t find a smaller version in the right scale of a real coal bucket...) 

Also, I have been looking at lots of sites and pictures of Japan or other miniatures.  I came across these cute little stools with woven seats.  So, of course, I put more time in and found how to actually weave this seat.  On this site, there are lots of explanations on how to weave chair seats.  I went back and forth whether or not I wanted to use kitchen string or cotton crochet thread.  I figured in the long run the string was best since it’s stronger and easier to weave.  I think it looks very nice in the kitchen.
Weaving test.  I ended up having to let the glue set up overnite as the weaving was distorting the legs.

Weaving done.  Just had to add additional bottom rungs.

Stool in the kitchen.  I think it's very cute.