Showing posts with label shingles. Show all posts

Saturday, August 9, 2014

Chapter 89 - The Awnings to the Left Side Porch Second Floor, Attachment of Porches


2nd August - 9th August 2014

Shingle time.  Not too pleased but, like the last chapter, these will be the last time of doing  something tedious.  So, I really can’t complain.

I started out by having to dry fit the awnings and sand down one of them to fit between the left and right awning.  The last porch they fit without much trouble.  This one was very much off and required quite a bit of sanding.  Anyhow, with that done, I measured out the underbeams, glued them in place and trimmed the corner beams to fit the larger diagonal beams - just like last time.  I then painted the awnings and beams plus half of another sheet of shingle and left them to dry.  I decided to paint the top of the awning a little too since sometimes the shingle peels off a bit and you can see underneath.  Since that was where the shingles would be applied, I had to be sure the awnings were bone dry before I started to apply any shingles.  So I left them for quite a while before embarking upon the dreaded shingling.  Courage. The last ones.

I cut up another sheet of wood into shingles and began application on a Sunday night. Just this first row on the longest piece takes approx. 15 minutes.  I completed the shingling on Tuesday morning.  I then mounted the awnings over the porch (the one side I trimmed had a pretty massive space but it would be covered with more shingles anyway so I wasn’t too stressed about it) and left the pieces to set for a while.  Once they were well set, I added the underside beams and the top corner shingles to finish the porch. Now on to the next big hurdle - attaching the porches!
This row took me 15 minutes to create.
Finished awnings.
Finished (and final) porch.
The first thing I had to do was to empty the second floor rooms of all non fixed objects (objects not glued in place).  Then I had to fix the hinges to the two porch sections.  The pre-made spaces were not wide enough (which was strange since all the other porches the hinges fit into the space without problems - as far as I remember anyway) so I had to find a way to sand down the inside edges without damaging the rest of the internal porch walls.  I ended up scratching one a bit but I suppose it was minimal.  I then retouched up the surfaces that were sanded and installed the hinges.  I drilled holes first with my dremel type drill (as I remembered from experience that the wood screws provided with the kit were crap so pre-drilling was a necessity if I wanted to be able to screw into the wood without much effort) and attached the hinges.  It took me around 15 minutes since, for some reason, my hands were shaking more than usual that morning and I had a tough time lining up the tiny screws into the holes (when will someone make a tiny magnetic screw driver?! They make full size ones dammit!). 
The next step was to clear off my table so I could remove the second floor and place it there for easier attachment.  I used my cutting matt to even out the bottom (since the underside of the floor had the insertion pieces attached which accounted for a few mm difference between the actual flat edge of the floor and how it sat on my table) and checked the edges with the hinges.  The left porch seemed to match up better than the right.  I applied some double edged tape to the facing side of the hinge, lined it up with the left room’s left edge beam and made some marking with the drill bit.  I then removed the porch and drilled the holes.  The only mishap was that the vibrations from the drill caused the left room awning to detach, the back wall to detach (along with the pit support beam) and the “glass” in the bathroom to detach.  So, I got hung up reglueing and leaving things to set before I embarked on the actual porch attachment.
Sanding the hinge space to fit.
Drilling the porch holes.
Screwing in the hinge.

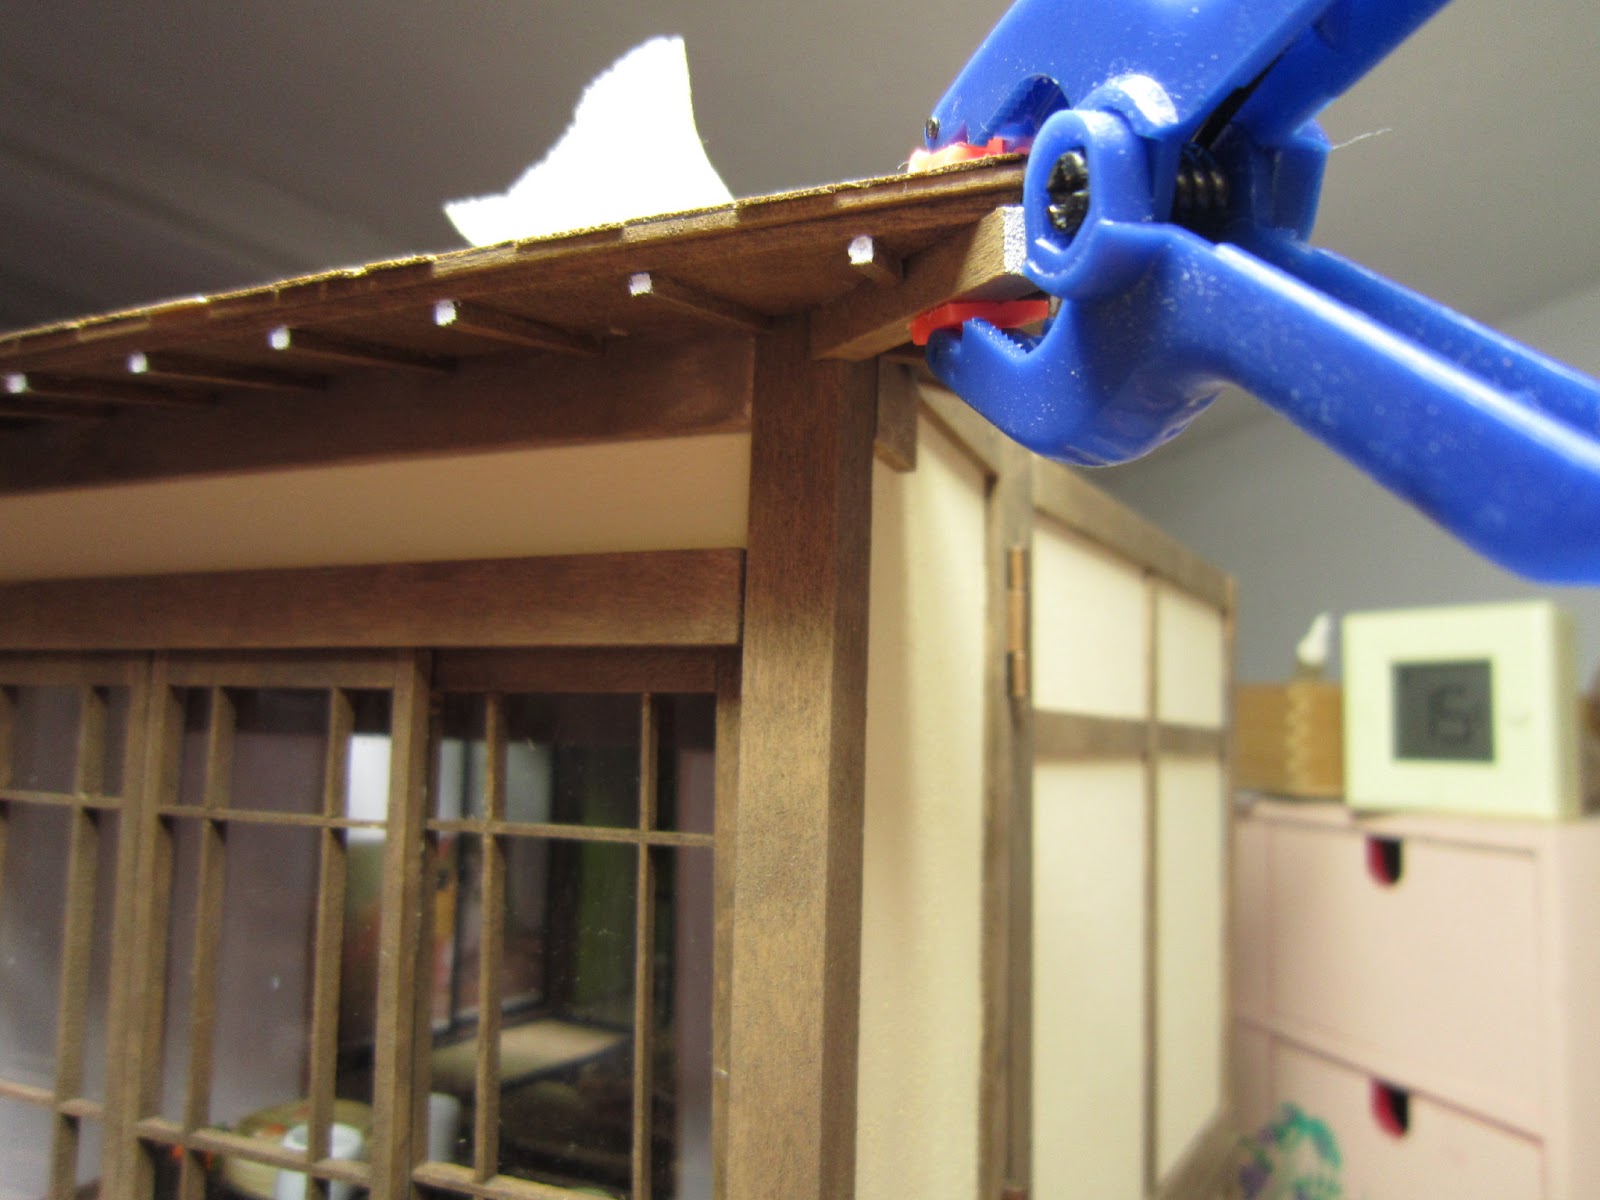
Adding a bit of double sided tape to help line up the floor with the porch

Drilling the holes in the fire pit side for the porch attachment.
Damage and repair caused by drilling vibrations for the holes in the side beam

More repairs and waiting for glue to dry.
In the meantime, I worked out how many LEDs I had left.  I wanted an extra one in case I couldn’t get the 12v LED in the outside area to work and I ended up with two extras.  I needed to drill some holes in the hallway ceiling (contemplating putting two LEDs in there together as it’s supposed to illuminate the entire stair well) and a hole for the fire pit room’s ceiling lamp.  The down time also gave me a moment to cut out a small lamp to put in the buddha room (behind the screen - I just didn’t like the naked LED behind there).
Once things were dried, I attached the left porch.  I used some wooden pieces placed under the porch to help match up the drilled holes.  Then, with a ton of patience, I screwed in the screws.  While I was doing that, the right hand wall of the buddha room unattached.  So, I had to reglue that wall and wait for it to set too.  The porch attachment was turning into a two day job.  The next day, I attached the right hand side porch with a lot more difficulty.  The double sided tape to help the hinge attach and give me an idea of where to drill was not working out that well.  But since the entire floor was on the work table, I was able to estimate where to drill.  The last time vibrations caused a lot of damage so I drilled these four holes with the floor actually sitting on a pillow.  Nothing came unattached.  Now to place the floor onto the dollhouse!

My husband had come up to see what I was doing and gave me a hand in getting the floor onto the first floor and trying to level it out.  No matter what I did, the floor wouldn’t lay flat.  There were large spaces that just weren’t there when I attached the first floor to the ground floor.  I blamed it on the mm pieces that the kit had me attach under the buddha room and the fire pit room.  I think the ceilings from the floor underneath should have fitted a few mm into the actual space but they tended to be flush.  Since they weren’t going to go in any further, I decided to move the floor (and porches) back to the table and try to remove those slats from underneath when....

DISASTER!!!

Holy crap on a cracker!!!
That’s what you get from moving the entire floor structure too often.  It wasn’t meant to be moved as a whole piece so having manipulated it as much as I did it was only inevitable that the whole center piece would give way.  My husband was there and thank god because had he not been there, the buddha room and the attached porch would have fallen on the floor.  As it was, the porches were unscathed and I just had to reglue again where walls and sections had come away.  I also had to rebuild the bathroom.  But this gave me the opportunity to reglue the landing section which had become warped a bit, cut off the mm slats on both the left and right sides (leaving the ones in the middle) and to test fit just a room to see where the actual problem was and why the floor was not lying flush.  Needless to say, I lost more time in completing the final phase of the build.  Best laid plans.....
In the afternoon, I managed to glue the fire pit room into place, re-attached the remaining small door awning and attach the second floor landing to the buddha room.  While that was drying, I finished drilling holes and installing the LEDs in the fire pit room ceiling, the bathroom and the stair well ceiling (which I did in fact end up doubling up on).  I also cut out a another small paper lantern to attach to the bathroom light fixture.  I then (carefully) added the landing and buddha room with ample glue and weights and clamps.... ho hum. Lots of spaces which will have to be “filled” somehow later.  And again left that to set up sufficiently. 
Working on removing the slats the inhibit the floor from laying flat.

Repair work.....
Gluing the landing and the buddha room in place.
Next was to re-attach the bathroom.  The back wall had moved a bit so the bathroom front wall didn’t quite match up flush to the right side buddha room entrance wall.  That meant I had to add some small strips of leftover laminate (from the shingles) to cover the gaps.  I really didn’t want so much light to show through when the light is on inside. 

Positioning the bathroom.
Hiding a gap...will be my legacy.
I think the biggest problem I had with this build was what I noticed from the start.  I purchased the kit and put everything in plastic bins but the heat from my attic and the attic room caused a lot of pieces to warp.  I just don’t have all the tools to fix pieces that aren’t going together smoothly.  One thing I have learned tho is that kits are nice but I suspect very few of them fit together like a perfect puzzle.  I still don’t think the house is too shabby for a first time project!!

Anyway with the bathroom done, the attachment of the second floor was pretty much complete.  I put lots of the objects back into the house keeping the landing free as the next hurdle was getting back to the finishing the steps!!
Opened.  Ceiling pieces will be installed once I install the hanging lamps.
Closed.  Still need to make the bamboo shades for these porches.


Wednesday, July 16, 2014

Chapter 82 - The Awnings to the Right Side Second Floor Porch

July 9th - 16th 2014

The first thing I had to do with the awnings was create some shingles.  I had some left over from the last porches but now I didn’t have many and I had to start from scratch.  First was to apply double sided tape to the back of the shingle material.  Then I had to paint it with a little color to have different tones when it came time to cut and mount the tiles.  While the material was drying, I could begin work on the underside of the awnings.
Adding some stain to one piece to produce darker color tiles.
First up was to apply the underside decoration.  The instruction had me leaving the end pieces off to be cut to fit later but from my previous experience, this was not easy to do.  So I opted to use the method I used before.  Mounting those pieces then cutting away the excess from where the corner beams would fit.  I just had to measure the angle and cut away the excess.  I then sanded and painted the pieces as well as adding white paint to highlight the underside decoration.  Next up was penciling in some guide lines for lining up the shingles as they get applied.  Now I was ready for more shingle production.

Adding the underside decorations...
...cutting away space for later installment of support beams...
...checking the measurements...
...stained and painted ready for shingle installation.
I measured out appx. 1cm spaces and cut the shingle material into strips.  I then cut the strips into uneven 1cm or less shingles.  There were a few old lighter colored ones that I probably can’t use anymore as I don’t have enough to spread out across the awnings.  But I can paint some over a even darker once they are installed - just to even out the overall shingle shading.  I started cutting the tiles then separated them out by color tone.  In this case just the two tones.  Then next was removing the tape off the back of each one and applying each tile to an awning.  Needless to say, this is not fun. I’ve already done two floors of awnings and this step is one of the most boring.  I ended up skipping a few days and went back to work on the tiles on a Monday and completed tiling by Tuesday. 
Next was to attach the awnings to the porch. I used some sticky wax and glue to attach them.  By having the wax I was able to position and then glue in place with at least some insurance that the awnings would not fall off.  Since the porch wasn’t attached yet, it made the installation easier by laying it on its side.
Measuring the cutting lines for the shingles.
Cutting the shingles.
Applying the shingles to the awnings.

Finished shingles.

Gluing the awnings onto the porch.
The last part was to add some tiles to cover the intersections of the awnings, paint the ends white to the underside support beams and touch up some tiles with dark stain. 
Underside supports glued in and painted white.

Corner shingles added.

Porch in place. Not yet installed tho.


The porch will be installed once I complete the other porch.  That way, I can pull down the whole floor and install them using my table.  But I've got another porch to build!!
View thru the porch into the Buddha room.

Tuesday, March 26, 2013

Chapter 60b - Right Side Porch Awnings, The Egg Carrier


March 12th - 26th 2013

The adding of the awnings has pretty much been documented previously.  It’s just a matter of making up the little shingles and slowly taking the tape off the back and sticking them on.  As simple as it seems, it’s very time consuming and boring.  Obviously you have to ramdomize the placement a bit.  I realised tho that at the end of the whole installment, I had made very few ultra-dark colored shingles so I had to just touch up some of the shingles with some darker brown to make the awnings match the other side.  Another change I made was that this time, I cut to size the smaller underside beams so that I wouldn’t have to go crazy afterwards trying to install the larger corner beams on the underside.  This way, I just installed the smaller beams, stained, put on the shingles, installed the awnings, tested the fit for the larger corner beams then stained those and painted the tips white and installed those.  They glued in perfectly.  DONE! (almost as annoying as making the tatami mats....)
Positioning the awnings and sanding to make sure they match up.

Glueing the small underside beams.
Preparing the underneath beams for later installment of the larger corner beams.
Adding the shingles one by one.

After staining, painting the end tips white.


Adding the corner beams. Easier once the smaller ones have been cut to accommodate.

Awning glued in place with corner covers as well.

Finished awnings after adding a few darker shingles by touching up with dark brown paint.


Of course in my internet travels I always come across interesting little details that I can add to the house.  Some months ago, I came across a picture of eggs wrapped in straw.  When finally I ordered some eggs, I wanted to make this little wrapping but of course couldn’t relocate the picture.  After digging around for over an hour on the net, I came across it.  It’s from a book about Japanese packaging.  Even if the book is entitled “How to....” there is virtually no explaination on how to wrap these eggs.  And of course, as I am discovering, I couldn’t find anything upon searching (using every term from macramé to wrapping).  It seems trying to find "how to's" for any Japnese minis is nearly impossible.  I did find the pic tho and figured, “I’m clever...I can do this.”  Ah....arrogance.

After two days of screwing around with these friggin eggs, I had to resort to glueing them in place then working the “straw” (in this case raffia) around the eggs.  Yes, I know.  The eggs are the wrong scale (1/12) but I don’t care.  I still like the final effect.
Inspiration for egg wrapping.

Started by bunching up some raffia....
...then adding the eggs.  I had to glue them in place. I used a piece of acetate underneath so I could easily remove the egg bunch once the glue dried.

Finished wrapped eggs.

Hanging in the kitchen.  They look like ostrich eggs !


And now, I can move on to a few new things.  I want to install the stairs next before actually making more bamboo blinds for this side of the house.  And I have been stressing about actually getting the house mounted onto its base.  I think another trip to Ikea for some kind of table/desk on wheels is in order ?


Thursday, September 27, 2012

Chapter 59 - Left Hand Porch Awnings


Masking tape to hold in place for fitting.
Sanding down one piece for fitting.
September 18 - 27th 2012

This chapter came with the awnings which needed to be fitted onto the outside of the porch.  Fitting was necessary because during the build, the porch is not quite perfectly lined up around.  The instructions had me using double sided tape to keep the pieces in place while I measured and sanded the pieces down to fit.  Course the tape wouldn’t hold so I just used regular masking tape which leaves less damage and holds the pieces on while I sanded then fitted, sanded and refitted etc.


One piece in particular needed some heavy sanding.  It was off by quite a bit.  The trick was to sand to fit the front without distorting the back end.  I had to use the power sander for this one but in the end it seems to fit fairly well.

Next part was adding the underside beaming.  These needed to be spaced about 18mm from each other.  Since the corners need to line up underneath with larger corner beams, I had to leave some spaces on the end to be attached once the awnings are actually installed.  After that, it was just a matter of staining, varnishing and adding in the white tips for the overall decoration. 
Spacing the beams....

Painting the ends of the beams with white.


See through wood!


 In this chapter they gave us a sheet of thin wood paper (for lack of a better word).  The wood was so thin you could see thru it.  First I had to apply the double sided tape to the back, then measure out 1 cm lines where I would cut the wood.  Next was to actually paint some of the pieces darker so I just painted half the board with darker brown paint.  The first awnings on the ground floor we were given white wood board a little thicker than this one.  Consequently, I ended up with quite a few pieces of white shingles.  Something that this piece doesn’t have.  Luckily I saved all the other shingles as well as a sheet of the wood unstained.  Also because in the instructions, they say to stain the cut 1cm strips.  But I learned that this tends to bow out incredibly and I ended up with most of the shingles bowing out (and I still don’t know how to fix that) on the first floor awnings.  It looks rustic and I may play with that look more but I figured if I could get these shingles to lay down flatter it would be better.  Hence painting before and then flattening it under the cutting pad until dry.  Then cutting up the shingles into individual pieces.  It seems they were less bowed so this will be the procedure from now on.
Double sided tape underneath.

1cm height measured out for cutting.
Stained and then.....
...flattened.

Cut up strips around 1cm each, then irregular sized shingles.
Sorted by color for easier application.


Placing the shingles.  A little uneven is nice.
Finished awning.


After painting and cutting them into various width pieces, I began attaching them to the awnings.  The time consuming factor was simply peeling the tape off the back.  It was a total pain in the ass.  The tape never came off cleanly.  So, after a week of peeling, I managed to complete the 4 awnings.  Since they met up sort of off (with too much space) I decided to actually apply a few shingles over the junction of the awnings.  A little glue and masking tape to hold it in place over nite and the trick was done.


Masking tape to hold the awnings in place overnite.

Glue to hold the filler shingles.
Filler shingles did the trick.  Much cleaner.


Clamping the larger underside beams overnite.


 The underside just needed the larger beams and fill in small beams (with painting the tips) and this chapter was complete.  It really was hard to match up the awnings - I even have them off a bit on the right - but instead of unattaching everything that is the way it’s gonna be!

Finished port awnings! Only took a week!