February 6th 2015
Hello all!
Apologies for not having blogged in a while. Full sized life took over for the past few months and I've been unable to partake in my mini hobby. Not to say that the ryokan house is complete (I wonder if it ever will be) but it's without a doubt nearing the final phases.
As per the previous blog posts, I added the roof and made the ryokan sign which was the final chapter of the kit. I still have a few things I want to build and add to the back of the house but I have only just returned from the States having spent some time with my Mom. She was recently diagnosed with a terminal illness and has gone through all manner of hell just trying to maintain some semblance of normalcy. I am very happy that I was able to spend time with her and my Dad and help them transition a little into their new reality. The roller coaster isn't over yet. And there will be many more painful moments. I am sad I cannot be physically closer to them and my siblings. It's not easy being so distant. Wishing that someone had invented a Star Trek transporter. Then I could split my time between my family in the States and my husband and son here.
In any case, I was contacted last November by The Dolls' House Magazine as they wanted to do a little photo op and write up on the ryokan house. I have yet to see the magazine (perhaps it will arrive soon) but given that the Buddha Room actually made the cover I am hopeful that the write up and the photos did the ryokan justice. I was actually really surprised that it made the cover. I still see so many errors on the construction but I have to remind myself....it is the first time I've actually built a project of this kind. I've learned so much! And it has been a fantastic journey.
I think I will be sad when it's finished...sitting up here in my cold attic room. I can't move it anywhere else right now. So the next project just won't be so big!! Of course I already have another project in mind. I've been holding off so I wouldn't neglect the completion of the ryokan. But I can see the day coming when I will tackle something new. Hopefully it will be as challenging as this project has been.
Thanks all for following the construction and hope you will check out the magazine too!
As usual, onwards and upwards (because you can't go backwards).
Step by step construction of a Dolls' House Kit (Ryokan - Japanese Inn with a Spa)
Friday, February 6, 2015
Wednesday, November 26, 2014
Additional Work : Miso Barrels, Whisky Barrels, Soy Barrel, Water Barrels and Spa Barrels
November 21st - 26th 2014
When I purchased the walnut cleats from the Italian mini shop, I also purchased some small barrels that I wanted to use in the storage area of the kitchen. I wanted the barrels to contain some things that were common use but also unique. I found some pictures of some pretty cool barrels for miso (a kind of soy paste used in cooking) and a Japanese whisky (altho not the one that has been in the news recently). It seems odd but this whisky brand has been around quite a while and perhaps the inn would have a barrel or two for their VIP guests.
First I found some labels that could be transferred to the barrels. Next was finding the best medium for transferring them. I printed the labels out on paper and a transparency both on the laser printer and the inkjet and set about making some tests. All the tutorials I read required certain solvents (Citra Solv which I have no idea what that is and it’s not available in Italy, acetone, etc) or products like Modge Podge which are not available here either. So in reading the tutorials on how to transfer, the only thing that stuck with me is what can dissolve the printer ink onto a porous surface. I tried printing off my laser printer onto paper then placing the image on the wood and wetting the paper with acetone, then rubbing. Wrong. Not even one small bit of toner ink came off. So that failed. I then tried using the acetone on the surface and trying to transfer the toner ink from a transparency - nothing. So my toner ink is pretty non soluble.
Next was testing the inkjet on the transparency.
Clearly the ink is wet so you have to be super careful not to smear it (hence why I printed off many little images) but the size of my barrels are so small you really can’t see details once some of the ink transferred over. I did discover it was best not to moisten the barrels as the ink just ran and clouded the image. So, on the miso barrel, I finally got a few transfers to show up. The soy sauce barrel was a total loss. So I printed the page out again on calligraphy rice paper and attached the labels to the barrels with water and glue. As the paper dries, you can see the printing through the paper a little. Since I couldn’t see enough for the soy, I reprinted it on the other side (still with the toner ink) and then decoupaged it onto the barrel. So, overall it was not a total loss. In any case, all the tutorials about transferring images to wood are a bust for small pieces. There just isn’t enough possibility to get good detail.
Next was decorating the miso barrels. One barrel has stones on top (found photos on the internet that showed how they press the fermenting paste by setting stones on the lid) and one of the barrels is open for use in the kitchen. I used some acrylic paint to color a mix of glue and sand to create a paste-like mixture that I then spread onto the top of the barrel. I made a small spatula and inserted it into the paste. The final effect is quite cute.
I then pulled out the changing room’s wardrobe so I could add some obijimi - obi belts - to the kimonos nestled there. I just cut and glued some small colored ribbons. Just a small detail that I wanted to add for a while and finally got round to it.
Next I made a few buckets for the spa and water buckets for the irori fire pit room. I also painted one bucket red to put into the Buddha room as a decoration. Red sake buckets are given during wedding ceremonies so I thought maybe a bucket would be used up and then placed as a decoration in one of the rooms. It’s cute and small. So I was sold. I painted “water” in kanji on two buckets which I filled with “water” (liquid Fimo) and baked for half an hour in a low oven. I let them cool then finished aging them. I then placed one in the irori room and one in the kitchen near the stove. I then also placed the miso barrel in the kitchen and the whiskey and soy barrel in the storage area. I think they look pretty good.
It’s now Christmas time as I write this (well, really the day before Thanksgiving) so all the manger accessories are out in the stores. Often you can find a few little objects that work well in scale but you have to go within a day or two of the displays being put out because the cool objects disappear quickly. Anyway, I found a set of tubs (buckets for a manger scale but for me they will be tubs) and cleaned them up a bit, painted them and varnished them. I used a gold paint pen to trace a small band of “metal” round the outside. I’m not quite sure what I will do with them yet but they are definitely going in the house.
Anyway, real life is crashing down on me of late. My next idea is for the back of the house but I have to plan it out and I’m not really concentrated right now. So, perhaps after Thanksgiving (which I am going to celebrate on Sunday).
Happy Thanksgiving to all my family and friends and remember to appreciate your loved ones at least one day out of the year. Eat turkey. Be Happy!!
When I purchased the walnut cleats from the Italian mini shop, I also purchased some small barrels that I wanted to use in the storage area of the kitchen. I wanted the barrels to contain some things that were common use but also unique. I found some pictures of some pretty cool barrels for miso (a kind of soy paste used in cooking) and a Japanese whisky (altho not the one that has been in the news recently). It seems odd but this whisky brand has been around quite a while and perhaps the inn would have a barrel or two for their VIP guests.
First I found some labels that could be transferred to the barrels. Next was finding the best medium for transferring them. I printed the labels out on paper and a transparency both on the laser printer and the inkjet and set about making some tests. All the tutorials I read required certain solvents (Citra Solv which I have no idea what that is and it’s not available in Italy, acetone, etc) or products like Modge Podge which are not available here either. So in reading the tutorials on how to transfer, the only thing that stuck with me is what can dissolve the printer ink onto a porous surface. I tried printing off my laser printer onto paper then placing the image on the wood and wetting the paper with acetone, then rubbing. Wrong. Not even one small bit of toner ink came off. So that failed. I then tried using the acetone on the surface and trying to transfer the toner ink from a transparency - nothing. So my toner ink is pretty non soluble.
Next was testing the inkjet on the transparency.
![]() |
| Printing on a transparency. |
![]() |
| You can barely make out the label... |
![]() |
| The miso label was a little better on a dry surface |
![]() |
| Inspiration - miso barrell with stones on top. |
![]() |
| Inspiration - Miso paste |
![]() |
| My mini version of both. |
![]() |
| Inspiration from Nikka Whisky |
![]() |
| Finished barrels. |
![]() |
| Adding the obijime. |
![]() |
| Water filled buckets for the spa. |
![]() |
| The shower drain with a small bench. |
![]() |
| Buckets filled and non filled for the spa. |
![]() |
| Two fire fighting water buckets and the red used sake bucket. |
![]() |
| Whisky, soy and miso barrels in the storage space. |
![]() |
| Buckets placed in the spa. |
![]() |
| Miso paste barrel in place and water bucket at the far right. |
![]() |
| Manger buckets will become tubs in my house. |
Happy Thanksgiving to all my family and friends and remember to appreciate your loved ones at least one day out of the year. Eat turkey. Be Happy!!
![]() |
| Super cute pie miniature you can find on Etsy. |
Labels:
1:20 scale,
buckets,
deagostini,
giapponese miniature,
half scale,
japanese dollhouse,
miso barrel,
miso paste,
nikka whisky,
obijime,
ryokan dollhouse,
shaym00,
soy barrel,
whisky barrel
Wednesday, November 19, 2014
Chapter 120 - Installing the Roof, Installing the Lanterns, The Ryokan Sign
November 18th - 19th 2014
Well, the final big step was installing the roof onto the house. I checked before and noticed that the roof doesn’t lie perfectly flat on the top of the last floor so I applied large globs of glue in the four corners and positioned the roof on top. I figured that the weight will hold it in place and the glue will stop it from sliding. It would be very easy to remove if needed (perhaps for moving the house to a different location?) and then reattach. I think it looks very super
![]() |
| Globs of glue.... |
| Roof is on. Looks crooked to me but that's me overcompensating.... |
![]() |
| The tiny clips that would fit into the tiny drilled holes. |
![]() |
| Lantern in place. |
![]() |
| Tiny bits and pieces. |
![]() |
| Assembled signage. |
![]() |
| Dirtied and in position. |
| Open house. |
| Left side porches and spa changing room. |
![]() |
| Right side porches and kitchen. |
Tuesday, November 18, 2014
Chapter 115, 116, 117, 118 & 119 - Tiling and Peak Finishing Decoration, Painting the Roof
![]() |
| Remaining areas left to be tiled. |
I went back to tiling today. Cutting, sanding and glueing. Hardly exciting but needs to be done. I am working on the back roof of the house now. Lots of tiny pieces to insert into areas that I hope will be covered effectively later (well, not much later). Anyway, I had to finish the back roof areas and then also finish off the last three corners of the peaks. So since I had used some of the tiles previously for the front, I had to open chapter 117 to get more tiles to finish the back and corners. I finished the last two left corners and while the glue was drying, I pulled out Chapter 116 and 118 which were the pieces to finish the top of the peaks of the left and right side roofs.
![]() |
| Nearly finished tiling. Just one tiny corner spot left to be done. |
![]() |
| Chapters 116 and 118 had these pieces for decorating the roof tops. |
Once the last row dried in place, I started adding the pieces that would support the upper peak decorative tiling. It was necessary to use some pieces as filler and glue in place using fairly big globs. Not only that, for the side peaks I made the mistake of thinking I could glue all the layers together and then place them on the roof. Wrong. The pieces are thin and notched to permit you to bend them into place and glue. But since I had absolutely no way to hold the pieces in place (my little clamps had no where to “hold on” to) I was forced to hold them in place for a while or use big globs of glue and my weights and just hope that gaps are not so visible from the front of the house. So again, I lost time waiting for glue to dry. But at least now I know how to proceed for the rest of the roof.
![]() |
| Two side pieces and the top added. |
![]() |
| Creative weighing down to adhere to the curve of the roof. |
![]() |
| You can see the structure of the pieces to allow some bending. Not much tho. |
![]() |
| Adding the corner support. The front of this part of the roof has been painted. |
![]() |
| You can see the difference betwwen the painted tiles (right) and non. |
![]() |
| Painting the roof. |
![]() |
| Painting complete and adding the final covering pieces. |
![]() |
| Detail of the corner, gable and juncture areas of the roof. |
![]() |
| Finished roof. |
Tuesday, November 11, 2014
Intermediate Work: The Back of the House, Lighting Part II
November 9th - 11th 2014
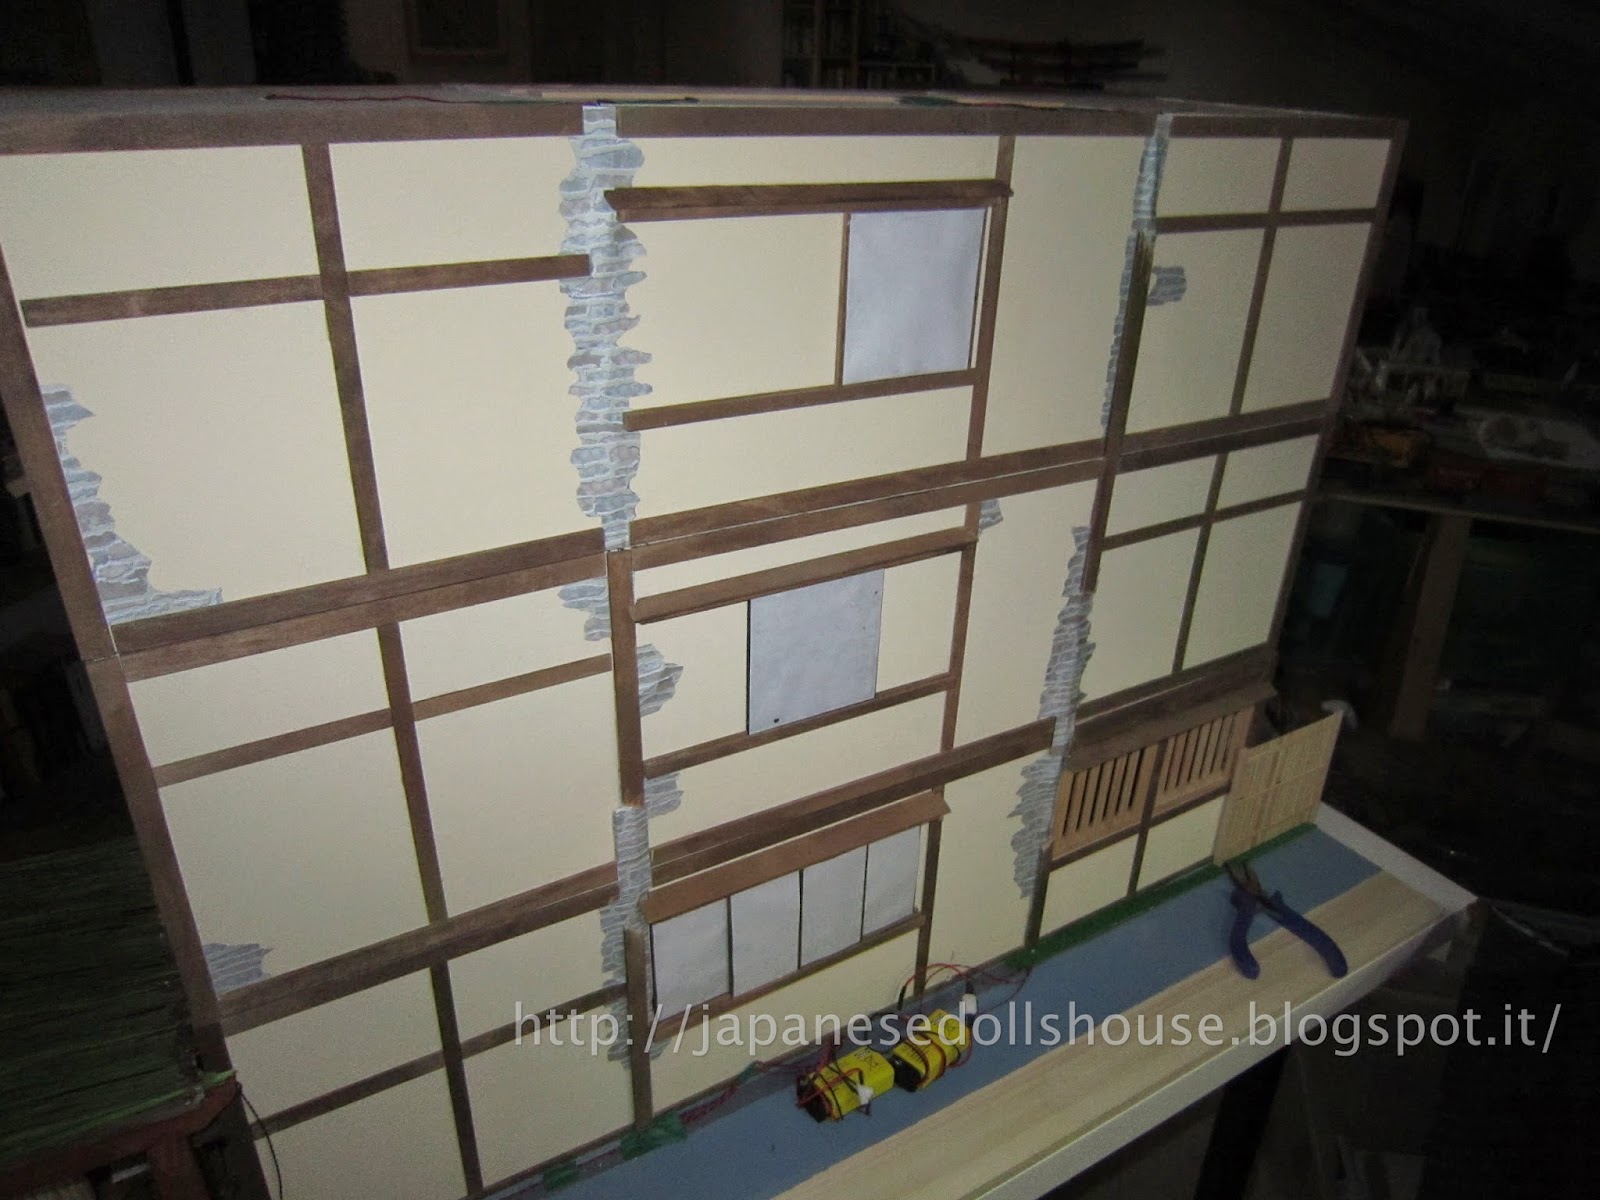
So here’s the deal. When I started the inn, I had an idea that it would be for young people, a bit bohemian. Not five star class if you get my drift. I even had an original idea to make it a Japanese bordello...course, as I got into it I could see that it really could be something nicer instead of cheap. Still, the ryokan, from the start, is a little old and not very well kept. I chose not to varnish most of the embellishments on the walls and to keep areas unfinished a bit. My choice was two fold: first I knew I was going to run into problems in the construction (both for my inexpertise and the fact that many of the pieces were badly warped to start with) so I knew the rooms and whole house would have gaps or fit together imprecisely and second, it was my first dollhouse. There was no way I was going to do justice to a beautiful five star ryokan. So, my inn is for everyone. The young the old the hippie....all are welcome! Which brings me to the back of the house.
The kit never was really set up to actually show the back of the house but I didn’t like that idea. I wanted to do something there too. Like a behind the scenes stuff going on in the alleyway kind of area. So, I purchased some stone work printed paper to use to attach or glue on the external walls around the house - exposed brick as it were. Knowing also that I had no real way to effectively hide the electrical wires, I figured I’d use this paper to create where the ryokan is pretty much falling apart - at least in the back. From the front, it looks fine. But we know that the ryokan is in dire need of repair. I used the double sided tape and attached paper over the wiring. All of this can be easily ripped out when the LEDs finally give out and need replacing (of which I have NO idea how I may mange that!) and I also cut some of the wooden beam decorations to show they had also split and fallen away. I will add broken bits of beam all along the bottom of the back sidewalk. Like they are holding them till they get a chance to renovate the exterior.
Once I cut to size and shape, the back walls of the house were done. I added the last two mini awnings that went over the second and first floor center windows. And I added a few more random exposed bricks on the back. Fun.
I also added a few more posters and welcome signs to the inn. One that’s most important was the “no tattoo’s allowed” sign outside the onsen spa. I guess in Japan tattoos are frowned upon (due to them often being a mark of mafia affiliation) so I added that - plus a how to behave in the onsen sign on the inside wall of the changing room. Now we all know how to behave!!!
Next was making the garbage receptacle to hide the batteries. I had seen a really nice version in one of the pages that came with the kit (same place I got the inspiration for the rackets and the umbrella stand and even the kimono stand!) and I just liked the overall look of it. So again I used scraps to construct it.
The outside of the scale one is made of some kind of concrete. So, I cut some wood to size and glued it together. I then added a few decorative pieces to the sides and front to simulate a heavier concrete container. Next up was covering it in a simulated concrete surface. I watered down some glue, spread it lightly over the surfaces I wanted and then sprinkled some very fine sand onto it. That made the surface rough. I know that they actually sell paints which have sand particles premixed but right now I really can’t afford to be spending money on stuff I’m only going to use this once now. Then I had to let it dry before applying the grey paint. I mixed up some dark grey and white and painted the sandy surface with some of it. I must say, it does simulate concrete fairly well. I then painted the top and the embellishment pieces a terra cotta brown (I used some leftover shingle sheets from the kit to construct the top and the front) and the trash bin was done!
I added some grass the the edges where the wires run while I was waiting for paint to dry so that it looked acceptable in the back. Eventually I will add some rubbish bags around the trash bin.
And as a final touch, Bansksy struck!! While I was waiting for paint to dry overnight, the next morning I awoke to find that Bansky had visited behind the ryokan leaving his mark in the homicidal panda. Little bastard! Now someone will want to cut away a piece of the back wall and sell it at Sotheby’s!
Anyway... wiring and back of the house - DONE! Back to tiling!
So here’s the deal. When I started the inn, I had an idea that it would be for young people, a bit bohemian. Not five star class if you get my drift. I even had an original idea to make it a Japanese bordello...course, as I got into it I could see that it really could be something nicer instead of cheap. Still, the ryokan, from the start, is a little old and not very well kept. I chose not to varnish most of the embellishments on the walls and to keep areas unfinished a bit. My choice was two fold: first I knew I was going to run into problems in the construction (both for my inexpertise and the fact that many of the pieces were badly warped to start with) so I knew the rooms and whole house would have gaps or fit together imprecisely and second, it was my first dollhouse. There was no way I was going to do justice to a beautiful five star ryokan. So, my inn is for everyone. The young the old the hippie....all are welcome! Which brings me to the back of the house.
The kit never was really set up to actually show the back of the house but I didn’t like that idea. I wanted to do something there too. Like a behind the scenes stuff going on in the alleyway kind of area. So, I purchased some stone work printed paper to use to attach or glue on the external walls around the house - exposed brick as it were. Knowing also that I had no real way to effectively hide the electrical wires, I figured I’d use this paper to create where the ryokan is pretty much falling apart - at least in the back. From the front, it looks fine. But we know that the ryokan is in dire need of repair. I used the double sided tape and attached paper over the wiring. All of this can be easily ripped out when the LEDs finally give out and need replacing (of which I have NO idea how I may mange that!) and I also cut some of the wooden beam decorations to show they had also split and fallen away. I will add broken bits of beam all along the bottom of the back sidewalk. Like they are holding them till they get a chance to renovate the exterior.
![]() |
| Preprinted stone wall paper. |
![]() |
| Cutting to size to hide the wiring. |
![]() |
| Cutting more pieces to size. |
![]() |
| Finished back with broken beams and exposed brick. |
![]() |
| No tattoos allowed!! |
![]() |
| Changing room now carries the "how to's" of the onsen. |
![]() |
| Outside welcome (blessing) sign. |
![]() |
| Inspiration for the trash bin and place to hide the batteries. |
![]() |
| The design and cut scrap pieces |
![]() |
| Testing the fit. |
![]() |
| Batteries fit in fine. |
![]() |
| Adding some light decorative pieces. |
![]() |
| Painting the concrete. |
![]() |
| Finished dust bin. |
And as a final touch, Bansksy struck!! While I was waiting for paint to dry overnight, the next morning I awoke to find that Bansky had visited behind the ryokan leaving his mark in the homicidal panda. Little bastard! Now someone will want to cut away a piece of the back wall and sell it at Sotheby’s!
Anyway... wiring and back of the house - DONE! Back to tiling!
Subscribe to:
Posts (Atom)