Showing posts with label shoji. Show all posts

Friday, August 1, 2014

Chapter 88 - The Railings to the Left Side Second Floor Porch, The Shōji

1st August 2014

This chapter had the completion of the last of the shōji doors and the outside railings. 

The shōji went together as usual - quickly - now that I know how to do them.  I installed them (again, after discovering that I had glued in the top piece instead of just taping it in place - ouch - easy to remove tho) fairly easily and the upper piece didn’t even need any sanding this time either.  Must have been payback for all the previous times sanding my butt off.  Anyway, they slid into place, I added the final two on the inside and the holding piece.  Complete!


Last of the shōji.
View of the shōji backlit.  You can see the leaf watermark.
Next were the railings which I will not go thru again step by step as I already did them here recently.  Suffice to say that this time I painted the pieces before putting them together.  It meant that I had to gently hammer in some of the pieces into their corresponding slots (the paint caused the wood to swell just a fraction) but everything went together smoothly.  I then varnished them and glued them into place.  Now just the awnings.
Finished railings.
I had three of these boxes when I started.  These are all that's left of the kit's chapters!

Tuesday, July 8, 2014

Chapter 81 - Bannisters and Shōji for the Right Side Second Floor Porch

July 7th - 8th 2014

I started first by trying again to install the front porch windows.  This took a lot longer than I thought as I had to slowly sand down the one piece that fits the inner sliding windows.  All of my windows (and doors) slide.  I wasn’t about to give up on this one porch because the doors were so tightly fitting.  So after a few millimeters of sanding, testing, sanding etc. I finally got the windows to fit.  Now I just had to glue the beam in place and let it set.  You can see in the foto where I had to sand down so much but this part is actually hidden when I install the outside panes.  So I wasn’t too concerned with it being clean or perfect.  Just the windows had to slide! 
Gluing the cross beam after massive sanding.  You can see the uneven edge.  It will eventually be hidden.
Next was making the final two shōji doors.  They went together quickly.  I didn’t like my leftover shōji paper so I cut some new pieces that would look nice when light shines behind them.  After gluing them to the back of the door, it was time to mount them to their sliding beam.  I had mounted the previous windows backwards since, like the front porch windows, the back side windows get installed before the front ones.  It’s because there is a running piece of wood that fits across the top of the windows and holds them in place.  Different from the front ones which need to be inserted into their respective slots above and below for them to fit (which is why I had such a hard time with the front porch windows).  Anyhow, since the final piece just gets glued across and holds them in place, it was fairly easy to install from the inside of the room (although had I done it right, I’d be installing from the outside of the room - so...I screwed up! What can I say.  I had done two porches already and I guess I forgot this detail...) so I painted the piece and installed the shōji by dropping the final piece into the room and positioning it in place.  I tested the windows to be sure no glue had gotten inside the sliding area.  They slide just fine! So since the porch was laying on its back, I then installed the front porch windows dropping them into place and gluing the final piece across to hold them.  Success! And they DO slide!
The two shōji windows.

Fitting the top cross beam which holds the doors in place.
Finished shōji doors.  They DO slide.
Adding the upper cross beam to hold the windows in place. And these slide too!
Next up was the bannisters that get installed on the outside of the porch.  There are a few steps that add to the overall look of the ends of the bannisters so I had to glue small pieces in place that then needed to be sanded down to shape.  So I had to glue then leave the glue to set before shaping the ends.  Once set, I sanded them down to shape, glued them in place, painted the bannister, varnished it and installed the bannisters into position on the porch.
Top before shaping, bottom after.

Bannister ready for varnishing.
Onwards! I’m on a roll! (See what happens when you have extra hobby time!)
Porch nearly completed.  Needs just the awnings.

Sunday, January 26, 2014

Chapter 76a / 77a Partial - The Windows and Shōji to the Right Porch, The Kadomatsu

December 27th - 26th January 2013

The past month has been very busy and somewhat stressful.  I am still laid off.  I am not very motivated to do much of anything at all.  Yet today, 26th January, I woke up with the realization that technically, I am already 50 years old and I haven’t got all that much time left to complete all the projects I have started.  What will happen to them once I am gone I do not know.  But dammit, I owe it to myself to finish them.  So, onwards!!!

I had decided to jump into some of the future chapters to pull out the pieces to make the windows and the shōji for the porch.  I just didn’t feel like painting up more pieces during the holiday weekend leading up to New Year’s so just wanted to do something less challenging and more satisfying.  I actually enjoy installing the windows and shōji.  That was pretty easy and finally I actually got to use the shōji paper I had purchased at my favorite Florentine shop Ajisai.  The paper is gorgeous.  The watermark will make such a difference once the lights are installed.  I only wish I had this paper when I had done the other porches.  Well, the last two will have the actual correct paper!
Shōji window frames.

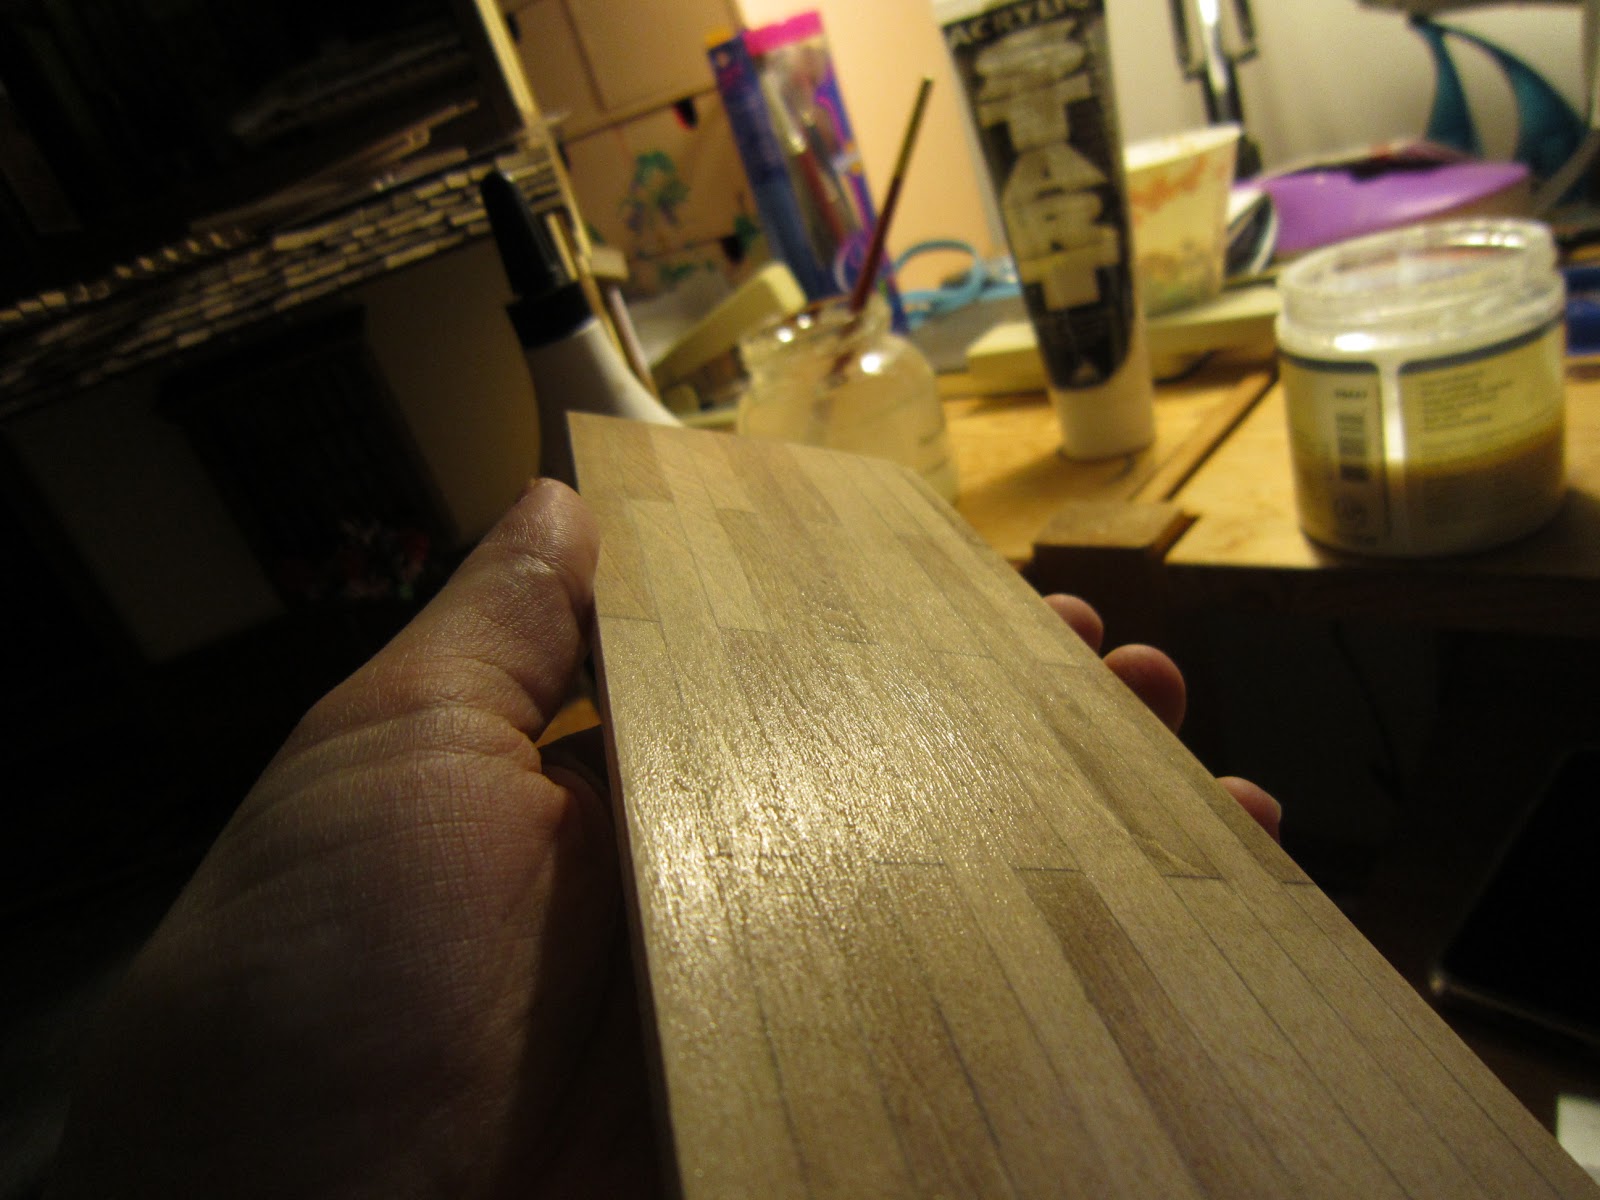
The shōji paper. You can see the watermark.
Shōji paper in place.

Fixing the first two of four shōji.
I installed the two (out of four) shōji doors and then moved on to the porch windows.  The upper wall area was a total pain to fit (as usual) and only after finishing one window did I realize I was going to have to drastically sand down this piece.  So, at some point after the New Year, I did just that.  Note that I have lots of manual problems when I am working.  I had cut myself badly whilst preparing the New Year’s dinner (nearly taking off the tip of my left index finger) and ended up having to bandage it for over two weeks.  I had just taken off the bandages and was working on sanding down the piece to the window on the porch and of course, the dremel sander slipped and I took off a big chunk of the same finger’s knuckle.  Bleeding again.  The disadvantage of having MS is that often I cannot gauge the actual time/space continuum and end up thinking a knife or tool is a few centimeters or millimeters from where it actually is.  Hence the chopping off of bits of my fingers.  The advantage is that there is a lot less pain involved (reduced sensation) once the cutting has happened.  Which can also be bad since until I see blood, I have no idea that I’ve cut myself.  Anyway..... working along with my dremel and bleeding off a knuckle, I did manage to sand down the piece sufficiently to fit in the windows which, once sized correctly, slid into place.  Done.

The upper small wall area was the one that needed sanding.

Finished windows and half of the shōji.
Over the holidays, I got a FaceBook notification from an association that I have been following.  It’s the Lailiac Association for Japanese expats here in Italy.  Every year they have a wonderful weekend expo of all things Japanese.  Anyway, they had  posted a few pictures of kadomatsu (or matsukado) which are New Year’s decorations.  They are supposed to be in pairs but I’ll make one this year and one next year.  Hopefully the house will be complete by then.  I cut off a branch from my pine tree and let the needles dry out.  Then I could construct my decoration.
Another example of the Kadomatsu

And example of a Kadomatsu


 I used a perfume bottle top and wrapped it with a little double sided tape.  I then wrapped some raffia vertically and tied it off.  I put some florists’ green foam inside and then cut a green straw in three heights which is doubling for my bamboo.  I painted the inside with a little buttermilk to simulate the inside of the bamboo.  I then bound some of my pine needles and found some other greenery to use and stuck it into the base.  The last bit was some red berry like decoration.  I had some white berry bits and just painted them red.
The perfume bottle top. Adding some raffia.

Adding a little green foam inside to hold the florals
The wrapped vase.
Painting the inside of a green straw

The pine needle bunches

Painting the white berries red.


Taken from a simple explaination:
“The central portion of the kadomatsu is formed from three large bamboo shoots, ... Similar to several traditions of ikebana (Japanese flower arrangement), the shoots are set at different heights and represent heaven, humanity, and earth with heaven being the highest and earth being the lowest. Some kadomatsu place the humanity and earth shoots at the same height.”

Wishing everyone a very healthy and happy 2014.
My kadomatsu outside in the front entrance. Happy 2014!

Friday, December 13, 2013

Chapter 74 - The Shōji to the Second Floor Landing, The Dressing Table

 December 12th - 13th 2013

I have been so busy lately between hosting my usual Thanksgiving here in Italy and then decorating my house for Christmas I didn’t really have time to do any dollhouse building.  The next chapter was supposed to be the fire pit but since it requires a little ingenuity (something I’ve been using too much of lately!) I figured I’d take a break and skip that chapter and take on this one which is relatively simple.

Basically I had already put together a dressing table in a previous chapter and I really wanted to get the back shōji window in so that I could at least place the second floor rooms on top of the house and away from my work table.  So.. that was the plan.

The rear shōji window was pretty easy.  It just needed painting and glueing around the frame then attaching the paper to the back.  The sliding supports were also easy to install.  I did not install the overhang since that would have to be put on once the side panels are applied to the back (and I still need to hide wiring under those wooden panels) so I just put it aside inn my container of pieces to be applied later.  So the sliding back window went together super quickly.
The supports in and back side of the shōji window.

The shōji from inside the 2nd floor landing (next to the bathroom)
The dressing table was also a little easier this time.  Since I knew pretty much where the problem areas were from the last one, I was able to anticipate problems in the fitting.  The cutting to size and double checking the fitting of the drawers was a must to save time.  Once the pieces were glued together, I just needed to paint and varnish them and leave to dry (at least this time a little less drying time as I bought some quicker drying varnish for small work - not flooring). 

Lots of tiny pieces to be cut and sanded.
Ready for assembly
Then I attached the mirror.  Now last time, I really didn’t look into the mirror covering thing deeply so this time I decided to check it out.  My first hunch was correct.  Most mirrors are covered if they are found in a bedroom.  I guess there are some superstitions about spirits coming out at nite or some kind of feng shui thing that says mirrors in bedrooms should be covered.  I found only one small picture of a covered mirror and it has kimono fabric instead of just regular cotton.  So, since I had a few kimono patterned pieces left over, I decided to use that to cover my mirror.
I think the kimono covering makes the difference.  Quite nice!
Finished dressing table with kimono covering.

Saturday, September 8, 2012

Chapter 58 - The Ceiling to the Right Porch, the Sliding Windows


September 6 - 7th 2012

The ceiling was the same old installation.  As usual, the pieces to never fit to perfection so I had to coax and glue them in in some ares.  Overall it wasn’t that bad a fit.  Consider also that the external top of the ceiling is actually hidden when the porch (which is the “door” to the dollhouse) is in the closed position. 
Painting the pieces.
Spacing out the beams for the inside of the ceiling.
Glueing in the internal "wainscotting".
Positioning the ceiling....
...clamping it down into position with the wooden trim

As for the sliding windows (construction of which you’ve just seen recently), I had to actually insert them in “backwards”.  This porch area had me building a little against logic.  The other porch section went better because I actually had to install all the windows and shōji before I put in the railings.  That way I could manipulate the porch while installing the wooden window tracks and fixing the final pieces.  So, I ended up having to install the piece that fixes the last two sliding windows in place from inside the porch room.  Tight to work on since the shōji were already installed and I was afraid of damaging them.  Got everything in tho...in the end.  Where there is a will there’s a way.
Wooden piece, had to slide it in between the installed shoji and position it without glueing the actual sliding windows to it.  So far, all my windows and shoji slide !

Finished porch

Skipping chapter 58 as it has me putting on the awnings and I’d prefer to actually attach the porches first, then put on the awnings.

Thursday, September 6, 2012

Chapter 56a - The Shōji to the Right Porch First Floor

September 6th 2012

This next chapter had me starting on the stairs to the second floor.  Since I hadn’t even finished the porch areas, I decided to jump ahead and finish the two porch areas, get them attached and then circle back and attack the stairs.

So, in the chapter, I am only installing the shōji.  I realized before when I had screwed up the sliding windows that the sill was attached in a permanent manner.  This time, I was lucky because the two ends attaching the woven upper window spaces was not actually continuous and could be swung out to accommodate the back shōji.  The front ones just need to be placed on top then a long wooden piece is glued over the top to keep them in place. 
So lucky it actually could swing outwards.

The shoji just had to slide in.


I had also decided not to do the window within a window since I just wasn’t able to execute the last time the way I’d like to.  So, I’ve left the center shōji with the little window and the side ones without.  I don’t think it takes away from the overall look of the porch room.
Glueing up the wooden board that holds the other shoji screens in place.

Finished shoji. 
Skipping chapter 57 as it’s the installation of the stairs.  Will get to that later. I still have to attach the first and second floor to each other by supports on the back of the house.  Once that is done, then I can go back and start working on stairs.

Saturday, August 25, 2012

Chapter 52 - The Walls and Floor of the Right First Floor Porch, the Shōji

August 22nd - 25th 2012

Staining and painting again.
Painting internal(white) and external walls. I use the sponge to give a stippled effect.

Staining wooden embellishments


Using an exacto knife to cut into the wood enhances the "juncture" sections on the floor
The pavement section was the same as the other one already made before but this time I decided to do a test run on the varnishing of the floor.  Once I get up to the last room, I want a super glossy floorboard finish so I figured I’d try it out on this floor to see if I could achieve a high gloss.  I needed to first paint the floor, sand it, gloss it, sand it, etc.  I figured I’m going to have to buy floor wax to make it really shine but sanding in between glossing did help to smooth out the overall look of the floor.
Painting shades of wood to give the floor some interest.
Nice shine to the varnished "hardwood" floor.


Building the porch went easy enough - some clamping to be sure the woodglue would keep the outer walls held tight.  The rest of the pieces slid in with little difficulty and the porch section is done.  Just the windows and railings need to be added.
Wooden embellishments being added.

Porch section temporarily placed.


Cutting away sections for the small internal window
The last part of this chapter was putting together the shōji windows.  The kit comes with all the necessary pieces but there were some changes to the inside woodwork to give these shōjis a window within a window.  I think it’s quite nice and the final effect will be more interesting so we can actually see into the bamboo bedroom.  The only pain in the butt was having to cut the rice paper to fit the little window.  The first one came out with a few tears (oh well) but for the second one I used the first as a template.  That way the first cut would be clean.  The final effect is acceptable even if there are some small tears on the corners.

Back side of door - you can see the torn corners :-(
Right side of door.  No defect is seen.  Small plastic pieces are placed to simulate glass.