February 25th - 27th 2013
Over the past year, I have spent a lot of time looking for objects and inspiration on the internet. I would search out anything that had “japanese” or “miniature” in it just to see what kind of objects were being sold or created. I’ve come across lots of objects (some too expensive for me to purchase and in any case the wrong scale) and lots of tutorials. With my latest hiatus, I warehoused in my brain, computer or pinterest a ton of ideas. This idea came from a combination of a picture I came across and some experiences from my past.

First of all, this is the picture which I had saved to my computer. By the info of the file, I found it in October of 2012 (during my Halloween break). I cannot find who it belongs to so I am unable to give credit where it is due (if this is yours, please message me and let me know!). I loved it so much but I do remember it was the wrong scale (1:12) so even if I wanted it, I couldn’t use it. But I could use it as inspiration. I wasn’t sure how exactly it worked till I was watching the film “The Ten Commandments” one night (classic) and during the Exodus, many of the freed slaves had these sort of wooden framed carriers to haul wood, food and....baskets full of stuff.
So, backtracking for a moment, many years ago while I was at University getting my art degree, we had a scupture professor who was a bit bohemian. Long hair, soft spoken, work boots and a very large basket style back pack. I had never seen anything like it. My dream back then was to get my degree and get a masters in costume design. I used to come to classes ready to throw on the ceramic wheel or chisel at my marble wearing angora sweaters, 3 inch heeled suede boots...well you get the idea. I never ruined or dirtied any of my clothes but I was very much the complete opposite of the majority of my fellow students - not to mention professors. Anyway, that damn back pack was so foreign to me it ended up being the way I remembered him through the years. And
by this link, it's not like it was inexpensive! Recently he has even had a show at the Maine Museum of Art but all I can still picture of my memory of him was that damn bohemian back pack.
So, I decided to make the basket and the wooden carrier. My homage to
Duncan Hewitt ??
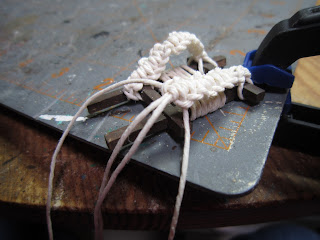
The first thing I had to do was map out more or less the scale. Since the humans in this house would be 3-4” tall, the carrier had to be fairly small. The basket could be bigger than the carrier (testiment the Exodus slaves in the movie) but I had to figure out the size and how to lash the shoulder straps to the wood. I had also decided to notch the small pieces of wood otherwise the carrier would be too awkward and bulky. After that, a little paint, wood paste and sanding did the trick. I ended up macrameing the shoulder straps as no other solution was plausable. The scale is so small that the crochet thread was too tiny (my hands cannot work that small anymore, they kept cramping up) so I opted for the kitchen string which worked out better than I thought.
 |
| Working out the proportions and cutting the pieces. |
 |
| Notching the pieces. |
 |
| Fitting them with a little glue and wood paste. |
 |
| Fitting the center support piece. |
 |
| Adding the straps using kitchen string and simple macramé. |
 |
| Adding the basket/load support pegs. |
 |
| Finished dirtied carrier |
The basket was as a lot of fun. I had checked out a few
tutorials and one by “1 inch minis” was wonderful but I just didn’t have the materials to carry it out. I ended up going with the tutorial for the shopping cart from “
Collectors Club of GB”. I liked this method for two reasons. One I could actually print out something on photo paper (I went to a site and had “First House” translated to kanji - thus batptising my ryokan) and two, I could use the wire that I had on hand to work with.
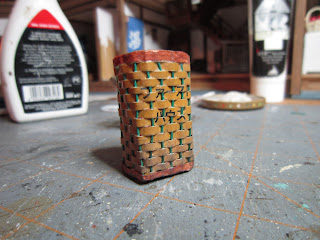
The method was pretty straight forward. Only a few steps I changed. I used double sided tape instead of glue to fold over the ends of the basket and I added a strip of rice paper on the top and bottom to reinforce it. I painted it with a mix of glue and water to help the wire stick to the paper better. Then, I painted the inside and paper strips on the top and bottom and finally varnished the whole thing. Once dry, I could distress it as much as I wanted. I’ve been using some old makeup eye colors and brushing layers on to finished pieces gives it a nice dirty used look. Sometimes it gets a little sparkly, but just burnishing it a bit with your fingers removes any excess.
 |
| Wires cut and ready, printed "basket" with "First House" in kanji. My printer | ink was running out! |
 |
| Measuring out 1/4" spaces to make cutting more precise. |
 |
| Sliding in the wires. No need now to glue as I did that afterwards. |
 |
| Using a small piece of flat wood to facilitate inserting the wires. I then cut out the basket and folded and fixed the edges. |
 |
| I used a travel size square lotion bottle to help keep the shape of the basket. It was easy to trim to size. I also had a small square piece of balsa wood for the bottom. |
 |
| After covering it with a mix of glue/water, the wires were fixed by adding a small strips of rice paper to both top and bottom. Then covering again with the glue/water mix. |
 |
| After painting the rice paper strips, I varnished it and distressed it using old eyeshadow powders. |
I added the last braided strap to hold the basket in place (when attached to the carrier), distressed the carrier and the trick was done. I really like the finished piece. It was a lot of fun seriously.
 |
| Braided safety strap to hold the loaded basket. |
 |
| My bohemian back pack. |
March 2nd 2013
Added a small sewing hook painted black to the back wall to hang the back pack on. The basket I placed below it as I figured it'd be near the back door for quick access when they need to go out and gather wood or something else.
 |
| Kitchen with the backpack hanging on the back wall. |
April 3rd 2013
My sister found an old foto of me at University and lo and behold next to me is the infamous basket. Forget about my derby, the basket is what kills me! And on a side note, I am sitting on the ground in a Norma Kamali coat. Fashion plate to the last. So 80's !
 |
| Raku firing in a Kamali coat. How chic! |
17th October Update!
I found the original back pack picture ! You can purchase it
here. So glad.
