Tuesday, November 11, 2014

Intermediate Work: The Back of the House, Lighting Part II

 November 9th - 11th 2014

So here’s the deal.  When I started the inn, I had an idea that it would be for young people, a bit bohemian.  Not five star class if you get my drift.  I even had an original idea to make it a Japanese bordello...course, as I got into it I could see that it really could be something nicer instead of cheap.  Still, the ryokan, from the start, is a little old and not very well kept.  I chose not to varnish most of the embellishments on the walls and to keep areas unfinished a bit.  My choice was two fold: first I knew I was going to run into problems in the construction (both for my inexpertise and the fact that many of the pieces were badly warped to start with) so I knew the rooms and whole house would have gaps or fit together imprecisely and second, it was my first dollhouse.  There was no way I was going to do justice to a beautiful five star ryokan.  So, my inn is for everyone.  The young the old the hippie....all are welcome! Which brings me to the back of the house.

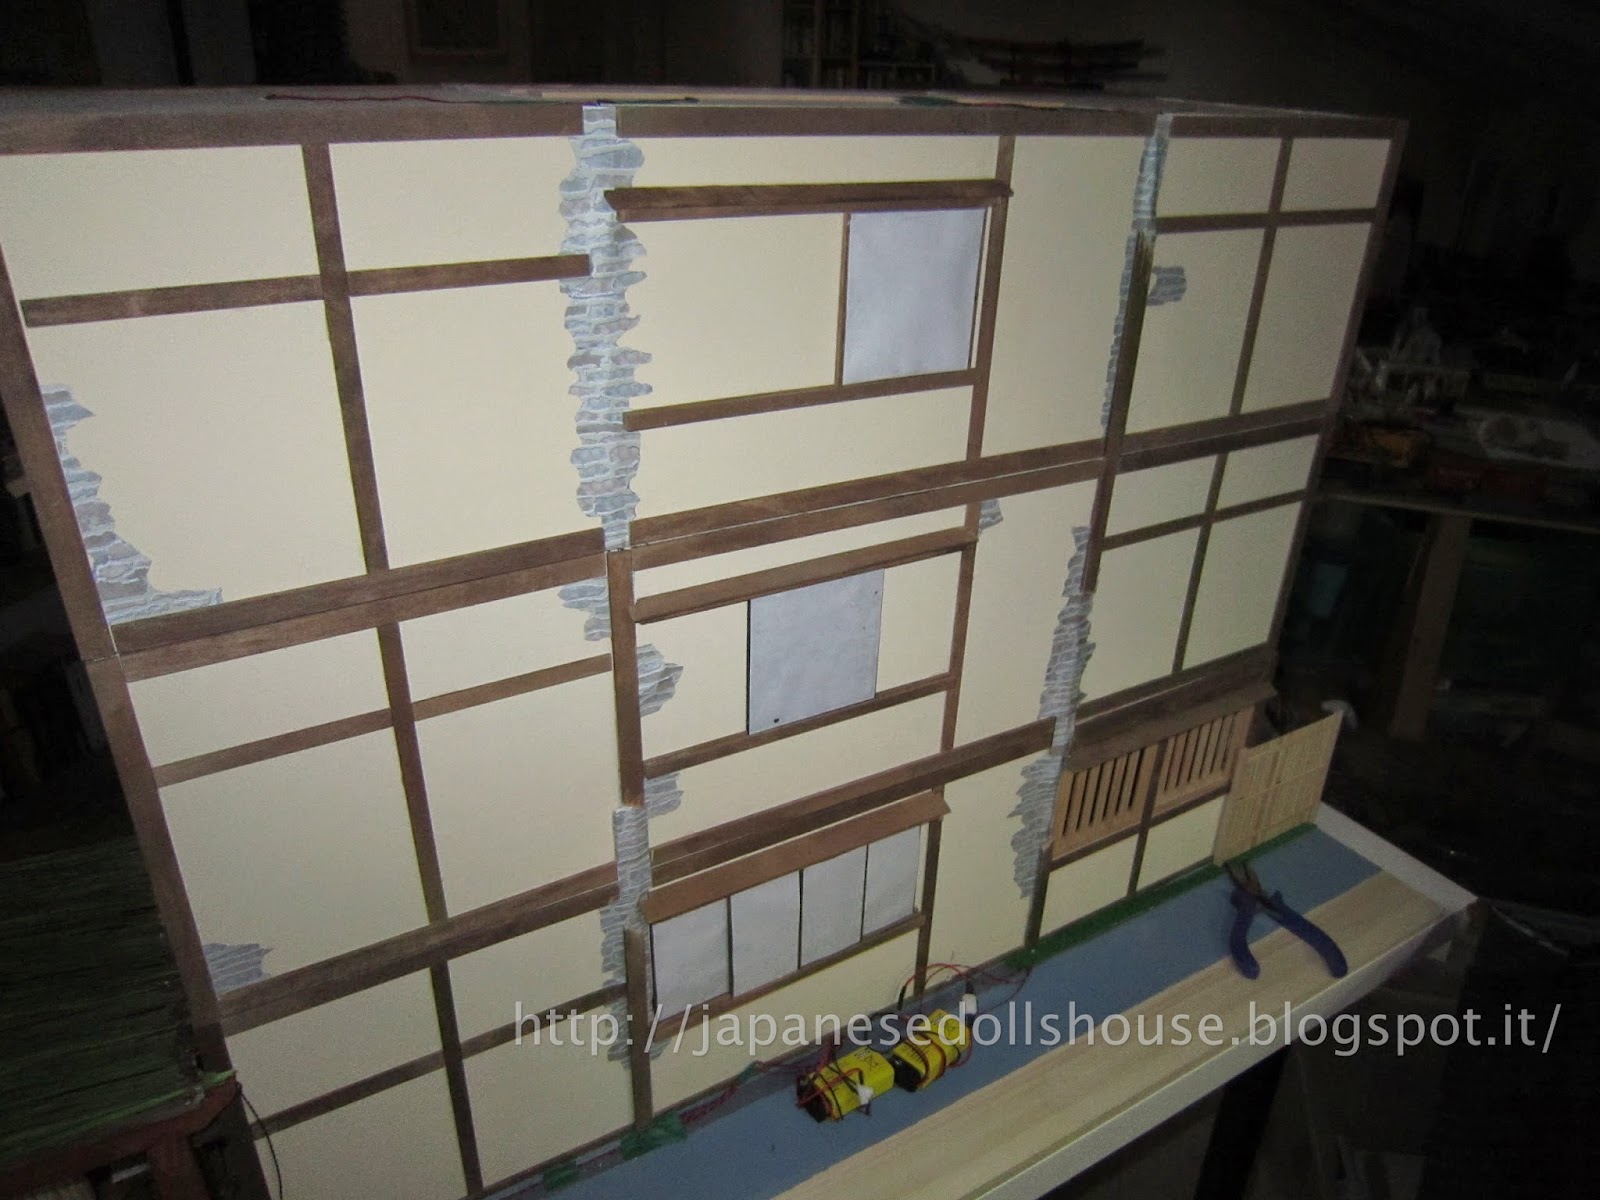
The kit never was really set up to actually show the back of the house but I didn’t like that idea.  I wanted to do something there too.  Like a behind the scenes stuff going on in the alleyway kind of area.  So, I purchased some stone work printed paper to use to attach or glue on the external walls around the house - exposed brick as it were.  Knowing also that I had no real way to effectively hide the electrical wires, I figured I’d use this paper to create where the ryokan is pretty much falling apart - at least in the back.  From the front, it looks fine.  But we know that the ryokan is in dire need of repair.  I used the double sided tape and attached paper over the wiring.  All of this can be easily ripped out when the LEDs finally give out and need replacing (of which I have NO idea how I may mange that!) and I also cut some of the wooden beam decorations to show they had also split and fallen away.  I will add broken bits of beam all along the bottom of the back sidewalk.  Like they are holding them till they get a chance to renovate the exterior. 
Preprinted stone wall paper.

Cutting to size to hide the wiring.
Cutting more pieces to size.
Once I cut to size and shape, the back walls of the house were done.  I added the last two mini awnings that went over the second and first floor center windows.  And I added a few more random exposed bricks on the back.  Fun. 
Finished back with broken beams and exposed brick.
I also added a few more posters and welcome signs to the inn.  One that’s most important was the “no tattoo’s allowed” sign outside the onsen spa.  I guess in Japan tattoos are frowned upon (due to them often being a mark of mafia affiliation) so I added that - plus a how to behave in the onsen sign on the inside wall of the changing room.  Now we all know how to behave!!!
No tattoos allowed!!
Changing room now carries the "how to's" of the onsen.
Outside welcome (blessing) sign.
Next was making the garbage receptacle to hide the batteries.  I had seen a really nice version in one of the pages that came with the kit (same place I got the inspiration for the rackets and the umbrella stand and even the kimono stand!) and I just liked the overall look of it.  So again I used scraps to construct it.
Inspiration for the trash bin and place to hide the batteries.
The outside of the scale one is made of some kind of concrete.  So, I cut some wood to size and glued it together.  I then added a few decorative pieces to the sides and front to simulate a heavier concrete container.  Next up was covering it in a simulated concrete surface.  I watered down some glue, spread it lightly over the surfaces I wanted and then sprinkled some very fine sand onto it.  That made the surface rough.  I know that they actually sell paints which have sand particles premixed but right now I really can’t afford to be spending money on stuff I’m only going to use this once now.  Then I had to let it dry before applying the grey paint.  I mixed up some dark grey and white and painted the sandy surface with some of it.  I must say, it does simulate concrete fairly well.  I then painted the top and the embellishment pieces a terra cotta brown (I used some leftover shingle sheets from the kit to construct the top and the front) and the trash bin was done!
The design and cut scrap pieces

Testing the fit.
Batteries fit in fine.
Adding some light decorative pieces.
Painting the concrete.
Finished dust bin.
I added some grass the the edges where the wires run while I was waiting for paint to dry so that it looked acceptable in the back.  Eventually I will add some rubbish bags around the trash bin. 

And as a final touch, Bansksy struck!! While I was waiting for paint to dry overnight, the next morning I awoke to find that Bansky had visited behind the ryokan leaving his mark in the homicidal panda.  Little bastard! Now someone will want to cut away a piece of the back wall and sell it at Sotheby’s!
Anyway... wiring and back of the house - DONE! Back to tiling!

Saturday, November 8, 2014

Intermediate Work: Lighting the Dollshouse Part 1

November 7th - 8th 2014

Ok, again, taking a little break from tiling.... I decided to light my dollshouse.

I was adding so many nice little things in the rooms but since the lighting hadn’t been completely installed yet, I decided to do something about it.  I purchased some LEDs from Evan Designs a long time ago as well as shrink tube and hook up wiring so I was pretty well stocked with materials.  I pulled out my soldering gun and even watched the LED installation video the Evan Design site for the best way to hook up groups of lights.  So...on with it!!
The first thing I had to do was to shorten some wires and strip them (using the soldering iron) then connect them.  I tried to connect the wires in groups as close as possible.  The left back middle and top room, the left back first floor room with the spa and entrance way.  I also found a hole in the Music room wall - I mast have planned to add another LED there but didn’t in the end.  Anyway, the back of the house is pretty messy with wires but I have a few ideas how to hide them (altho I am not sure they will work just yet...).  Anyway, having connected the wires into two groups, I then connected some lead wires to each group and brought both down to the bottom floor.  All the while double checking to be sure everything lit.  It did.  Once I got to the bottom, I connected the switch again and checked.....WOW!! With a fresh battery the house looks freaking great!!!  I was so astonished how cool it looked!  Now...on to the other side.
Wires cut, connected and held in place with a bit of tape, for now.
WOW! Hard to get a good picture but the effect was surpising!
The lamp that needed replacing...
I attached the top and bottom in the same manner I had already done to the left back.  I double checked the lights worked and then had to tackle the outside light in the external kitchen area.  My virtual friend Antonio(who by the way is doing a bird cage giveaway on his FaceBook page - all you have to do is like his page to be included!) who had given me an extra lamp but since it was set up for a different voltage, I had to replace that bulb with one of my LEDs (last one actually).  Thing was I had already glued it into place so I had to kind of rip it out. That went fairly quickly and I replaced the bulb with one of my own LEDs, then attached a longer wire to connect with the other lights for the right side of the house. 
I painted this wire black as there would be no where to really hide it (although I can carry it along the bottom of the house and hide the longest part with grass etc. later) but the wire that travels down the side of the pergola will remain exposed.  Whatever.  It is a kind of messy back of the house (of which the decoration of the back will be explained in a later chapter :-)).  I also added lots of tacky wax to the pergola top to reattach the roof.  I had been glueing it in place but now I decided to just wax it into place.  The wax holds up pretty well - almost as well as glue!  Next I connected the two wires from the right back side and the one hook up wire from the pergola lamp to the switch and voila! Let there be light!!  I did the same to the left back and gathered all the wires and batteries together to the back.  The tape is provisory till I get cracking on a way to hide all the damn wires.... But that will be coming later....
Top of the pergola - you can see where I tacky waxed the wire in place.
The back of the house somewhat cleaned up.
And here are a few preliminary pics of the house with its glorious lighting! I’m so pleased! It’s all just missing the damn roof.....sigh.
The house open.
Fire Pit room second floor.
Second Floor landing with Bathroom.

Buddha Room second floor.
Music Room first floor.
First Floor landing with phone booth.

The Bamboo Room first floor.
Onsen ground floor.
Entrance Hall ground floor.

Kitchen ground floor.
Storage area outside the kitchen - ground floor.
Outside of the house with lighting installed.

Thursday, November 6, 2014

Chapter 113 - 114 - 115(partial) - Decoration and Finishing of Right Front and Back Peak, Tiling, Kimono Stand and Accessories


October 30th - November 6th 2014

I had a few days off since I was busy constructing some Halloween decorations for a small party I have every year.  Since it’s really not celebrated in Italy (or celebrating incorrectly - as an excuse for young teens to vandalize and be destructive) I actually enjoy teaching my friend’s kids how to have fun on Halloween without hurting anyone or anything.  So I put some effort into making fun food and decorations.  But I really want to get back to the build of the house otherwise I feel it will just take forever to complete!

Having had a few days off gave me a little more energy and the correct mind set to attack the next few chapters.  First up was some more tiling and the prep work for the peak decorations.  I repeated the same procedure from the last chapter cleaning and recarving the bubble pieces and painting everything.  I then put those pieces aside as I had to tackle the tiling of the right front and back roof areas in front of the peaks.
Bubble piece decorations and gable decor painted.
I started cutting tiles and glueing them in place.  Sanding them was still a messy dusty problem until a friend’s husband suggested I use a vacuum cleaner to suck away the dust while I was sanding.  So, after Halloween, I tried it with my little hand vacuum “The Shark” and it worked pretty well! It reduced the amount of fly away dust even if there was still some depositing on my hands.  I am still wearing a mask obviously but it does cut down on the dust that was covering my work area, computer, printers....
I managed to finish tiling the front roof area under the gable and insert the gable as well.  I also got the top onigawara in place.  So that was good.  So the kit has me moving round to the back peak area and roof but....as usual...I deviated from the procedure.  First because I had a ton of little pieces that could be used in filling the gaps in the center front roof so it just seemed logical to get it out of the way.  So I decided I would. But first....
Finished right front roof and peak decor.
I had been mulling over making a kimono stand.  I had already made a small obi stand so I knew I could figure out a way with the extra scraps of my kit to make one so, I measured the space in the fire pit room and got to making the pieces.  I cut, glued, sanded then painted the stand black.  I then added the little copper embellishments that my friend had traded with me for some oak cleats.  The top and bottom external pieces had to be filled with a little black Fimo and glued in place.  Which I did.  You can see the inspiration in the pic next to the finished stand.  My next step would be to add folded obis or a full kimono to the stand....while tiling, I will consider which.
Working on the kimono stand from scraps.
Shaping the copper decoration for the top and bottom edges.

Finished kimono stand and the inspiration.
I then turned back to tiling the center front of the roof.  I measured out four full pieces and then cut back scrap pieces and was able to finish the front central roof area.  I also cut some small pieces to fit into the areas right under where the peak’s tiles meet the roof.    I did have to open Chapter 115 to get some tiles but since that was upcoming anyway I didn’t mind.  Once that section was tiled, I turned the entire roof around and started on the final back roofing and gable.
Front of the roof with completed tiling.
Remaining tiling to be done to the back of the roof.
While the last tiles were drying, I came back to the kimono stand.  I really wanted to try and make a paper kimono.  I did (by cutting panels and constructing using double sided tape) but overall I really didn’t like it on the stand.  So, I may use it elsewhere in the house as a wall decoration.  But I still needed something for the kimono stand.  So I made some folded paper kimonos.  You really can’t tell what they are but I used kimono pattern origami paper do simulate folded kimonos, an obi and an obijime (a chord used to tie around the obi) and placed them on the stand.  I even decorated the end of one obijime with some metal tips and cut the edges to form tassels.  I then placed the stand in the fire pit room and I must say, it fills the wall perfectly.  I really wanted something that was unique but that wouldn’t block the area where people would be eating etc.  I think it’s a good fit.
Making patterns to cut paper and fabric.
Cutting out some fabric for backing the paper.

Adding the sleeves to the back panel

Finished paper kimono.
Finished kimono stand with "folded" kimonos and obi draped over it.
Kimono stand in situ.
So, back to the tiling... I attached the tiles on the back right side under the peak and off to the right so that when I installed the gable’s tiling it wouldn’t be blocking that area (which happened with the back left installation).  I also had some extra little pieces that I managed to size up and glue to the right side corner of the roof.  So even that bit of roof is done.  Next I installed the decorative sections to the peak - sanding down the pieces and glueing the bubble piece and paper piece #3 etc.  Then I could install the two tiles on top of the gable.  As usual, I had to sand the tops down to match the length then glue them in place - still pretty tricky since the little plastic clamps aren’t well suited to the job.  But while I waited for the glue to dry, I made some little hagoita.
These little rackets were used in a badminton type game back in the 15th-16th century.  They are usually decorated with New Year’s images at court.  Today, the rackets are used during New Year’s and are now covered with kimono fabrics and the figures are rendered 3D.  The antique ones often had images of famous actors so I printed out some images and attached them to some pieces of thin wood.  I decorated the handles with red and black and added all three to the buddha room.  They do look cute.
Cutting out the racket and image to glue onto it.
Wrapping a little black thread round the handle.
Finished hagoita.

Hagoita decorating the wall.
Final phase of tiling was done in the afternoon adding the last tile to the right side of the gable and letting it dry.  I still cannot add the onigawara because I still have to tile the inside of the back roof.  But more of that later.....
Finished and final gable.  Now just to push on with tiling...