Monday, October 28, 2013

Chapter 70 - The Sliding Doors, Wall Finishings and Floor of the Second Floor Left Hand Room


October 23rd - 28th 2013

Real life has invaded my mini-ing time.  There is always something to do.  We have an enormous pine tree in our front yard and when finally we had a Saturday without rain, the gardner came to prune it.  It took around 4 hours total but the work was done by Saturday afternoon.  There was lots of clean up.  In the meantime, I had a bookcase whose wheels broke so I had to make an Ikea wheel pick up and empty a book case (!!), re-install the wheels and reload the bookcase.  It had to be done as the bookcase was blocking my work bench where I am building the house.  What a pain.  And also, my beloved Red Sox are in the World Series so I was staying up late to see the games and too tired to actually do any mini-ing.  So, by the time I had some energy, 10 days had gone by.   But I am back ! ;-)

First thing I had to do was to paint all the wooden embellishments as usual.  Then I worked on painting the sliding doors.  There are extra inserts in the doors that needed some sanding attention beforehand.  After that, I fixed some of the wooden decorations of the walls so that the floor area was prepped for installation.  I painted the wood frames and internal areas and then decided it was time to attach the flooring.
Cleaning the internal grill areas to the sliding doors.
Adding the wall beams.
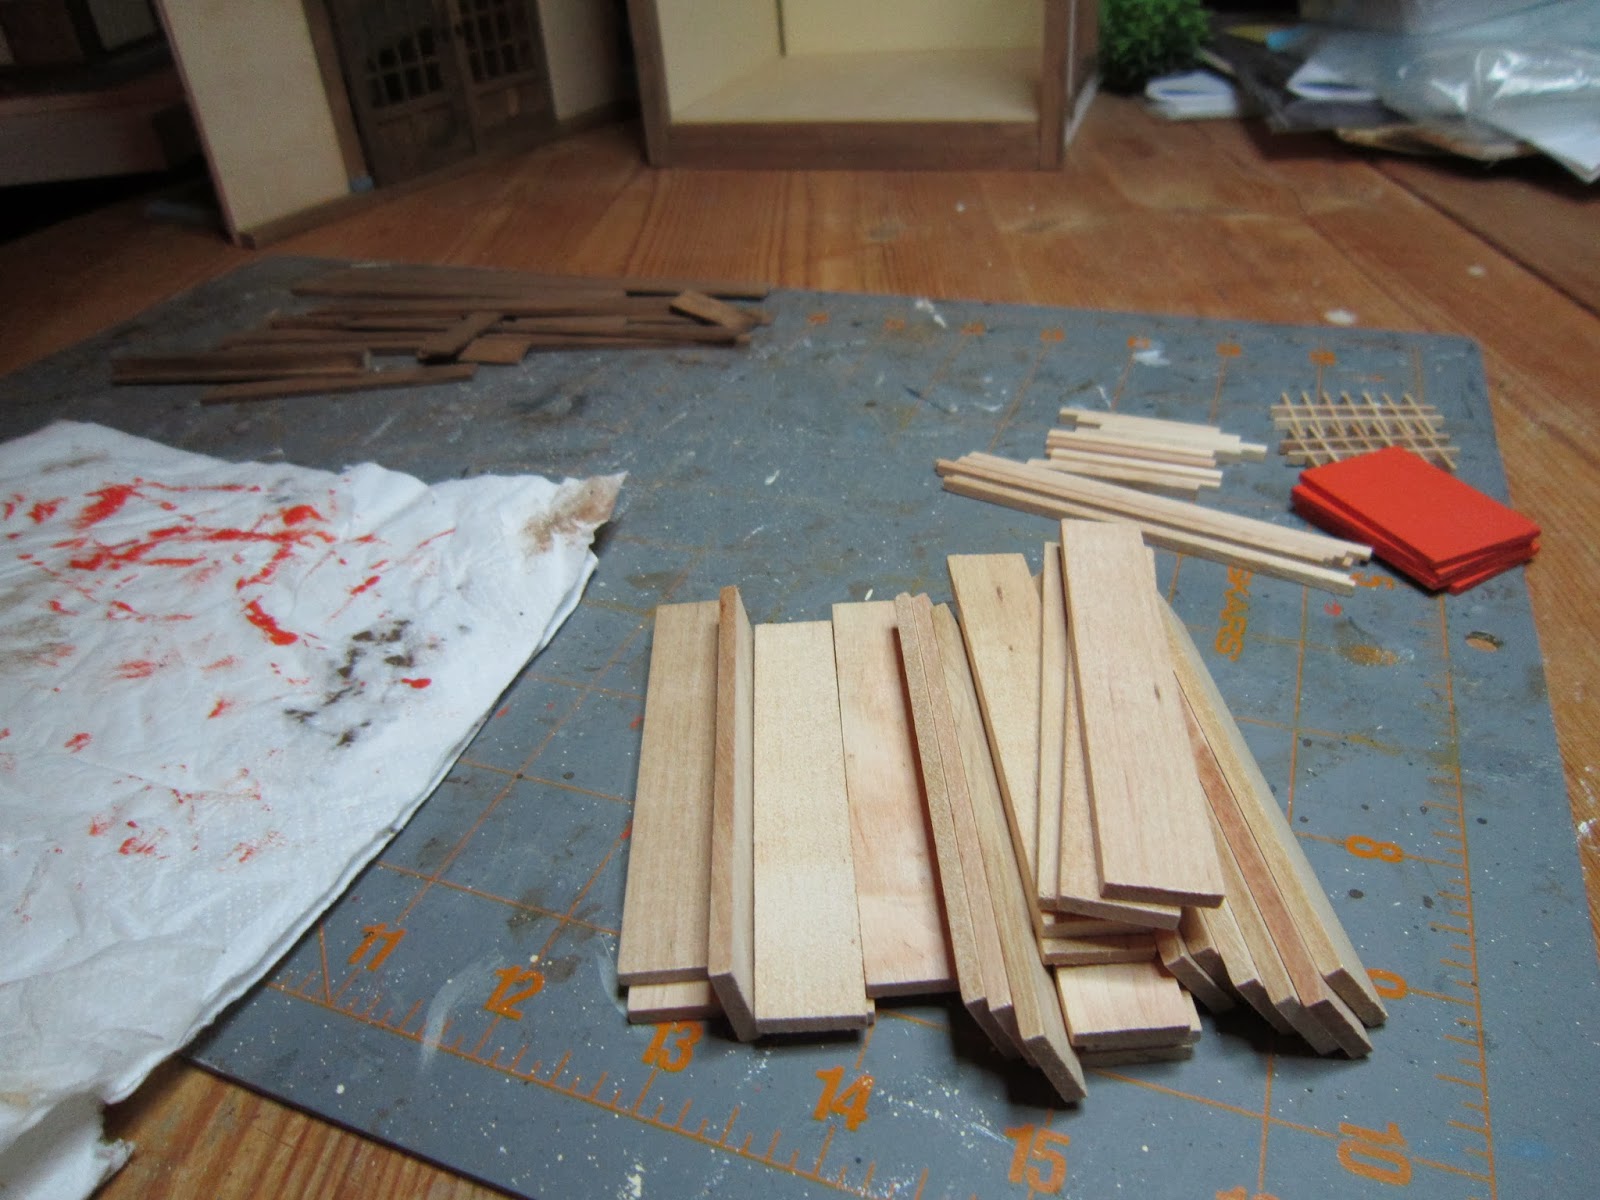
The kit came with a series of planks.  I had thought about painting them all black beforehand but rejected that idea when I realized that the best bet was to create the floor, paint it in a few coats of black, sanding it, varnish it, sand it, etc. but without actually installing the floor in the room.  I stumbled upon someone’s suggestion to attach the wooden flooring to a cardboard backing which then can be installed into the room.  So, after measuring and cutting, that’s what I did.
Flooring planks.
Measured piece of cardboard backing.
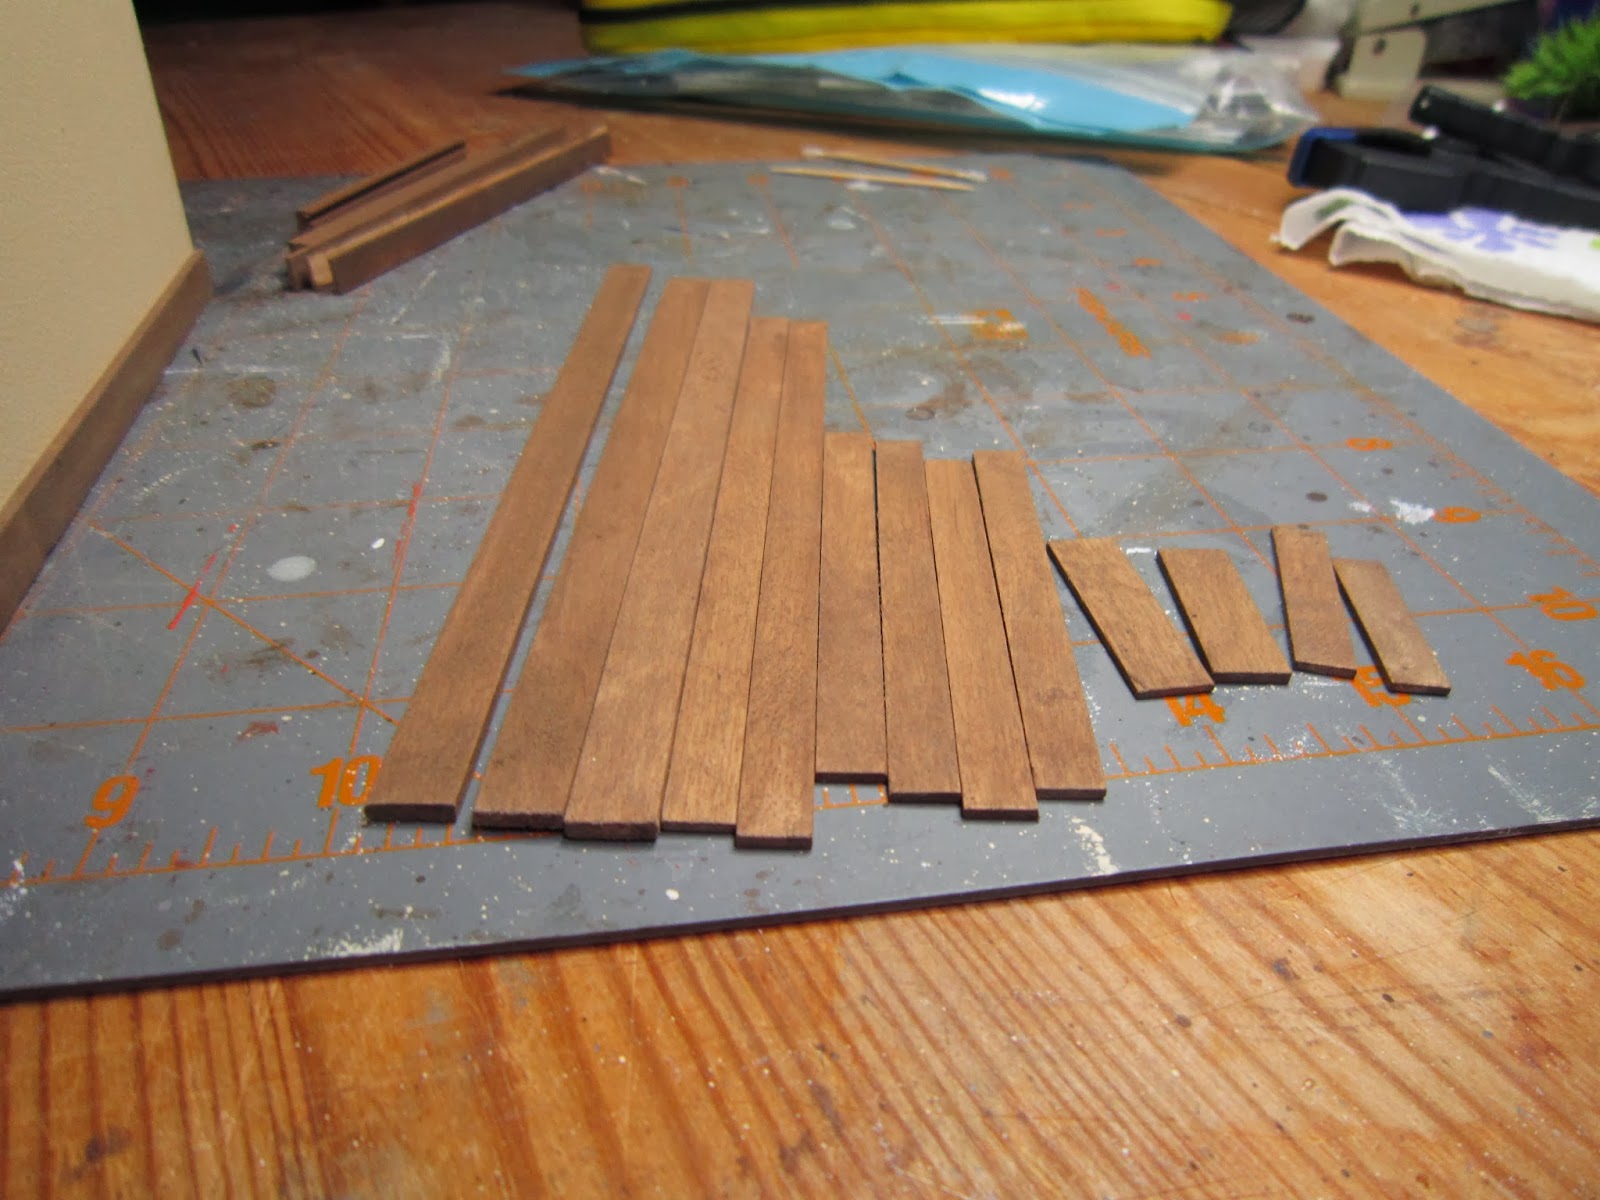
Some of the planks were not a perfect fit.  So I did have to sand some to size.  Once that was done, I painted the floor black, sanded and then varnished it.  Obviously over a day since the varnish needs a good day to dry between coats.  I even managed to touch it and leave a print so had to varnish it again! That meant more drying time before waxing and installing.  What a pain.  But in the meantime, I did manage to create the doors and varnish those as well.


Selecting the right side and position of the boards.
Checking the fitting for the last two.

Meeasuring and slowly sanding down to size.
Final fit before painting and varnishing
Sanding the floor and using the sanded dust to fill in the small gaps.
Sanded and ready for painting.
Coats of pain and varnish.
Assembling the doors and sanding the grill to fit.
Fitted grill.  Door before varnishing.
The door grill in the middle was supposed to be covered with some kind of rice paper, but honestly, I like the open space where you can actually peek into the room from the outside.  The way this room is decorated it doesn’t really convince me that it is also a bedroom (like the other rooms).  When I did do the research, I only found one pic of folded futons in the same room with a fire pit.  So, I am going to have to work out how to resolve this.  Maybe using the porch as the actual sleeping area?
Once the door jambs were dry enough, I installed the sliding doors and all the wooden decorations around the frames.  Course they all needed sanding for fitting but not so much to be difficult.  With the doors in, I really must say I like the strong contrast between the ochre and the black.  I couldn’t wait till the floor was actually dry enough to install!  That took another 24 hours.
Installed sliding doors and wood decorations.
Inside view of the room with decorations.
Floor varnished and ready for waxing.
Trimming the cardboard edge, waxing the floor.
Finished floor and doors. 
Finally I could wax the floor, trim off the extra edge and and install the finished floor.  But of course, waxing turned out to be a hassle.  The wax is fine but the floor being black shows every streak of wax on it.  May have been that the varnish wasn’t 100% dry but I did leave it on extra time.  Whatever.  I installed the floor and the final front piece.  Ready for the next chapter which may have to wait anyway as I’m a little busy with real life again.  Just wish I could devote my time to this build all the time.  Welcome to the real world.


Floor inspiration.

Sunday, October 13, 2013

Chapter 69 - The Left and Right Walls to the Second Floor Left Hand Room

October 8th - 13th 2013

More painting and waiting for paint to dry.  Which it doesn’t do while you watch it so I took the time to plan ahead a little.

This room is going to have a central cooking pit.  So I wanted to give the room a warm feeling - sort of like a kitchen where people congregate while they eat but also cook what they are eating in real time.  I’ve never liked the idea of dining rooms or separate rooms for eating.  What I grew up with was a kitchen and eating area - you want seconds, they’re on the pot on the stove go get some.  An American kitchen is also a place where people sit and chat.  So I just loved the idea of this room in the ryokan being food prep and chat all in one (as well as technically being a place where you will sleep too! How cool is that?)

So, I wanted at least one wall a sort of warm orange ochre color.  I had to mix the color (some Orange, Santa Red and Burnt Umber) and had to be sure I had enough.  I had looked ahead (as usual - it’s a good idea just in case you forget to mix enough color that you’re going to need later) and in fact found that the door panels are supposed to be the same color ochre.  So, I found the next chapter and pulled the pieces that needed painting from there.  I had to sand them a bit before the second coat as the wood is not the smoothest quality but they look acceptable.  I then sealed them back up into the chapter pack till I finish this chapter.
Painting the wall and the door panels ochre.  In reality it's not so dark orange.
The wooden beams and embellishments were painted brown like the rest of the house.
Painting all the embellishments
Some where a bit damaged and I had to glue them together.  The external beams that are supposed to slide onto the wall pieces are always too tight so I had to sand the inside to accommodate the walls. 
Measuring where to sand after fitting the outside door edging.
No power sanding here - too small for that.  So time consuming hand sanding.  Having a piece of wood covered with sand paper does help tho.  Fitting the left wall went smoothly but the right wall (ochre colored one) was not the greatest fit.  I hope it won’t be an issue attaching it to the landing section.  We shall see. 
Gluing the internal wall to the rest of the room.
The ceiling beams (that will provide a place for the ceiling to rest on) were too long.  These pieces can be a pain sometimes as they do not fit into the pre-drilled sections so easily.  They’re either too long or too thick.  Adjustments made here as well.  The inside corners had to be decorated with similar wooden strips as well.  Sanding those down to fit too.
The next step was to add the wooden decorations on the outside walls.  Just a few measurements and gluing in place. 

These pieces had to be 114mm from the bottom edge

The final step in this chapter was adding in the door jambs to the sides and setting up the sliding door bottom jamb.  I had to pound in one side to fit (using my trusty hammer and a small piece of wood so as not to damage the pieces). 
Sometimes a hammer is needed for the fitting.
The inside of the jambs overlapped a bit onto the ceiling support so I had to cut the excess away with my exacto knife.
Before...
...after.
Once that was done, just the final four decorations on the wall around the door and the room is pretty much complete. 
Final decoration glued in place.

Internal landing wall side.
Now for doors and flooring.
External walls.
Finished walls of the cooking room.

Tuesday, October 8, 2013

Chapter 68 - Floor and Back Wall of Left Hand Room Second Floor, Two Small Chairs and Seat Cushions Tutorial


October 7th - 8th 2013

Construction of the floor and back wall was very straight forward.  Just glueing and waiting.  The kit says to paint the back wall ochre but I wasn’t too keen on that.  So I made that wall beige and will probably make the side wall where the doors are an ochre color.  This room is to be the room with the grill in the middle of the floor.  So some cooking colors are pretty appropriate. 
Floor and Back Wall
The little chairs have been made so many times but I wasn’t sure if I every really gave many details so, here are some particulars.
Pieces to the Small Chairs
The wooden pieces are shown in the foto.  Their measurements are :
2 pieces 18mmx26mm (#7 in the foto)
2 pieces 25mmx23mm (#8 in the foto)
4 pieces in the shape #9 in the foto 30mm by 5mm at the thickest end
4 pieces in the shape #10 in the foto 30mm by 2mm by 3mm where the hump is

You just need to glue two piece #9 to the piece #7 to form the back of the chair.  Then two piece #10 to piece #8 to form the seat (the hump goes towards the back).  Then glue them together using the straight widest bottom edge of #9 as a reference to line up to the straight edge of the seat.  Once that’s done, just paint and varnish. 
Chair glued.  Be sure to line up the sides with a 1mm overhang
Painted and varnished chairs.


The cushions are quite easy as well.
Just take two pieces of lightweight material (cotton is best as it doesn’t look bulky) measuring 7cm by 4cm.  Apply strips of double sided tape as shown in the pic.  Use packaging materials (the kit came with that foamy stuff you use to wrap glass in) which are light and can be bulked up by layering (instead of having something too thick to start with).  Use one small square about 27mm by 22mm and one 30mm by 27mm.  Just one square slightly smaller than the other.  That way you have a sort of cushioned rise in the center area.  You can use tape to hold the two pieces together.  Fold the fabric in half creasing the tape and the fabric.  Tape the cushion material on the top half of the seat.  Cut away some fabric at the corners to allow for angling in the folds.  Remove the tape and fold over using the actual width of the tape (5mm) as a guide. 
Double sided tape on the fabric

Cushion material positioned, corners trimmed for folding.

Fold over the edges using the tape as a guide


Next step is to make the “tassels” that will be attached to the four corners of the seat cushion.  I am using red here because these cushions are going in the red Buddha room. 
Take a piece of cardboard 15mm wide and wrap around some thread (around 12 times for sewing thread size).  You can use DMC too so color selection is endless.  Glue the top and bottom edges of the thread by just spreading a little glue across the top.  Once dry, remove the thread from the cardboard by sliding it off or just cutting it down the middle.  The top and bottom will stay glued.  Use the exacto knife to cut thru the two bunches and create four small tassels.  Add some double sided tape to the inside of the cushions and apply the tassels to the four corners.  Close over the cushion and pinch the tassels into shape.  Using the same thread color, run one stitch through top to bottom (I made a small french knot on the top of the cushion) and secure on the other wrong side.  With all the tape inside, it’s not necessary to secure it excessively.
Wrap the thread round a small piece of cardboard

Snip it off from the cardboard then split each tassel into two tassels. (four per cushion)

Add tape to the edges on the inside

Attach the tassels to the corners of the taped area, then a french knot in the center to finish
Place your cushions on the little chairs by folding it a little so that the back tassels show through the back end of the chair.  Done.

Sunday, October 6, 2013

Chapter 67 - Ceiling to Right Hand Room, Television, Chair


October 3rd - 6th 2013

Ceiling was straight forward - again just measuring and glueing the decoration across.  I drilled a hole and inserted a second light for this room seeing as I had ordered additional LEDs from Evan Designs.  That way I can add a bathroom light and one to the hallway as well.  I am still bummed that I lost a LED somewhere.  I think I lost it when I took it with me to the model store to ask for appropriate gauge wire - which they didn’t have.  Model stores here suck really.  Very limited amount of materials.  So, I ordered the extra wires off Evan Designs too this time.  Fool me once....
Measuring and glue the wooden strips.

Glueing the celing in place.  Always need a vice.
Finished Red Room.  Just need to decorate it.


Friggin TV antenna.  Had to glue and reglue it in place.
Variety show circa 1963!


The TV was a pain just like it was last time.  But I decided to make it look a little more 60’s-ish.  I painted the front red and added a pic of a variety show woman for the screen.  The antenna was a royal pain in the butt but eventually I forced it into place.
Using double sided tape to attach a green fabric strip to some light cardboard.
Had to do this strip twice as I ruined it durng construction of the chair.
To hold all the strips and fabric in place on the odly shaped sections of chair.

Finished TV and Comfy Chair.


The comfy chair was the same as last time.  Still, I had to redo the strip that covers the front since I had glued it on wrong and when I went to take it off, ripped it apart.  Not to worry.  I am very frugal.  Made sure I had paper and fabric to redo any mistakes.  I dirtied up this chair just like the other one using some old green eyeshadow and it will in fact go into the porch with its twin.  Looks like the bamboo bedroom is finally complete.  (...then again....)


Comfy chairs now in place on the Bamboo Room Porch.