Friday, December 27, 2013

Chapter 75 - Back Wall to the Right Front Porch - Second Floor

 December 21st - 27th 2013

I had already opened the blister pack for this chapter to fish out a few pieces to install the bathroom previously so I had to pretty much remember what I had removed (I forgot to mark them). Anyway, I figured out which pieces were left over and installed some wooden slats on the underside of the two rooms.  If I remember, this will help in making the entire second floor fit onto the floor below it with some stability.
Slats to add stability to the entire floor.
Went thru the usual sanding and cleaning of the pieces then started painting the various parts.  Brown for the wooden beams and support, Buttermilk for the outside and white for the inside pieces. 
Next was weaving the small wooden sticks into what will eventually be the ranma or architectural wall above the shōji doors to the front porch.  These need to be glued and left overnite for drying. I then assembled the remaining pieces to create the back wall of the porch.  Some pieces needed lots of coaxing as usual since they don’t fit in well to the prefabricated slots but after some sanding and force fitting, it went fine.


Gluing the woven sticks.

Fitting the ranma
I decided to leave some pieces out since I preferred at this point to jump ahead and install both the sliding windows and the shōji before proceeding with the actual porch area.  Having done these porches before, it just seemed easier.  Onwards...

Leaving out pieces to better fit the windows and shōji.

Thursday, December 19, 2013

Chapter 73 - The Overhang to the Left Side Room, the Firepit (Irori)


December 14th - 19th 2013

As explained, I had skipped this chapter as I felt the firepit required my attention and little ingenuity to pull off.  But I finally got around to it.

First was to build the overhang.  Pretty straightforward and quick.  I had already done three of them so there was no big change in building this one.  The time consuming part is measuring out the spacing between the wooden slats.  Quick paint job, varnish and white tipping the under beam supports.  Then attached over the room doors.  Done.
Spacing the top part of the overhang.
The bottom part of the overhang.

Finished overhang.
Problem came up tho when I had to attach the two decorative beam fillers, one over the doors and one in the corner.  The one over the door didn’t fit for the same reason as the room’s internal ones - I had made a mistake in the overlap of the vertical slats.  Some sanding then a forced glue with clamps did the trick (I hope).  We’ll know better when the time comes to fit the ceiling to the landing area on.  I will re-enforce it then.  The corner piece also was a tight fit but that was a little easier as it required only some sanding.

Forcing the overhead beam filler.
On to the firepit - or the irori as it’s called.  (I also discovered the name of the hanging hook for the irori - a jizai-kagi)  The sunken firepit or hearth was a gathering place and source of heating not just for cooking but also for the room.  Usually the rooms were much larger but today there are even many restaurants that use the irori as a focal point for cooking.  There is more info on the kikkoman site which was helpful and informative.

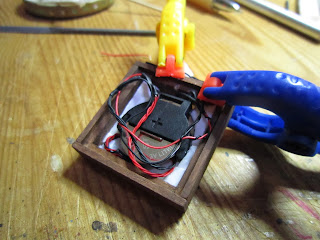
My first task was to figure out a way to squish the battery carrier and the lights into the small hearth frame (appx 28mm square).  I fooled around with the foam core piece from the kit as the covering area and then had to cut the wires down to an acceptable length.  There was no soldering involved here but I did use my soldering iron to strip the wires. Super fast! I then glued the three fire bulbs onto the foam core support and left them overnite.  Next day, I trimmed down the wires some more and glued the actual battery holder into the foam core (and left that too for a while).  I then painted the bottom part of the irori and made some more notches to fit the battery in a little better.  Then sealed up the connections and glued the wires and switch in place. 

Firepit pieces and the FIRE LED kit from Evan Designs.
Gluing in the LEDs onto the foam core.
Gluing the switch and the wires into place.

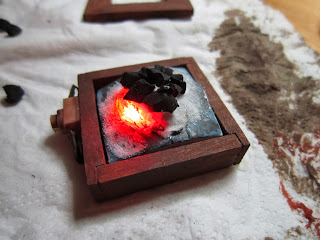
Once the glue was set, I squished the battery into place and attached the back panel. I didn’t glue it in because I knew I may have to substitute the battery one day so all I will have to do is push from the top and the whole thing will pop out.
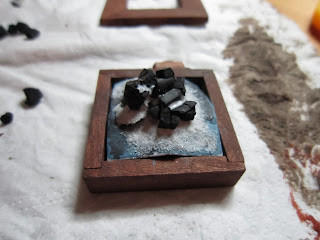


Adding some "ash" and charcoal pieces.

Celophane in place and adding more color to the coals.
Next step was coloring the switch, the top section and painting the inside of the pit a grey color.  I also covered the lights with a cellophane film included with the kit. It helps to tone down the flicker and make it a little less intense and more uniform.  Once that was glued down, I could add the sand (ashes) and charcoal bits, let those dry and then make some touch ups using some dark grey, grey and white. 


The last phase was the top section edge.  I glued that on and clamped it down.  And the trick was done.
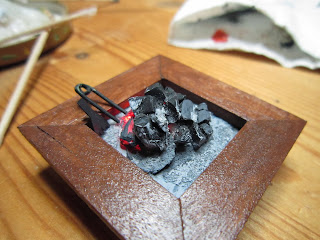
Finished irori firepit.

Making the utensils for the fire pit.


Only “problem” was that the irori wouldn’t actually accommodate the hanging pot I had already made.  The fire coals were higher up than if there were no battery underneath.  But I am more than happy making the sacrifice.  I added some small utensils for cleaning the pit too.  Once I complete a few more things, we can start adding some details to this room too.


Here is a video of the pit in action.  You can even hear Christmas music in the background! Yeah!

Friday, December 13, 2013

Chapter 74 - The Shōji to the Second Floor Landing, The Dressing Table

 December 12th - 13th 2013

I have been so busy lately between hosting my usual Thanksgiving here in Italy and then decorating my house for Christmas I didn’t really have time to do any dollhouse building.  The next chapter was supposed to be the fire pit but since it requires a little ingenuity (something I’ve been using too much of lately!) I figured I’d take a break and skip that chapter and take on this one which is relatively simple.

Basically I had already put together a dressing table in a previous chapter and I really wanted to get the back shōji window in so that I could at least place the second floor rooms on top of the house and away from my work table.  So.. that was the plan.

The rear shōji window was pretty easy.  It just needed painting and glueing around the frame then attaching the paper to the back.  The sliding supports were also easy to install.  I did not install the overhang since that would have to be put on once the side panels are applied to the back (and I still need to hide wiring under those wooden panels) so I just put it aside inn my container of pieces to be applied later.  So the sliding back window went together super quickly.
The supports in and back side of the shōji window.

The shōji from inside the 2nd floor landing (next to the bathroom)
The dressing table was also a little easier this time.  Since I knew pretty much where the problem areas were from the last one, I was able to anticipate problems in the fitting.  The cutting to size and double checking the fitting of the drawers was a must to save time.  Once the pieces were glued together, I just needed to paint and varnish them and leave to dry (at least this time a little less drying time as I bought some quicker drying varnish for small work - not flooring). 

Lots of tiny pieces to be cut and sanded.
Ready for assembly
Then I attached the mirror.  Now last time, I really didn’t look into the mirror covering thing deeply so this time I decided to check it out.  My first hunch was correct.  Most mirrors are covered if they are found in a bedroom.  I guess there are some superstitions about spirits coming out at nite or some kind of feng shui thing that says mirrors in bedrooms should be covered.  I found only one small picture of a covered mirror and it has kimono fabric instead of just regular cotton.  So, since I had a few kimono patterned pieces left over, I decided to use that to cover my mirror.
I think the kimono covering makes the difference.  Quite nice!
Finished dressing table with kimono covering.