Tuesday, June 26, 2012

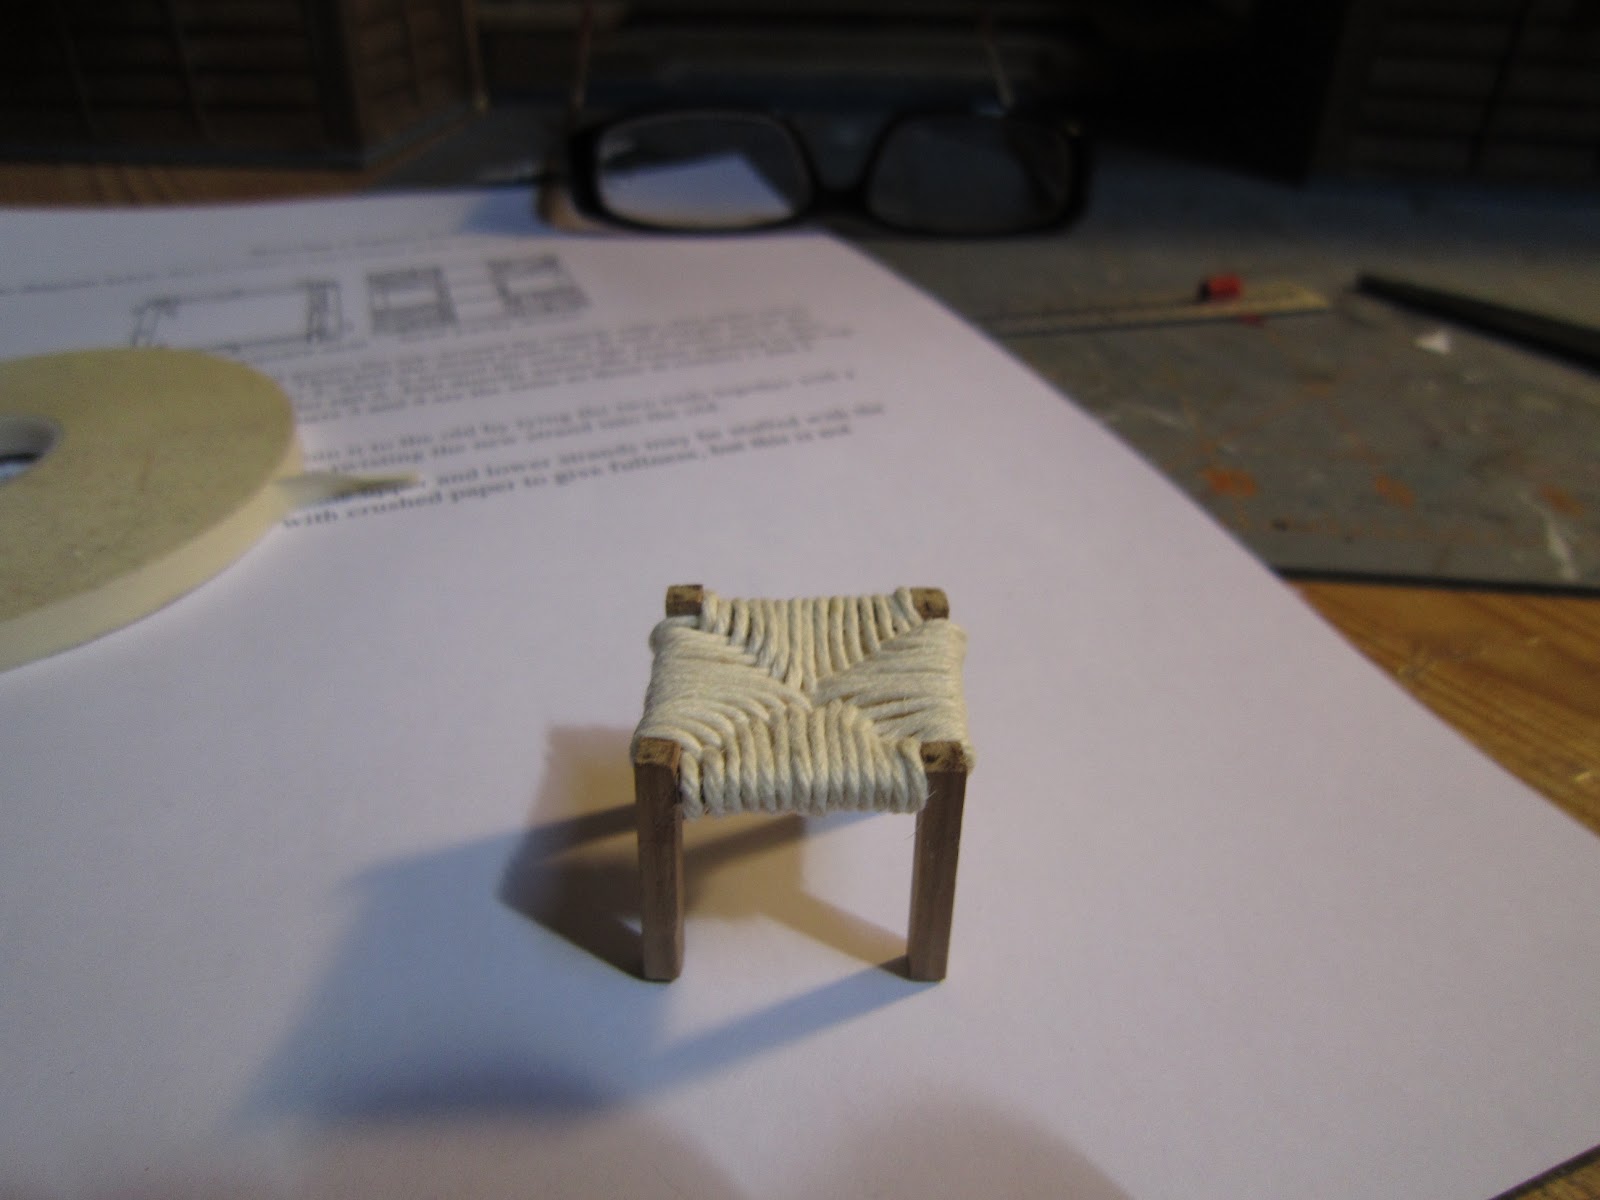
Intermediate Work - Small Kitchen Stool


Cutting pieces for creating the stool.
June 25-26th 2012

Still navigating and making some purchases.  I bought some minis from the Dolls House Emporium and they arrived fairly quickly.  The objects are a bit big but I can adjust as usual to fit where I need them.  I did find a great handled bucket that will be the coal bucket (since I just couldn’t find a smaller version in the right scale of a real coal bucket...) 

Also, I have been looking at lots of sites and pictures of Japan or other miniatures.  I came across these cute little stools with woven seats.  So, of course, I put more time in and found how to actually weave this seat.  On this site, there are lots of explanations on how to weave chair seats.  I went back and forth whether or not I wanted to use kitchen string or cotton crochet thread.  I figured in the long run the string was best since it’s stronger and easier to weave.  I think it looks very nice in the kitchen.
Weaving test.  I ended up having to let the glue set up overnite as the weaving was distorting the legs.

Weaving done.  Just had to add additional bottom rungs.

Stool in the kitchen.  I think it's very cute.

Tuesday, June 19, 2012

Intermediate Work : Japanese Koto for the Entertainment Room First Floor


June 18-19th 2012

I have pretty much lost myself over the last few days doing lots of research into different ways to decorate the house.  My friend sent me a link which actually confirms that this kit is something called a “Ya Sena Onsen Ryokan” or meaning a traditional Japanese hotel or boarding house with a spa.  There was even some kind of film called the “Love Hotel” I guess which is about a boarding house with a spa and lots of goings on.  Anyway, it was nice to see that my impression was confirmed and convinced me even more into designing the house as a place of entertainment. 

With that in mind, I pushed ahead with my intention of now making a Koto.  The Koto is another traditional Japanese instrument which often is seen in prints and Japanese films being played by a Geisha during their entertainment sessions.  So, this will end up in the left front room which is going to be a food and music room. 
I got hold of a piece of wood that was square and using a foto that I found on the net for inspiration (an actual pic of a mini koto) I figured I could pull something off.  Sanding, painting and then stringing the koto was pretty easy.  I did it in an evening after dinner.  The problem was trying to find some way of making the Ji or the bridge pieces.  Today a koto has thirteen strings but it started out with 5 so I made mine with 8.  I just had no way of actually making 13 tiny holes to thread the “strings” (which traditionally were made of silk).  In the end, looking at the shape of the sliding bridges, I figured I could use some micro beads that I had in my jewelry making kit.  They are triangular so they actually make a nice addition and are small enough to seem to support the strings.
The strings are plucked with special picks that fit onto the fingers so there is no special “pick” that had to be made like for the shamisen. 
Painting and drilling the holes.
Finished Koto

I am still not keen on picking up the house build yet.  Truth be told I am still having fun making objects to put into the house.  I have a few more ideas and have been navigating quite a bit to see if I can actually make them.  We shall see.....

The inspiration

Thursday, June 14, 2012

Intermediate Work : Additional detail to Kitchen Table, The Obi Stand, The Ice Box

Inspiration 

My Obi stand
 7 June - 13th June 2012

Still putting off starting the second porch area of the first floor...

I had seen some time ago a really nice Obi stand.  I found one (a set with some other little bamboo embellishments) for $37.00 so, thinking it was excessive (and it is), I made one.  Just with leftovers and some black paint and gloss.  I had the fabric from the room to make a sort of Obi belt to hang on the stand.  An Obi is just basically a very long kimono belt that ties around to the back of the kimono and creates a box like shape.  The stand would be a westerner’s version of a butler - the wooden hanger thingy that lots of men use to hang their jackets for work the next day.  Again, the trick is just figuring out the scale then cutting up a few pieces and glueing them together.  Looks great in the bamboo bedroom.

I had made a little table for the kitchen in the last chapter and it was pretty much a slap dash kind of thing.  Then I saw on a Pininterest page a really nice aluminum topped table.  A few nites ago, we got chinese take-out.  Different from American takeout, here it comes in aluminum tray pans with aluminum backed paper covers.  One portion had a double cover which meant clean and pristine.  So I threw it into my “may need for future construction” box and wouldn’t you know, came across the aluminum table pic.  I glued some of the tray top to the wooden table I had made, then added the fish tray and the wooden plate for sushi display and - WOW! made the difference.  Now that table is special.
Aluminum table top

On my never ending quest for an ice box, I had no luck but I did find a few pics showing two door and one door boxes.  I decided to build my own.
Calculations for the obi stand and ice box

After purchasing some balsa wood and glueing it to the aluminum lined paper tray cover (the inside of the box is lined with some kind of metal as are the doors), I had to paint the pieces. I had seen a really lovely “shabby chic” matchbox side table (again thru Pininterest) and decided to make the ice box the same style.  All it takes is some dark paint, applying some candle wax to the object, then painting it white.  Once the white is dry, sanding away the paint (which doesn’t stick to the wax) makes the object look old.  And since our dollhouse is supposed to be late 50’s early 60’s, I figured our ice box would be much older.
Left over take away tray cover
Just some normal wax will do...


Then embarking on the quest for some hinges.  Since 1/20 or even 1/24 are so hard to find, I was considering going with some kind of fabric hinge until I came across something called an “arc hinge”.  Basically, it is a flat piece of rounded metal (which I can glue onto the doors) and insert into the balsa wood using jewelry wire.  Thank the gods I actually did some jewelry work otherwise I wouldn’t have realized the ease of substituting one thing for another.  I ended up buying some frame hanging brackets when, cut in half, could sub for some decent arc hinges.  But then I had an idea - using aluminum trays.  I cut up an aluminum tray into tiny hinges, rolled one end and trimmed the other.  The tray metal was much easier to work with and pretty resistant.  I then cut the nail heads that came with the brackets and managed after much coaxing to hammer in those as hinge heads.  My hands are just not up to the challenge and again, the cut nail head fell on the floor and was lost for a bit.  I did find it after some searching with a flashlight.  At first I thought the balsa was going to be too weak for this ice box but luckily, having to use jewelry wire to insert the hinges, it was perfect.
Aluminum tray to the rescue
Working on the hinges


Milk box and ice block.

In my travels, I also came across a printable page in Japanese.  With of course a milk box.  Ok, it’s a bit big but I still think it looks super in there.
Oh, and the ice is a piece of gardening plastic blocks bought at Ikea.  They are used to fill up a vase for flower arrangement.  But they look just like ice ! What luck I had bought a box of them many years ago! :-)


Finished Ice box... for now...
Seems to fit right in.


Tuesday, June 5, 2012

Intermediate Work - Decorating the Bamboo Bedroom Shrine, Filling the Kitchen Shelves and Decorating the Kitchen

June 4th - 5th 2012

I decided to take a break and use some of the objects that had been arriving over the last few weeks to decorate the kitchen and the shrine in the bedroom.  I had been surfing the web and managed to find a few sites with some nice objects which, if displayed properly, would work out fine in the 1:20 dollhouse even if the objects are mostly 1:12.

I purchased some bowls and such from I Love Miniatures site and used one for the shrine (to contain water) and the rest I put in the kitchen hutch. There are two hutches to store things so one I have put the bowls and a bento box and the other I put some copper pots.  I purchased those and some measuring cups that, once hung on the wall, just look like normal pots for cooking.  I also purchased a wok and wok utensil from the same site - I just trimmed the handle on the utensil, hung a hook in the house then distressed the wok so it looked used.  My free gift from this seller was a page of kitchy 50/60's Japanese prints including a calandar.  So that went on the wall too.
Wok and fish being prepared.

 I purchased a series of fruit and veg plus some fish on a platter from the Superminiatures site.  This one was the fastest purchase to arrive.  Less than two weeks altho one or two objects had been switched out.  I am still wondering where my pears and knives are.  Oh well, they gave me other stuff by mistake so not like I was robbed or anything.  I made some wood crates from leftover wood and filled them with the veg.  The wooden shelving was then filled with the crates.  I used my “Mini-Hold” waxlike holding substance to fix everything.  Also this I found at a discount on the Love Miniatures site.  It works perfectly and since it’s not glue, you can easily remove the objects even if the stuff really does hold well.  I updated my butcher’s block by sticking a knife in it and sticking a fish ready to be filleted. 
Bamboo bedroom, just few more things to add.

I added some oranges, a “ceramic bell” (really a mortar and pestle) to ring to start the chanting, and a plant.  I’m just missing an incense dish.  I attached the lights for this room and the kitchen and I think they look very nice.  The kitchen light I printed off a lampshade and glued it to the ceiling to tone down the intensity of the light.  Very effective I must say.

I made a small kitchen table from scraps and aged it a bit.  I think I am going to have to make a few stools now to go with it.  Slowly, things will be added but I think that there are quite a few objects which look good even if the scale is not perfect.
Table and basket of apples. Just missing an ice box...
UPDATE :  Superminiatures already contacted me and they are sending my missing items! I so recommend this site!

Thursday, May 31, 2012

Chapter 50 - Railings to the Left Porch Extension

May 30 - 31st 2012

It's in the details.
The parts were many and all for a series of railings for outside the porch.  Some pieces didn’t really fit all that well but being so tiny and with painting them then glossing them, you really can’t see much of a difference.

Again, I am convinced that the beauty of this kit is in the details.  They could have easily had a simple railing set up outside the windows but instead, they followed Japanese architecture and came up with railings with nice little curved details on the ends.  As time goes by, these chapters are becoming repetitive somewhat because they are more or less the same room structures or windows but adding in a color here and an adjustment there makes it more interesting. 
Left Porch completed.  Just need to attach it.
Looking forward to getting to the 2nd floor!  But first, we have to complete the right porch....

Wednesday, May 30, 2012

Chapter 49 - The Sills and Sliding Windows to the Left Porch Extension, the Kutsunugi-ishi

29 - 30th May 2012

I immediately put together and stained the sliding windows.  Since I had already done quite a few, they went together quickly.

The sills needed staining so while they dried, I put together the shoe cleaning stone or Kutsunugi-ishi.  I made this one with white stones instead of sand since I liked the look better.  Left it overnite for complete drying to be sure the stones would stay put.

I also managed to trim and rework the fern plant so that it would fit in the corner.  Now that it is there, I like it.  I had to unattached the ceiling and the bannister to fit it in (and reglue leaves that fell off again...) but overall it looks cute in the corner.  The finished landing looks pretty nice.

The reworked tree and the Kutsunugi-ishi on the right
The sills required some sanding and positioning but luckily, at least this set, went in no problem.  The top section of the sill was just penciled in lines to give the effect of an outdoor terrace floor.  The wooden beam-like detail underneath was a nice touch.  I am thinking of painting also these with white but will wait till I see the overall look.  I still have to install some kind of terrace railing out there.

The sliding door area needed aggressive sanding as I had predicted.  Since the bottom piece installed in the last chapter was a tight fit and didn’t slide all the way down.  So adjustment was made and the window sections finally slid into place. 

You can see the beam details under the terrace floor

With this chapter completed, I have actually finished one of two and half books that I made for the construction of the dollhouse.  As each edition of the kit arrived, I removed the instructions and made books of them.  That way, I was sure to know what came next.  It was a good thing too because I have noticed that some pages are mis-numbered.  I numbered the kit sets too to be sure I had them in order and could find the chapters while working.  I must say, my prep work saved me a lot of time and has pretty much sped up construction.

Monday, May 28, 2012

Chapter 48 - The Ceiling and the Sliding Windows to the Left Porch Extension, The Little Indoor Garden

May 24 - 28th 2012


Luckily, the ceiling fit perfectly into place.  The only problem was piece number 5 which was supposed to be flush on both sides and ended up needing sanding to remove a lip section which would have fit on the ceiling on the other side.  Just coaxing and it all fit together perfectly.  Piece 6 needed sanding to fit into place (bottom section of where the sliding windows would fit) since it was so tight.  When the top piece is fitted, it will need some extra sanding to be sure the windows slide smoothly. 

The first two of four windows was the usual also.  The plastic “glass” needed trimming since it was too large for the windows.  Painting and using the bi-adhesive tape does the trick for fitting the glass.

The little garden is supposed to be for the corner of the first floor landing but I have my wall painting there so I don’t think it will actually look good there.  It came with a little wooden base that needed whittling to make it appear to be a stone covered mound. 
The leaves were printed on green paper that needed to be cut out one by one.  I didn’t do them all together but over two nites.  I also decided to cut out a few yellow ones from construction paper because I figured I’d add those at the bottom like the plant was yellowing or loosing some of it’s leaves.  I also had to locate some florists tape.  I knew I had some in the house somewhere when we were doing classes in Biedermeier arrangements so after locating that, I was able to twist the wires and cover the ends with this tape.  I think it looks cleaner rather than just twisted wires.
Even if the instructions had you wait till the end to glue on the gravel and small stones, I figured it would be easier to do it now and also glue in tighter the wired trunks.  So, with that done, I then proceeded to attach all the little leaves. 
I glued the yellow ones towards the bottom then had to wait for the leaves to dry since it would have been dangerous to manipulate the trees while the leaves were still fragile.  A diluted hand of gloss varnish and the tree garden was completed.

Ceiling section, bottom of sliding windows, fern tree.