Wednesday, April 25, 2012

Intermediate Work - Butcher’s Block and Knives

April 21 - 25th 2012

I had been looking on the net for a butcher’s block but, as I am discovering, the scale was a problem.  I can find some nice ones in 1:12 and some tiny ones in 1:24 but nothing in between.  Before I spent money on one that really wasn’t right in terms of scale, I looked into the actual dimensions of this block to see if I could make one.

One day walking with the dog I came across a small block of wood.  Seemed pretty good in size and upon checking it was.  Since I don’t have access to any real wood cutting tools (just a small handsaw) I figured it was fate that I had found this little block of wood.  So, I went to working on the dimensions and sizing.

I squared it off and cut some legs for it and went to work making the bottom shelving.  That I did just cutting some extra scraps of cane and some coffee sticks.  Fitting it and gluing it in place was a breeze actually (more so than spacing it - my hands are not so steady anymore). 

The most difficult part was finding away to simulate the different colored woods in the block.  I had to resort to some colored pencils and very tiny brush detail.  The wood was quite porous still so some areas were not quite as even in coloring as I liked but it’ll do.  I diluted some brown wash and gave it an overall aged look.  Also diluted some gloss varnish as I didn’t want it to be glossy - more matte in finish.


Simple instructions...tiny knives.
The knives I actually took from the house kit which includes lots of handy tips and instructions for some added details for the house.  I used the top of a soup can and transferred the knife forms onto the tin can lid.  Cutting was a bit difficult since I really didn’t have a pair of tin scissors but with a little patience and care, I managed nearly all of them (only the smallest was too small for me to cut).  I used a bamboo skewer for the handles and some regular masking tape to finish the top of the handles (so they wouldn’t slide down thru the knife holder).  The instruction says to paint the blades black with a white line along the cutting edge but when I did that, I really didn’t like it.  So I repainted them in a gun metal grey and glossed them to shine. 

Tiny Knives
 The knife holder was also a simple suggestion in the house kit - just a piece of cardboard cut into strips to make a holder.  Instead of attaching this to a wall, I attached it to the butcher’s block where I think it looks more realistic. 
Cardboard knife holder


I still have in mind to purchase some knives (even if they are larger scale) to be used on the block (like those giant butcher’s knives you see sometimes that chefs have for cutting large pieces of meat) along with some kind of food that will be put on the block for “quartering”. 


Original inspiration for the block
My butcher's block "finished"- 3.7cm x 3.7cm


Considering there was zero monetary investment in this piece, I’m pretty damn pleased.

Thursday, April 19, 2012

Intermediate Work - LEDs, Fire In the Stove, Futon Bed and Bedding, Kitchen Decor

April 16 - 19th 2012

While listening to a Sox game last nite, I was thinking about how I could work on the bedding in the right hand room.  I have an idea of the actual cover and pillows but just laying them on the tatami didn’t seem right to me.  I liked the idea of having an actual futon frame.  So, with some leftover pieces of wood and some coffee stirrers, I managed to make a little futon frame.  Now at least the bedding will look more realistic sitting on top of it.  I made a little mattress from a foam piece left over from our iPad packaging.  While I was navigating, I stumbled across this site which had the most amazing roomboxes I have ever seen.  The most interesting aspect was how he manages to render pillows that drape.  I discovered that he does workshops and mentioned that he uses sand.  So, of course, out I went to get some fine grain sand (not beach sand - I figured that would eventually stain from the oils and dirt in the sand) so garden decorating sand. 

I decided that by using fine sand, I would have to use adhesive tape while making the bedding.  That way, grains would not escape the way they would if I had sewn the actual futon duvet.  I must say that it looks much nicer - it actually lays flat on the futon instead of sticking up on the sides or something.

In the meantime, my LEDs arrived.  First thing I did was drill a hole in the stove piece and install the lights there.  I think they look pretty good. I added a few pieces of painted wood and glued down the lights.  I wanted to be able to see the colors a little more so by covering the lights with wooden kindling I figured it would look a little more interesting.  I managed to install the stove in the kitchen front room and create a little back shelf to hide the wires and cell battery.  I glued the actual on/off switch to the wall as if it were an actual light switch.  It’s not so obvious so more than acceptable for me. 


Still need some knives, utensils and pots...

After printing off a bunch of mini boxes (soap and food stuff) from Jim’s Printable Page and Jen’s printables, I glued in a few items in the kitchen.  It just needs some utensils and we are at a good point!

I also managed to install some of the lighting into the ceilings and run wires along the back of the house.  I should have ordered extra wiring as the gauge wire I used for Gianluca’s trains is a bit big.  I will have to hit another hardware store to see if they carry a finer gauge.  But the lights fit perfectly and installation should be a breeze once I hook them all up. 

Top of the Spa


It seems the further I get along in the house build the more stuff I discover that sets me back.  Still, I don’t have a timetable.....

Sunday, April 15, 2012

Chapter 40 - The Shōji of the First Floor Landing, The Dressing Table


April 13th - 15th 2012

The Shōji was very straight forward.  The instruction had you painting it brown but I liked the idea of it being black to go with the framework of the Fusuma on each side of the stairwell.  I am leaving out a few pieces on the back because I still have to somehow install lights and wires and until those are in, I don’t want to install the wooden decorations on the back where I plan to hide the wires.

The dressing table was a challenge because of the size.  So many tiny pieces.  I think the smallest by far.  You also had to cut up one piece into 3 smaller ones before assembling the table. 
Tiny bits and pieces cause big stress.
The instructions called for a few steps that were not necessary (like adhesive tape on the mirror that actually was already there) but the most difficult bit was bending the drawer handles.  I don’t know what kind of wire they decided to use but it was not very pliable at all.  In fact, I just couldn’t manage to get enough leverage to bend the smallest drawer’s handle.  Also, lining up the tiny metal rod which hitches the mirror to the stand was difficult.  Not only, but next time I will measure the distance myself as the instructions had me glueing the mirror holder too high and consequently, it doesn’t swing.  Next one will be fitted better now that I know. 

Don’t ask me the issue with putting a cloth over the mirror.  Maybe some kind of superstitious thing but have never seen anything similar. 
Stiffened fabric allows for folding it. But what's it for??? Shoji in the background looks great tho.

Completion of this chapter marks the 1/3 way thru point and nearly 3 months of work.  I think we just may complete this in less than 3 years time !

Friday, April 13, 2012

Chapter 39 - Left Hand Wall to Right Hand Room, The Fusuma

April 10 - 12 2012

I had decided some time ago to make the internal part of the Fusuma an erotic ukiyo-e print and I did end up finding one that was not too over the top and had the green tones I was looking for.  After tweeking the resolution with my Mac, I managed to get a reasonable print and glued it to the wooden panels.  Course, there actually is a correct way these fusuma should be installed and I ended up gluing the the two halves so that if I open and close the door correctly, our loving couple ends ass over teakettle.  It was pretty funny but I decided to leave it as is. 
"Manner of Kitaga" by Utamaro
Found it easier to glue the rooms standing on end.

I also painted the last wall a yellow green trying to tie it into the bamboo color I am going to use in the rest of the room.  I’m hoping the room will be somewhat kitsch sexy yet not vulgar. 

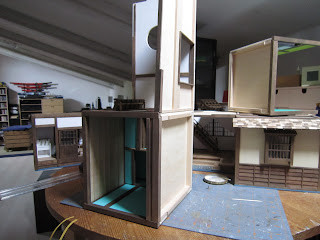
The instructions call for actually assembling the three upper sections at this point but knowing what I had to go thru with the Tokonoma of the other room, I’ve decided to install that part then attach it to the upper landing.  In any case, I’m still waiting for my LEDs to arrive so I can install them thru the ceiling and floor of the first story.

Monday, April 9, 2012

Chapter 38 - Right Side Wall of Right Hand Room of First Floor, Two Chairs


April 8 - 9th 2012

Well, after a bit of vacation, back to constructing our doll’s house.  I missed it. 

The chairs were the same as last time but I had found a small Japanese shop in Florence and bought a square of fabric there for around 7 euro.  I used this fabric for making the chair cushions as I wanted to have a green themed room.  Still working on the idea of having bamboo themed things in the bedroom.  So far so good.

The rest of the room construction was pretty standard.  Just choosing the colors for the walls.  Again, going with different greens and will keep the them all the way thru.  Luckily, I have on hand some paint colors which will make the room more interesting.  I had neglected to post the photo of the back wall in the last chapter.  I’ve decided to add an actual bamboo pic to the inside section of the back wall.  I figure that will be somewhat hidden anyway so the effect will be quite subtle.  I didn’t want to make the room full of gigantic bamboo images otherwise it would be overpowering.  But I think bamboo in this section will be effective.

I find as I got thru the construction more ideas come to mind.  I am already looking at gilding some of the furniture in this room and looking forward to the arrival of my LEDS so I can start lighting the insides.  Things are becoming more and more interesting and slower due to all this brain storming.  Fun stuff.

Sunday, April 8, 2012

Miniatur Wunderland - Hamburg Germany

31st March - 2nd April 2012

My sister and I had the pleasure of spending a weekend in the German city of Hamburg - located on the sea in the northern part of Germany.  After a few days in Florence, we basically returned to the winter weather as Spring hadn’t quite sprung yet in Hamburg.  Our main reason for going was to see the Miniature Wunderland exhibit located in Hamburg.  We had stumbled across it on the internet and planning a simple 2 day weekend just didn’t work out due to flights and timetables.  So we ended up spending the whole weekend and returning on a Monday.  The city was quite nice and the people surprisingly nicer than expected.  I guess we are both used to German tourists in Italy who unfortunately are not quite as well educated as they are when they are at home (or so it seems).  Hamburg is quite the shopping mecca with tons of shops and lots of restaurants (French, Spanish, etc) - most of the guests in the hotel were German in fact.  From what we could understand, the city is fairly well off with some of the biggest industries located nearby (Airbus for one) and a very active port.  For being a port city, we saw virtually no sign of filth or misbehaviour.  Even crossing the street was very orderly.  I was ready to cross when there was no traffic but it was obvious that no one else was so...well I conformed by waiting for the light.  Funny really.  The train system was very efficient (rivaling the British system I would say) and even if we had bought our tickets and were ready for any controllers none were to be found! No turn-styles or ticket validating machines.  Guess the fines must be deterrent enough to make everyone comply.  The weekend was definitely a success but the highlight was surely The Wunderland.

Before you go, you should probably reserve an entrance time especially if you plan on visiting on the weekend.  That way you arrive at a preset time and they are able to control the flow of people arriving at any given time.  Wunderland is located near the Baumwall U-bahn metro station and is an easy walk down to the port area.  It’s actually located on the 3rd and 4th floor of refurbished warehouses (and there is a lift to get you up there because honestly, the stairs are a killer).  Price is reasonable at Euro 12.00 for adults.

From what we were able to understand, it seems the Wunderland has been in construction for over 11 years at this point.  Last year they added their airport.  There are sections to each layout : Hamburg, Scandinavia, Central Germany, Knuffingen, Knuffingen Airport, Bavaria, Switzerland, Switzerland/Ticino, Austria and America.  I think the American section was the least convincing with it’s mix of Cape Canaveral, Florida and Vegas all in one.  Reminded me of “Team America”’s idea of what a country is - all the most famous monuments put into the same place.  It was pretty clear which sections were older as they didn’t have as much moving traffic on the roads.  The later layouts had trucks and cars (and fire vehicles) which move on a magnetic track under the layout.  Everything is fully programmed by 46 computers and an army of Train Geeks ready to fix anything that malfunctions.

I was amazed at how the layouts are immaculate.  Not only that, there is no apparent damage to any layout that I could see even if the place was packed on a Sunday with tons of small children who were crawling and climbing on the railings.  It seems that whoever comes to the Wunderland already understands the respect it deserves. 

Here are some numbers as of December 2011 :

LAYOUT SURFACE        1,300 square meters
THEME WORLDS           8
TRACK LENGTH            13,000 meters
TRAINS                             930
WAGONS                          14,450
LONGEST TRAIN            14.51 meters
SIGNALS                           1,270
SWITCHES                        3,050
COMPUTERS                    46
LIGHTS                             appx. 335,000
FIGURINES                      215,000
TREES                               228,000
WORKING HOURS         580,000 working hours
They have plans for expansion which include Italy, France, UK and Africa.

The lights were mostly LEDS and they were used in very creative ways to simulate fires whether camp fires or full blown accidents.  The figurines were painstakingly installed in at least 3 different venues including a full concert, stadium, amphitheater as well as a street Rave and Oktoberfest.  The detail in the landscaping was amazing - where tiny little sunflowers are applied or vineyards so perfect to seem real.

The final effect was incredible and perhaps the cherry on the cake was the passage of night to day.  Every 20 minutes or so, the lights would begin to dim to simulate sunset.  As darkness fell, all the lights came on or all the nocturnal activity was lit.  The train stations looked real, the cars with their headlights and even skiers coming down the mountain with their little torches. 

Strongly recommend a visit to Wunderland as I believe that right now, there is nothing in the world that quite compares !

Enjoy my video here !